
Related Manuals for Panasonic NB-H3801


Summary of Contents for Panasonic NB-H3801
- Page 1 Operating Instructions Arahan Penggunaan Electric Oven ( Household Use ) Ketuhar Elektrik ( Penggunaan Di Rumah ) ( S d NB-H3801 Model No.
-
Page 2: Table Of Contents
"Safety Precautions" and "Important Information". (See P. EN3 - EN7) ● Please keep this Operating Instructions for future use. ● Panasonic will not accept any liability if the appliance is subject to improper use, or failure to comply with these instructions. -
Page 3: Safety Precautions
To avoid risk of electric shock, fire, scalding burns or serious injury. ● Do not disassemble, repair or modify this appliance. Consult the place of purchase or a Panasonic service center. ➜ ● Do not damage the power cord or power plug. - Page 4 There is another abnormality or failure. In case of any of the aforementioned situations, please unplug the power ➜ cord immediately and call a Panasonic customer service center for maintenance services. ● Dust off the power plug regularly. Unplug the power plug, and wipe with a dry cloth.
- Page 5 To avoid electric shock, fire, smoke, burns, scalding, injury or property loss. ● Do not use the appliance for any purpose other than those described in these instructions. ● Do not use the appliance while on the following places. On uneven surfaces, on carpet, non-hot-resistant surface or tablecloths etc. Places where it may be splashed with water or near a heat source.
- Page 6 Safety Precautions Please make sure to follow these instructions. To avoid electric shock, fire, smoke, burns, scalding, injury or property loss. ● Do not insert any object in the gaps. ● Do not use knives, sharp objects or tools on your product as the heater may get damaged.
-
Page 7: Important Information
Important information ● Do not drop this product as it may get damaged. ● Do not place anything or press by force on the glass door when it is opened. ● Do not hit the glass door with an external force. ●... -
Page 8: Part Names And Handling Instructions
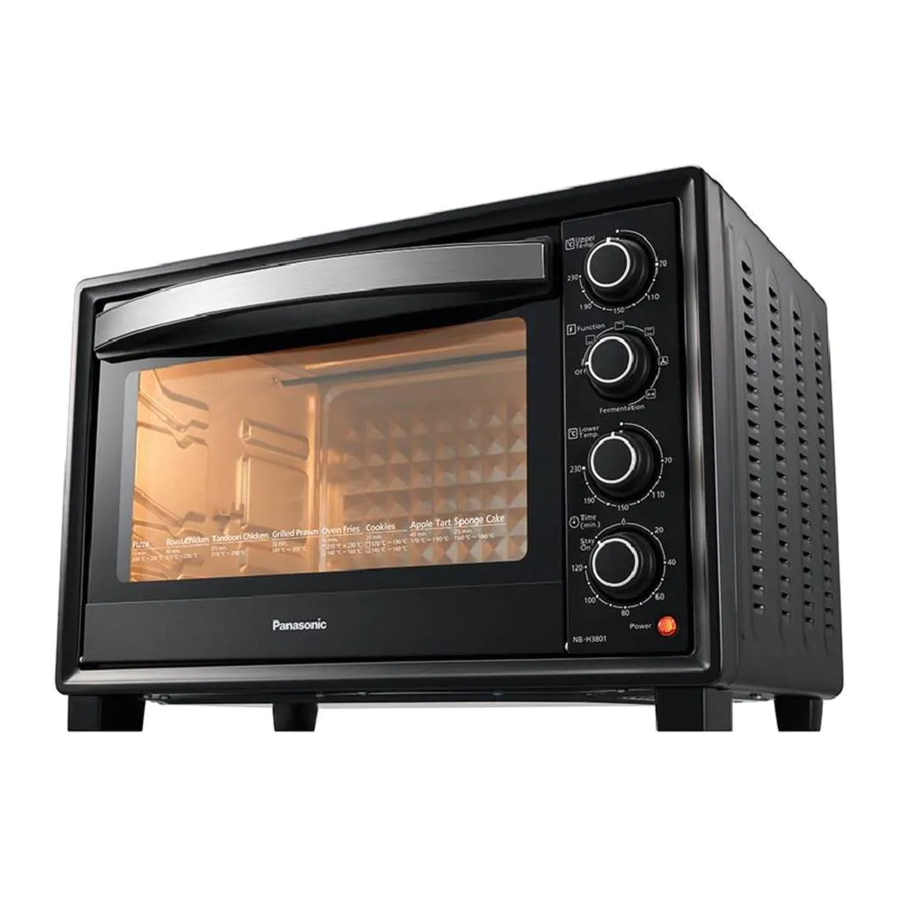
Part Names and Handling Instructions Layer 1 - 4 from the top to the bottom Rotisserie spit insertion hole * Position for placing the enamel baking tray and cooking rack. Heat vents Main unit Heater Control knob Crumb tray Power cord Door handle Power plug Glass door... - Page 9 Operating Controls Upper ● Upper and lower heaters Temp. ● Function knob: temperature knobs: Temperature range: Operates the lower heater 70 ºC - 230 ºC Operates the upper heater Function Operates the lower & upper heater at the same time ●...
- Page 10 Part Names and Handling Instructions Rotisserie spit / Extraction bracket Insert the baking Fasten the screw Use the baking Attach the other baking fork on stick into one at the baking stick to skewer the the opposite baking fork. fork to secure a chunky piece of end of the food at the center.
-
Page 11: Before Use
Before Use Remove all packaging materials and tape in advance, clean your product according to the 1 . Clean all accessories. (See P. EN20) 2 . Place the enamel baking tray, cooking rack and crumb tray in the oven. (Do not place any food.) 3 . -
Page 12: How To Use
How to Use Insert the power plug Put food in oven and close the glass door ● Place the food at the center of the enamel baking tray or cooking rack. ● Position the cooking rack according to the height of the food. ●... -
Page 13: Menu
Menu From the top to the bottom, there are 4 layers in the electric oven for use (P. EN8). Pizza Select the function. Upper and lower heaters : 210 ºC Time: 15 minutes Ingredients (A diameter of about 19 cm) Frozen pizza base .... - Page 14 Menu Select the function. Upper heater : 230 ºC Chicken Time: 25 minutes Ingredients Chicken thigh ..... 8 (approx. 45 g / piece) Method Lemon juice ........16 g 1. Apply lemon juice and salt to the chicken Salt ............. 2 g thigh.
- Page 15 Select the function. Upper and lower heaters : 190 ºC Prawn Time: 10 minutes Ingredients Prawn ....8 (approx. 15 cm long) Method Salt ......Appropriate quantity 1. Cut the backs of the shrimp and devein. Dry after washing. 2. Arrange the shrimps evenly over a sheet of baking paper on the enamel baking tray. 3.
- Page 16 Menu Cookies Select the function. Upper and lower heaters : 150 ºC Time: 20 minutes Ingredients (about 25 pieces) Butter ..........100 g Method Salt .............1 g 1. Place the butter in room temperature Granulated sugar ......30 g until it softens into paste. Powdered sugar .......30 g 2.
- Page 17 Apple Select the function. Upper and lower heaters : 190 ºC Time: 45 minutes Ingredients (6" crust mold) [ A. Crust ] Method Butter ..........75 g [ A. Crust ] ......100 g 1. Mix butter and the sieved low-gluten Powdered sugar ......10 g flour, add powdered sugar and salt.
- Page 18 Menu Sponge Select the function. Upper and lower heaters : 170 ºC Cake Time: 30 minutes Ingredients (6" cake mold) Eggs ....... 3(approx.150 g ) Method ....... 90 g 1 . Line a 6" cake mould base and sides Granulated sugar ......90 g with baking paper (or coat with a layer of Butter ..........
-
Page 19: Key Points For Baking Food
Key Points for Baking Food ● The standard time set by the menu may vary with food temperature, type, serving size (weight) and the container used for baking. Please adjust these parameters according to actual baking needs. ● Place the food in the middle of the electric oven. ●... -
Page 20: How To Clean
How to Clean Before cleaning, please turn off and unplug the power. After baking, do not clean until the oven is cooled off completely. Caution ● Do not clean your product with volatile oil, thinner, alcohol, bleach, polishing powder, metal brush or nylon brush as the body may get damaged. ●... -
Page 21: En21
Insert the power plug completely into the socket. Baking ➜ ● Error encountered failure Consult the place of purchase or a Panasonic service center. ➜ ● The baking time is too long. Power off your product, disconnect the power cord, and ➜... - Page 22 Panasonic ● ● P. SC3 - SC7 ) ● ● P anasonic SC 3 SC11 SC 12 SC13 SC19 SC 20 SC 21 SC21...
- Page 23 ● ➜ Panasonic ● ● ● ➜ ● ● ● ● ●...
- Page 24 ● ● ● ● ● ● ● ● ● ● ● ➜ ● ➜...
- Page 25 ● ● ● ● ● ● ● ● ➜ ● ● ● ● ● ● ● ● ● ➜ ● 20 cm 10 cm...
- Page 26 ● ● ● ➜ ● ● ● ● ● ● ● ● ● P. SC20 ●...
- Page 27 ● ● ● ● ● ●...
- Page 28 1 - 4 P. SC13 - SC19 ) ● ● ● ●...
- Page 29 Upper Temp. ● ● 7 0 ºC 2 3 0 ºC Function ● " 0 " Fermentation Fermentation( Lower Temp. P. SC19 ) Time (min.) " S ta y On " Stay ● Power ● 70 ºC 230 ºC " "...
- Page 30 ● ● SC10...
- Page 31 P. SC20 ) 230 º C ● ● ● ● SC11...
- Page 32 ● ● ● Upper Temp. ● Function ● Fermentation Lower Temp. ● ● " 0 " Time (min.) Stay Power ● ● ● SC12...
- Page 33 (P.SC8) : 210 ºC 19 cm ) ..1 ......... 30 g ......... 30 g ......... 15 g ....... 50 g ......... 50 g 2 1 0 º C 2 1 0 ºC ● ● : 230 ºC : 80 1000 g ) ....
- Page 34 : 230 ºC : 25 ..8 45 g / ......16 g ........2 g ....... 100 g ........2 g ........4 g ....... 6 g 3 - 4 ..............2 3 0 SC14...
- Page 35 : 190 ºC : 10 ....8 15 cm) ........1 9 0 º C 1 9 0 º C : 230 ºC : 150 ºC : 30 ......400 g ........3 g ..............2 3 0 ºC 150 º C 230 ºC 150 º...
- Page 36 : 150 ºC : 20 ......100 g ........1 g ........ 30 g ........ 30 g ......... 1 ....... 125 g ....... 1 g 2c m) 1 5 0 º C 1 5 0 º C SC16...
- Page 37 : 190 ºC : 45 ........ 75 g ....... 100 g ........ 10 g ........ 20 g ........1 g .........40 g ......25 g ......50 g .........40 g ......... 1 1 9 0 ºC 190 ºC 7 . 1 0 1 9 0 ºC 190 ºC SC17...
- Page 38 : 170 ºC : 30 ..3 150 g ) ....90 g ......90 g 1 . 6 ......30 g ....30 g ( 5 0 ºC 1 7 0 º C ● ● ● ● SC18...
- Page 39 ● ● ● ● ● ● ● ● ● ● 10 ºC ● ● ● ● 1 - 4 P. SC8 ) ● 1 - 4 SC19...
- Page 40 ● ● ● ● ● ● SC20...
- Page 41 ● ➜ ● ➜ Panasonic ● ➜ ● ➜ ● ➜ 1500 W 38 L : 70 ºC 230 ºC 30 ºC 1500 W 750 W / Stay On 750 W 10.1 k g 1.0 m 53.3 cm 39.2 cm 36.4 cm...
- Page 42 Terima a i erana mem e i pro u Pana onic ini. ● Si a aca ra an Pen en a ian ini en an te iti upaya pro u ini apat i una an en an cara yan etu an e amat. ●...
- Page 43 Langkah-Langkah Keselamatan Sila mematuhi arahan- arahan berikut. Untu men e a an ema an an atau ecen eraan epa a pen una in i i u ain an ero a an arta epa a en a i a patu i ara an ara an i awa . Petunjuk berikut menunjukkan tahap kerosakan yang disebabkan oleh pengendalian yang salah.
- Page 44 Langkah-Langkah Keselamatan Sila mematuhi arahan- arahan berikut. Untuk mengelakkan risiko kejutan elektrik, kebakaran, terbakar melecur atau kecederaan serius. ● Perkakas ini bukan bertujuan untuk digunakan oleh individu (termasuk kanak-kanak) kurang upaya dari segi fizikal, deria atau mental, atau kurang pengalaman dan pengetahuan, melainkan jika mereka dipantau atau telah diberi pengawasan atau arahan mengenai penggunaan perkakas oleh individu yang bertanggungjawab untuk keselamatan mereka.
- Page 45 Untuk mengelakkan kejutan elektrik, api, asap, terbakar, melecur, kecederaan atau kehilangan harta benda. ● Jangan gunakan perkakas untuk apa-apa tujuan selain yang dihuraikan dalam arahan ini. ● Jangan gunakan perkakas semasa berada di tempat berikut. i ata permu aan ti a rata i ata arpet permu aan atau a a me a yan ti a ta an pana an e a ainya.
- Page 46 Langkah-Langkah Keselamatan Sila mematuhi arahan- arahan berikut. Untuk mengelakkan kejutan elektrik, api, asap, terbakar, melecur, kecederaan atau kehilangan harta benda. ● Jangan masukkan apa-apa objek di dalam bukaan. ● Jangan gunakan pisau, objek tajam atau alatan pada produk anda kerana pemanas boleh rosak.
- Page 47 Maklumat Penting ● Jangan jatuhkan produk ini kerana ia boleh rosak. ● Jangan letakkan apa-apa atau tekan dengan kuat pada pintu kaca apabila pintu dibuka. ● Jangan ketuk pintu kaca dengan daya luaran. ● Jangan panaskan perkakas apabila tidak diperlukan. ●...
- Page 48 Nama Bahagian dan Arahan Pengendalian Lu an pema u an Lapi an ari ata e awa pencucu a at meman an e u u an untu me eta an u an pem a ar ename an ra mema a . o on Unit utama Pemana...
- Page 49 Kawalan Pengendalian ● Tom o fun i Upper ● Tom o u u pemana Temp. en en a i an pemana a a ian ata u at u u en en a i an pemana Function en en a i an pemana ●...
- Page 50 Nama Bahagian dan Arahan Pengendalian Pencucuk alat memanggang / Pendakap pencabutan a u an etat an ru una an atan Le ap an arpu atan pa a arpu pem a ar untu mem a ar ain pem a ar e pem a ar untu mencucu etu an i u un atan...
- Page 51 Sebelum Penggunaan e uar emua a an pem un u an an pita ter e i a u u er i an pro u an a men i ut an a i awa e e um men una annya untu a i pertama atau e epa ma a yan ama ti a men una annya.
- Page 52 Cara Penggunaan Pasangkan palam kuasa Letakkan makanan di dalam ketuhar dan tutup pintu kaca ● Leta an ma anan i a a ian ten a u an pem a ar ename atau ra mema a . ● Tentu an e u u an ra mema a men i ut etin ian ma anan.
- Page 53 Menu Dari atas ke bawah, terdapat 4 lapisan di dalam ketuhar elektrik untuk penggunaan (Lihat P. ML8). Pilih atau fungsi. Pemanas bahagian atas dan bawah: 210 °C Masa: 15 minit Ramuan ( iameter ira ira Kaedah o pi a e u ....epin ( inci) e uar an o pi a yan e u an...
- Page 54 Menu Pilih fungsi. Pemanas bahagian atas: 230 °C Masa: 25 minit Ramuan g etu ) Pa a ayam ....( ira ira Kaedah u emon ......... . Sapu an u emon an aram pa a aram ..........g pa a ayam. ampur an an perap rim ma am ........
- Page 55 atau fungsi. Pilih Pemanas bahagian atas dan bawah: 190 °C Masa: 10 minit Ramuan Kaedah U an ....( ira ira cm pan an ) aram ......uantiti yan e uai . Poton a a ian e a an u an uan urat utama.
- Page 56 Menu Pilih atau fungsi. Pemanas bahagian atas dan bawah : 150 °C Masa: 20 minit Ramuan ( e i uran epin ) Kaedah ente a .......... aram ..........g . Leta an mente a a am u u i i u a pa ir .........
- Page 57 Pilih atau fungsi. Pemanas bahagian atas dan bawah: 190 °C Masa: 45 minit Kaedah Ramuan (acuan era [ A. Kerak ] [ A. Kerak ] ampur an mente a an tepun ren a ente a ........... uten yan itapi ma u an u a Tepun uten ren a ....
- Page 58 Menu Pilih atau fungsi. Pemanas bahagian atas dan bawah: 170 °C Masa: 30 minit Ramuan (acuan e Kaedah Te ur ........ ( ira ira a ut tapa an tepi acuan e Tepun uten ren a ....... en an erta pem a ar (atau a uti u a pa ir ........
- Page 59 Perkara Penting untuk Membakar Makanan ● a a tan ar yan itetap an o e menu mun in er e a en an u u ma anan i an an ( erat) an e a yan i una an untu mem a ar. Si a e uai an parameter ini menurut eper uan mem a ar yan e enar.
- Page 60 Cara Membersih Se e um pem er i an i a mati an an ca ut ua a. Sete a i a ar an an er i an e in a etu ar i e u an epenu nya. Awas ●...
- Page 61 Penyelesaian Masalah Periksa perkara berikut sebelum menghubungi untuk perkhidmatan penyelenggaraan. Masalah Punca dan penyelesaian ● Palam kuasa tidak dimasukkan sepenuhnya. ➜ Kegagalan a u an pa am ua a e a am o et epenu nya. ● Ralat yang dialami membakar ➜...
- Page 62 ● ● ● ●...
- Page 63 ● ➜ ● ● ● ➜ ● ● ● ● ●...
- Page 64 ● ● ● ● ● ● ➜ ● ➜...
- Page 65 ● ● ● ● ● ➜ ● ● ● ● ● ● ➜ ●...
- Page 66 ● ● ● ➜ ● ● ● ● ● ● ● ● ● ●...
- Page 67 ● ● ● ● ● ●...
- Page 68 ● ● ● ● ● ●...
- Page 69 Nhiệt ● ● độ trên Chức năng ● Tắt Lên men Nhiệt độ dưới Thời gian (phút) BậT suốt ● Nguồn ● ● ● ● ●...
- Page 70 ● ● ●...
- Page 71 ● ● ● ●...
- Page 72 ● ● ● Nhiệt độ trên ● Chức năng Tắt ● Lên men Nhiệt độ dưới ● ● Thời gian (phút) BậT suốt Nguồn ● ● ●...
- Page 73 ● ● ● ●...
- Page 78 ● ● ● ●...
- Page 79 ● ● ● ● ● ● ● ● ● ● ● ● ● ● ●...
- Page 80 ● ● ● ● ● ●...
- Page 81 ● ➜ ● ➜ ● ➜ ● ➜ ● ➜ ●...
- Page 82 ● ● “ ” “ ” ( T 3 - T 7) ● ●...
- Page 83 ● ➜ ● ● ● ➜ ● ● ● ● ●...
- Page 84 ● ● ● ● ● ● ➜ ● ➜...
- Page 85 ● ● ● ● ● ➜ ● ● ● ● ● ● ➜ ●...
- Page 86 ● ● ● ➜ ● ● ● ● ● ● ● ● ● T 20 “ ”) ●...
- Page 87 ● ● ● ● ● ●...
- Page 88 ● ● ● ● ● ●...
- Page 89 ● Upper Temp. ● Function ● Fermentation Lower Temp. Stay On Time (min.) Stay ● Power ● ● ● ● ●...
- Page 90 ● ● ● T 10...
- Page 91 ● ● ● ● T 11...
- Page 92 ● ● ● Upper Temp. ● Function ● Fermentation Lower Temp. ● ● Time (min.) Stay Power ● ● ● T 12...
- Page 93 T 8) 210 °C : 15 ..............................................● ● : 230 °C : 80 ........................● ● T 13...
- Page 94 230 °C ....( ............................................................T 14...
- Page 95 : 190 °C : 10 ......( ......: 230 °C : 150 °C : 30 ..........................T 15...
- Page 96 : 150 °C : 20 ............................................................T 16...
- Page 97 : 190 °C : 45 [ A. [ A............................................ [ B..........) ..............................[ B. T 17...
- Page 98 : 170 °C : 30 ......( ................................● ● ● ● T 18...
- Page 99 ● ● ● ● ● ● ● ● ● ● (40 ± 10 °C) ● ● ● ● ● T 19...
- Page 100 ● ● ● ● ● ● T 20...
- Page 101 ● ➜ ● ➜ ● ➜ ● ➜ ● ➜ ● T 21...
- Page 102 Memo...
- Page 103 Memo...
- Page 104 © Panasonic Taiwan Co., Ltd. 2020 BZ51W208 Printed in China KL0427C0...
Need help?
Do you have a question about the NB-H3801 and is the answer not in the manual?
Questions and answers