Table of Contents

Related Manuals for Miele KWT 6833 SG


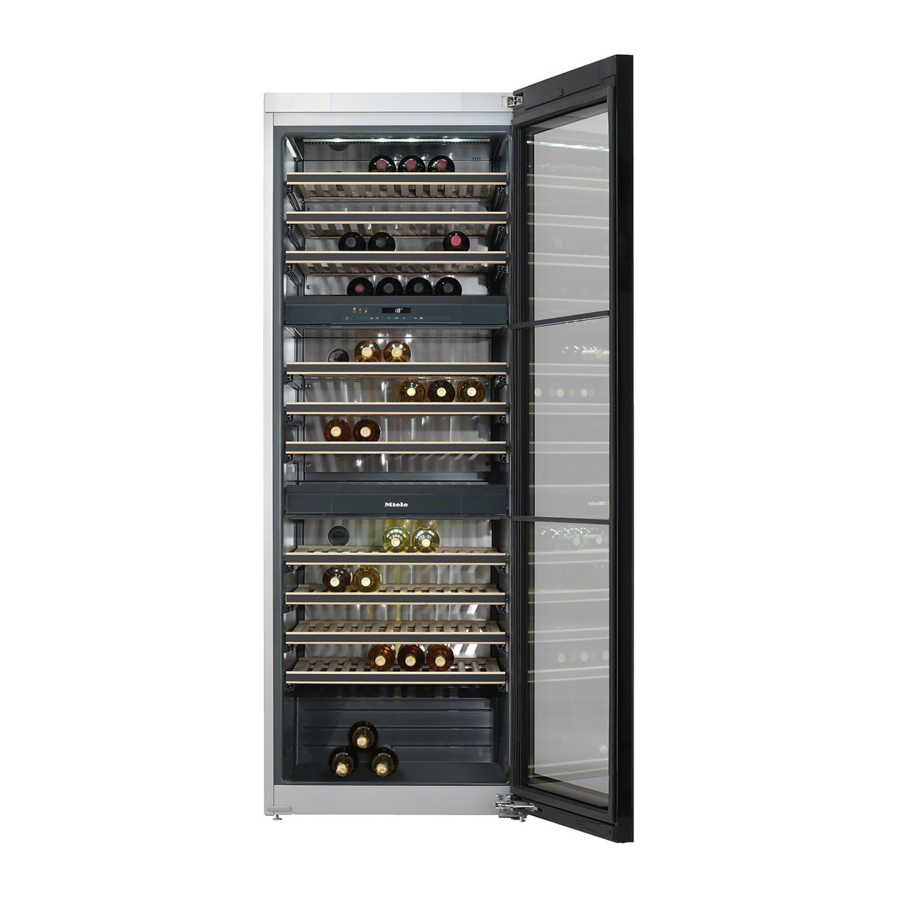
Summary of Contents for Miele KWT 6833 SG
- Page 1 Operating and installation instructions Wine conditioning unit To avoid the risk of accidents or damage to the appliance it is essen- tial to read these instructions before it is installed and used for the first time. en-GB M.-Nr. 10 439 390...
-
Page 2: Table Of Contents
Contents Warning and Safety instructions..............Caring for the environment ................12 Saving energy ....................13 Guide to the appliance ..................14 Symbols....................... 15 Accessories ....................... 17 Accessories supplied ..................17 Optional accessories................... 17 Switching on and off ..................18 Before using for the first time ................18 Cleaning the appliance................... - Page 3 Contents Bottle presenter....................35 Maximum capacity ....................35 Automatic defrosting ..................36 Cleaning and care ..................... 37 Cleaning agents....................37 Before cleaning the wine unit ................38 Cleaning the outer casing, the door, the interior and accessories...... 38 Cleaning the ventilation gaps ................38 Cleaning the door seal ..................
-
Page 4: Warning And Safety Instructions
Miele cannot be held liable for injury or damage caused by non- compliance with these instructions. Keep these instructions in a safe place and pass them on to any future owner. - Page 5 The wine conditioning unit is not suitable for use in areas where there is a risk of explosion. Miele cannot be held liable for damage resulting from improper or in- correct use of the appliance. ...
- Page 6 Warning and Safety instructions Safety with children Children under 8 years of age must be kept away from the wine conditioning unit unless they are constantly supervised. Children aged 8 and older may only use the wine conditioning unit without supervision if they have been shown how to use it in a safe manner.
- Page 7 - Ventilate the room where the wine conditioning unit is located for several minutes. - Contact the Miele Customer Service Department. The more coolant there is in a wine conditioning unit, the larger the room it should be installed in. In the event of a leakage, if the ap- pliance is in a small room, there is the danger of combustible gases building up.
- Page 8 If the electrical connection cable is faulty it must only be replaced by a Miele authorised service technician to protect the user from danger. Do not connect the wine conditioning unit to the mains electrical supply by a multi-socket adapter or extension lead.
- Page 9 Faulty components must only be replaced with genuine Miele ori- ginal spare parts. Miele can only guarantee the safety standards of the appliance when Miele replacement parts are used. This wine conditioning unit is supplied with a special lamp to cope with particular conditions (e.g.
- Page 10 Using accessories or spare parts from other manu- facturers will invalidate the warranty, and Miele cannot accept liabil- ity. Miele will guarantee to supply functional spare parts for a min- imum of 10 years and up to 15 years following the discontinuation of your wine unit.
- Page 11 Warning and Safety instructions Cleaning and care Do not use any oils or grease on the door seals, as these will cause the seals to deteriorate and become porous with time. Do not use a steam cleaning appliance to clean this wine condi- tioning unit.
-
Page 12: Caring For The Environment
Miele. By law, you are solely re- sponsible for deleting any personal data from the appliance prior to disposal. Take care not to damage your wine... -
Page 13: Saving Energy
Saving energy Normal energy consump- Increased energy con- tion sumption Installation site / In a ventilated room. In an enclosed, unventilated Maintenance room. Protected from direct sun- In direct sunlight. light. Not near to a heat source Near to a heat source (radi- (radiator, oven). -
Page 14: Guide To The Appliance
Guide to the appliance Control panel a For switching the whole f For setting the temperature wine conditioning unit on and off ( for colder) b Optical interface g OK sensor for confirming a selection (for Service technicians only) h For setting the temperature c For selecting the upper, middle or (... -
Page 15: Symbols
To prevent inadvertent switching off and al- tering of settings Audible tones Choice of keypad tone and door alarm tone Miele@home Only visible when a communication module or communication stick is fitted and signed Demo mode For switching off Demo mode... - Page 16 Guide to the appliance a Lighting strip (in all three wine conditioning zones) b Bottle presenter (Selector) c Active AirClean filter (in all three wine conditioning zones) d Wooden shelves with labels (FlexiFrames with Noteboard) e Isolator plate for thermal separation of the zones with controls for the up- per, middle and lower wine condi- tioning zones...
-
Page 17: Accessories
Accessories Accessories supplied Optional accessories A range of useful Miele accessories and Active AirClean filter care products are available for your The active charcoal filters in the back wine conditioning unit. wall achieve optimum air quality by fil- tering the incoming air. -
Page 18: Switching On And Off
Switching on and off Before using for the first time Operating the wine condition- ing unit Packaging material A light touch of the finger on the Remove all packaging material from sensors is all that is required to operate the inside of the appliance. -
Page 19: Switching Off
Switching on and off Switching off Touch the On/Off sensor. Touch the sensor for the wine condi- If this does not work, the safety lock tioning zone you want to adjust the is still activated. settings for. The sensors for the two wine condition- The sensor that has been selected is ing zones will then go out. -
Page 20: Selecting Further Settings
Selecting further settings Certain settings on the wine condition- ing unit can only be selected in settings mode. The door alarm is automatically dis- By touching the or sensor, you abled when the appliance is in set- can now select whether the safety tings mode. -
Page 21: Audible Tones
Selecting further settings Audible tones The wine conditioning unit has audible tones such as the keypad tone and the door and temperature alarms. Touch the or sensor now to se- lect: You can switch the keypad tone or the 0: keypad tone off;... -
Page 22: Display Brightness
Selecting further settings Display brightness The display brightness can be adjusted to suit lighting conditions in the room. By touching the or sensor you The display brightness can be adjusted can now alter the brightness of the in steps from 1 to 3. -
Page 23: The Optimum Temperature And Air Quality
The optimum temperature and air quality Wine keeps on maturing depending on Type of wine Recommended the surrounding conditions. The length drinking of time for which wine can be kept in temperature* good condition will therefore depend Light, fruity reds: +14 °C to +16 °C not only on the temperature but also on the air quality. -
Page 24: Setting The Temperature
The optimum temperature and air quality Safety device in case of low ambient Setting the temperature temperatures The temperatures in the wine condition- The appliance is equipped with a safety ing zones can be set independently of thermostat to protect your wine against one another. -
Page 25: Temperature Display
The optimum temperature and air quality - Touching a sensor once: Temperature display The last temperature selected In normal operation the temperature flashes. display shows the actual temperature in - Each subsequent touch of the the zone. sensor: If the temperature in one of the zones is Adjusts the temperature shown in not within the range that the appliance 1 °C increments. -
Page 26: Air Quality And Humidity
The optimum temperature and air quality Air quality and humidity Using DynaCool (constant humid- In most refrigerators the humidity is too ity) low for wine and therefore a refrigerator is not suitable for wine storage. High DynaCool raises the relative humidity humidity levels are necessary when inside the whole of the wine condition- storing wine to moisten corks from the... -
Page 27: Air Filtering With The Active Airclean Filters
The optimum temperature and air quality Switching off DynaCool Air filtering with the Active AirClean filters The wine conditioning unit uses slightly more energy and is a little The Active AirClean filters achieve op- noisier when the DynaCool function is timum air quality by filtering the incom- switched on. -
Page 28: Temperature And Door Alarm
Temperature and door alarm This wine conditioning unit is equipped Switching the temperature alarm off with an alarm system so that the tem- early perature cannot rise or fall unnoticed, If the noise disturbs you, you can thus possibly damaging the wine. switch the alarm off if you wish. - Page 29 Temperature and door alarm Door alarm An alarm will sound if the appliance door has been left open for longer than approx. 2 minutes. The sensors for the wine conditioning zones will flash in the control panel. The alarm symbol lights up in the display. As soon as the door is closed, the alarm will stop.
-
Page 30: Feature Lighting
Feature lighting The interior lighting can be set to re- Setting the brightness of the feature main on when the door is closed so lighting your wines can be on display at all The brightness of the feature lighting times. can be adjusted. -
Page 31: Lighting Duration Of The Feature Lighting
Feature lighting By touching the sensor Touch the OK sensor to confirm your choice. - lighting duration is reduced by The set brightness is saved to memory. 30 minutes The temperature display then appears again. As soon as the appliance door is closed, the set brightness for the fea- ture lighting takes effect. -
Page 32: Storing Wine Bottles
Storing wine bottles Vibration and movement have a negat- Risk of injury from falling wine ive effect on the maturing process, bottles. which can in turn affect the taste of the Wine bottles may become wedged in wine. the wooden shelves above and fall To avoid disturbing other bottles when out of the wine conditioning unit removing a bottle of wine, store bottles... -
Page 33: Wooden Shelves
Storing wine bottles Moving the wooden shelves Wooden shelves The wooden shelves can be removed and replaced again if required. Pull the wooden shelf out until it stops, then lift it up and off the run- ners. Hold onto the frame to do this. The wooden shelves are on telescopic runners which can be pulled out to make it easier to store and remove... -
Page 34: Adjusting The Wooden Shelves
Storing wine bottles Adjusting the wooden shelves Annotating wooden shelves The slats in the wooden shelves can be For quick and easy identification of the individually adjusted to suit, so that wines stored, you can write on the every bottle is stored in perfect safety blackboard-painted surface on the regardless of shape or size. -
Page 35: Bottle Presenter
Storing wine bottles Bottle presenter Maximum capacity The bottle presenter can be used to raise particular bottles so that they can be viewed when the door is shut. To set up the bottle presenter, the wooden shelf above must be removed: ... -
Page 36: Automatic Defrosting
Automatic defrosting The wine conditioning unit defrosts automatically. -
Page 37: Cleaning And Care
Cleaning and care Cleaning agents Do not let water get into the elec- tronic unit or the lighting. To avoid damaging the surfaces of your appliance, do not use Risk of damage due to moisture - Cleaning agents containing soda, ingress. -
Page 38: Before Cleaning The Wine Unit
Take out all other removable parts for brush or vacuum cleaner (you could cleaning. use a Miele vacuum cleaner dusting Remove the magnetic strips from the brush, for example). wooden shelves before cleaning them. -
Page 39: Cleaning The Compressor And Metal Grille At The Back Of The Wine Appliance
Cleaning and care Cleaning the compressor and metal grille at the back of the wine appliance A build-up of dust will increase the en- ergy consumption of the appliance. Risk of damage as a result of in- correct cleaning. Cables and other components can get broken off, bent or damaged. -
Page 40: Active Airclean Filters
symbol is displayed (means: the Turn the filter 90 °C clockwise or anti- counter has been reset). clockwise until it clicks into place. Active AirClean filters can be obtained from your Miele dealer, Miele or via the internet. - Page 41 Active AirClean filters Touch the OK sensor to confirm your selection. The selected setting is applied, the symbol flashes. Touch the settings sensor to leave settings mode. Otherwise the appliance exits set- tings mode automatically after ap- proximately one minute. The ...
-
Page 42: Problem Solving Guide
Unauthorised installation, maintenance and repairs can cause considerable danger for the user. Installation, maintenance and repairs must only be carried out by a Miele au- thorised technician. Problem Cause and remedy... - Page 43 Problem solving guide Problem Cause and remedy The compressor is The temperature in the wine conditioning unit is set switching on more fre- too low. quently and for longer Adjust the temperature. periods of time, the The door is not properly closed. temperature in the wine ...
- Page 44 Problem solving guide Display warnings Message Cause and remedy The alarm symbol is The door alarm has been activated. lit up in the display. The Close the door. The three sensors for the wine three sensors for the conditioning zones and the alarm symbol ...
- Page 45 Problem solving guide The interior lighting is not working. Problem Cause and remedy The LED interior lighting The wine conditioning unit is not switched on. is not working. Switch the wine conditioning unit on. To avoid overheating, the LED lighting switches itself off automatically after approx.
- Page 46 Problem solving guide General problems with the wine conditioning unit Problem Cause and remedy There is no audible This is not a fault. The alarm tone has been alarm although the door switched off in settings mode (see “Selecting fur- has been open for a ther settings –...
-
Page 47: Noises
Noises Normal noises What causes them Brrrrr ... A humming noise is made by the motor (compressor). This noise can get louder for brief periods when the motor switches Blubb, blubb ... A gurgling noise can be heard when coolant is circulating through the pipes. -
Page 48: After Sales Service And Warranty
In the event of any faults which you From 1 March 2021, information on en- cannot remedy yourself, please contact ergy labelling and ecodesign require- your Miele dealer or the Miele Customer ments will be available in the European Service Department. Product Database (EPREL). You can... -
Page 49: Information For Dealers
Information for dealers Demo mode The wine conditioning unit can be demonstrated in the showroom or at exhibitions in “Demo mode”. In this Leave your finger on the sensor mode the control panel and interior until the symbol appears in the dis- lighting are active but the compressor play. - Page 50 Information for dealers Touch the or sensor until 0 ap- pears (means: Demo mode is switched off). Touch the OK sensor to confirm your selection. The selected setting is applied, the symbol flashes. Touch the settings sensor to leave settings mode.
-
Page 51: Electrical Connection
If the mains connection cable is dam- aged, it must only be replaced with a specific mains connection cable of the same type (available from the Miele Customer Service Department). For safety reasons, such replacement may only be carried out by a qualified spe- cialist or the Miele Customer Service Department. -
Page 52: Installation
Installation Climate range Fire risk and danger of damage! Appliances which give off heat, such The wine conditioning unit is designed as toasters, mini-ovens or double for use within a certain climate range burner hobs, can catch fire. (ambient temperatures) and should not Do not place them on top of this re- be used outside this range. -
Page 53: Ventilation
Installation Ventilation Installation Remove the cable clip from the back The wine conditioning unit can be placed directly against a wall. Please of the appliance. note that to ensure sufficient ventilation, Check that all parts at the back of the the ventilation gaps must not be appliance are unhindered. -
Page 54: Aligning The Wine Conditioning Unit
Installation Aligning the wine conditioning Levelling the appliance door unit Risk of damage and injury caused by the appliance door falling out or the wine unit tipping over. If the additional adjustable foot on the hinge bracket at the bottom is not resting firmly on the floor, the ap- pliance door can fall out or the wine unit can tip over. -
Page 55: Door Opening Angle Limiter
The door opening angle limiter is avail- able from Miele or your Miele dealer. * Dimensions without wall spacers. Appli- ance depth is increased by 35 mm with the... -
Page 56: Dimensions When The Door Is Opened
Installation Dimensions when the door is opened... -
Page 57: Changing The Door Hinging
Changing the door hinging Open the appliance door as far as it The wine conditioning unit is supplied right-hand hinged. If left-hand hinging is will go. required, the hinges must be changed. To change the door hinging, you will need the following tools: The glass door is very heavy (approx. - Page 58 Changing the door hinging Changing over the soft-close mechanism Pinch cover in the middle and re- move. Push out soft-close mechanism . Remove screws from the soft- close mechanism on the right and left at the bottom of the appliance door. ...
- Page 59 Changing the door hinging Remove red safety device from the soft-close mechanism. Remove screw . Refit cover onto the soft-close mechanism. Pull out soft-close mechanism and remove. Put red safety device back onto the soft-close mechanism.
- Page 60 Changing the door hinging Removing the door Pull hinge pin upwards and out. Tip: Leave screw in the hinge pin un- Use a small flat-blade screwdriver to remove covers from the top of the til the hinge pin is inserted on the op- posite side.
- Page 61 Changing the door hinging Changing over the hinge bracket Click covers into place on both sides from the front. When doing this, guide the cover with the cut-out over Remove both covers at the top of the hinge bracket.
- Page 62 Changing the door hinging Unscrew hinge bracket from un- Remove cover from the bottom of derneath the appliance. the appliance. Then pull adjustable foot down- Remove screw on the bottom of wards and out. the appliance and replace it on the opposite side.
- Page 63 Changing the door hinging Refitting the door Position the appliance door onto lower bolt and guide the top to- wards the hinge bracket. Caution. The appliance door is heavy and needs to be handled by two people. ...
- Page 64 Changing the door hinging Remove screw from the hinge pin Pull the hinge joint of soft-close mechanism outwards to holder . and screw it into the drill hole in the hinge bracket. Fit hinge pin into the soft-close ...
- Page 65 Changing the door hinging Snap on cover . Make sure that you unscrew the ad- justable foot under the lower hinge Position the appliance in its final loca- bracket until it sits on the floor. Then tion. unscrew the foot by a further 90°.
- Page 66 Changing the door hinging Aligning the side of the appli- ance door If the appliance door is not in line with the side walls of the appliance, the ap- pliance door can be aligned by adjust- ing the upper hinge bracket. ...
- Page 67 United Kingdom Miele Co. Ltd., Fairacres, Marcham Road, Abingdon, Oxon, OX14 1TW Tel: 0330 160 6600, Internet: www.miele.co.uk/service, E-mail: info@miele.co.uk Australia Ireland South Africa Miele Australia Pty. Ltd. Miele Ireland Ltd. Miele (Pty) Ltd. ACN 005 635 398 2024 Bianconi Avenue...
- Page 68 KWT 6833 SG en-GB M.-Nr. 10 439 390 / 05...
Need help?
Do you have a question about the KWT 6833 SG and is the answer not in the manual?
Questions and answers