
Related Manuals for HIKVISION MCH508


Summary of Contents for HIKVISION MCH508
- Page 1 Helmet Camera Quick Start Guide Scan the QR code for Portable Device Assistant application.
- Page 2 INDIRECT DAMAGES, INCLUDING, AMONG OTHERS, DAMAGES FOR LOSS OF BUSINESS PROFITS, BUSINESS INTERRUPTION, OR LOSS OF DATA OR DOCUMENTATION, IN CONNECTION WITH THE USE OF THIS PRODUCT, EVEN IF HIKVISION HAS BEEN ADVISED OF THE POSSIBILITY OF SUCH DAMAGES. REGARDING TO THE PRODUCT WITH INTERNET ACCESS, THE USE OF PRODUCT SHALL BE WHOLLY AT YOUR OWN RISKS.
- Page 3 Helmet Camera Quick Start Guide Regulatory information FCC information FCC compliance: Please take attention that changes or modification not expressly approved by the party responsible for compliance could void the user’s authority to operate the equipment. Note: This product has been tested and found to comply with the limits for a Class B digital device, pursuant to Part 15 of the FCC Rules.
- Page 4 Helmet Camera Quick Start Guide 2006/66/EC (battery directive): This product contains a battery that cannot be disposed of as unsorted municipal waste in the European Union. See the product documentation for specific battery information. The battery is marked with this symbol, which may include lettering to indicate cadmium (Cd), lead (Pb), or mercury (Hg).
- Page 5 DO NOT disassemble the product for repair or maintenance by yourself. Only use the battery, power adapter and assembly parts specified by the manufacturer. ● Consult the authorized dealer or technician from Hikvision for any question and request for ● product using.
- Page 6 Helmet Camera Quick Start Guide Symbol Description Provides additional information to emphasize or supplement important points of the main text. Indicates a potentially hazardous situation, which if not avoided, could result in equipment damage, data loss, performance degradation, or unexpected results. Indicates a hazard with a high level of risk, which if not avoided, will result in death or serious injury.
-
Page 7: Table Of Contents
Helmet Camera Quick Start Guide TABLE OF CONTENTS Chapter 1 Overview ..................... 7 1.1 Appearance ....................7 1.2 Internal LCD Description ................8 Chapter 2 Installation ..................10 2.1 Change Battery ..................10 2.2 Install SIM Card and SD Card ..............11 2.3 Install Device to Helmet................ -
Page 8: Chapter 1 Overview
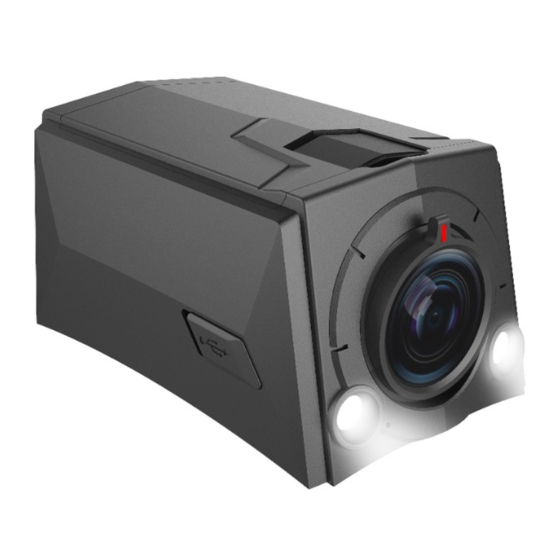
Helmet Camera Quick Start Guide Chapter 1 Overview 1.1 Appearance The appearance of helmet camera is shown as Figure 1-1. Figure 1-1 Helmet Camera Appearance Refer to Table 1-1 for the description of helmet camera appearance. Table 1-1 Description of Helmet Camera Appearance Name Description ... -
Page 9: Internal Lcd Description
Helmet Camera Quick Start Guide Name Description After the device starts up, hold it for 3 seconds to shut it button/Internal LCD on/off button down, and the device stops recording. After the device starts up and is ready, press it to capture a picture. - Page 10 Helmet Camera Quick Start Guide Figure 1-2 Internal LCD Refer to Table 1-2 for icon description. Table 1-2 Internal LCD Icon Description Icon Description Overwritten record is enabled./Overwritten record is disabled. The rest recordable time duration supported by the current storage capacity./MicroSD card exception.
-
Page 11: Chapter 2 Installation
Helmet Camera Quick Start Guide Chapter 2 Installation 2.1 Change Battery The device leaves factory with a battery. When the power is low, charge the device or change battery in time. Power off the device before changing battery. Before you start: Prepare a dedicated battery. -
Page 12: Install Sim Card And Sd Card
Helmet Camera Quick Start Guide Figure 2-2 Install Battery Step 4 Install the battery cover back. Figure 2-3 Install Battery Cover 2.2 Install SIM Card and SD Card You can install Micro SIM card for network connection and install MicroSD card for storage. Power off the device before installing Micro SIM card and MicroSD card. - Page 13 Helmet Camera Quick Start Guide Step 2 Take the battery out. Step 3 Unlock the card sockets according to the tips on the printing. Figure 2-4 Open Card Socket Step 4 Place the Micro SIM card and MicroSD card according to the gap direction. Figure 2-5 Place Cards Step 5 Lock the card sockets according to the tips on the printing.
-
Page 14: Install Device To Helmet
Helmet Camera Quick Start Guide Figure 2-6 Lock Card Socket Step 6 Install the battery back. Refer to step 2 of 2.1 Change Battery. Step 7 Install the battery cover back. Refer to step 3 of 2.1 Change Battery. 2.3 Install Device to Helmet The device is equipped with two hook fasteners and two loop fasteners for helmet installation. -
Page 15: Chapter 3 Basic Operation
Helmet Camera Quick Start Guide Chapter 3 Basic Operation 3.1 Startup and Shutdown Startup: Hold the On/Off button for 3 seconds until the indicator displays red. Then the device vibrates for 1 second, indicating the device has started up. ... -
Page 16: Capture
Helmet Camera Quick Start Guide After record starts, if you connect the device to PC via USB cable, or enable quick charging mode, record will stop. 3.5 Capture Manual capture: Press the capture button, and the device vibrates for 0.1 second, indicating capturing succeeded. -
Page 17: Chapter 4 Portable Device Assistant Connection
Helmet Camera Quick Start Guide Chapter 4 Portable Device Assistant Connection The helmet camera has been activated after leaving factory. You can enable Wi-Fi AP of the device. After connecting the mobile terminal to the Wi-Fi AP, you can preview the record and set the device via the Portable Device Assistant application installed on the mobile terminal. -
Page 18: Set Device
Helmet Camera Quick Start Guide Step 5 Enter User Name and Password. Tap Figure 4-1 Add Device The device default user name is admin, and the default password is 123456. Change the device password in time. You can change it via Portable Device Assistant. Refer to the application user manual for details. - Page 19 Helmet Camera Quick Start Guide Figure 4-2 Device Information Step 3 Tap Configure This Device. Result: After selecting the helmet camera as the set device, you can tap Start Live View to start live view. You can tap and select Device Maintenance to set the device.
- Page 20 Helmet Camera Quick Start Guide UD15436B...
Need help?
Do you have a question about the MCH508 and is the answer not in the manual?
Questions and answers