Advertisement
Quick Links
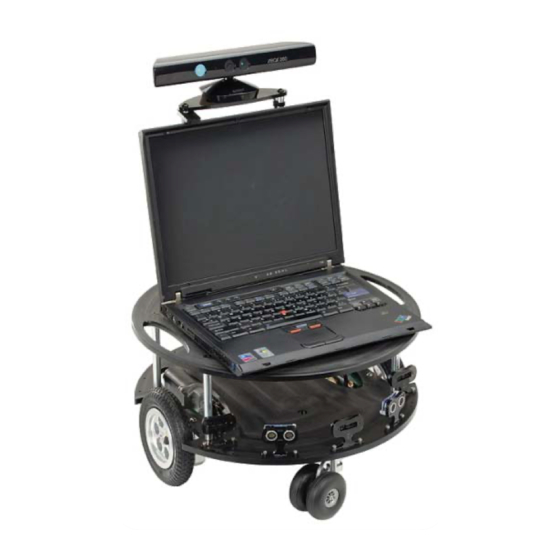
Eddie Robot Platform
(Assembled: #28990 / Unassembled: #28992)
Eddie is a mobile robotics development platform designed to foster creativity, innovation and
experimentation. Compatible with Microsoft's Robotics Developer Studio, Eddie can roam autonomously,
see in 3D using the power of the Microsoft Kinect, and be driven remotely using a wireless controller
(sold separately).
Eddie's Control Board uses the Propeller multicore microcontroller to directly control two high-torque 12 V
motors and collect data from multiple sensors mounted on the robot. Eddie is controlled over a simple
USB connection and a convenient, open-source command interface.
Features
Compatible with Microsoft Robotics Developer Studio
(RDS4)
Two-tiered design provides plenty of room for
electronics as well as convenient laptop mounting for
un-tethered, autonomous navigation.
High-torque 12 VDC gear motors
Durable 6" diameter pneumatic rubber tires traverse
various types of surfaces and terrain.
Three Infra-red distance sensors and two ultrasonic
distance sensors for object detection and collision
avoidance
Integrated control board handles all low level hardware
operations to control motors and collect sensor data
Twin high-capacity 12V , 7.5 Ah sealed lead acid (SLA)
batteries provide significant run-time between charges
USB connectivity
Built-in charging jack (charger included)
Key Specifications
Communication Interface: Serial
commands over USB interface
Operating temperature: 32 to 158 °F (0 to
70 °C)
Dimensions: 21.75" (55.25 cm) high
17.8" (45.2 cm) Diameter
Robot Weight: 25.3 lbs (11.5 kg)
Copyright © Parallax Inc.
Web Site: www.parallax.com
Forums: forums.parallax.com
Sales: sales@parallax.com
Technical: support@parallax.com
Application Ideas
Eddie Robot Platform (28990 & 28992)
Office: (916) 624-8333
Fax: (916) 624-8003
Sales: (888) 512-1024
Tech Support: (888) 997-8267
Autonomous navigation and mapping
Development and testing of machine
vision systems
Tele-presence robots
Voice-activated personal assistant robots
Security and surveillance robots
Crowd interaction and advertising
v1.3 1/16/2013 Page 1 of 17
Advertisement

Related Manuals for Parallax 28990


Summary of Contents for Parallax 28990
- Page 1 Dimensions: 21.75” (55.25 cm) high 17.8” (45.2 cm) Diameter Security and surveillance robots Robot Weight: 25.3 lbs (11.5 kg) Crowd interaction and advertising Copyright © Parallax Inc. Eddie Robot Platform (28990 & 28992) v1.3 1/16/2013 Page 1 of 17...
-
Page 2: Additional Items Required
Wheel Kits, carefully unpack the remaining components and sort them into their respective groups. You should have the items listed in the Bill of Materials table below. Copyright © Parallax Inc. Eddie Robot Platform (28990 & 28992) v1.3 1/16/2013 Page 2 of 17... -
Page 3: Bill Of Materials
Screw, Button Head, Blk, ¼-20 x ¾” 712-00008 Washer, ½” dia, .060 Delrin 713-00001 Standoff, 4-40 x 5/8” F/F Round 713-00022 Standoff, 4-40 x 1.5” F/F Hex Copyright © Parallax Inc. Eddie Robot Platform (28990 & 28992) v1.1 1/16/2013 Page 3 of 17... - Page 4 Assemble the Ping))) module by sliding a 1/16” thick nylon spacer onto each of the two 5/8” long, black machine screws. Insert these screws (with the 1/16” washers) through the Ping’s PCB mounting holes. Copyright © Parallax Inc. Eddie Robot Platform (28990 & 28992) v1.1 1/16/2013 Page 4 of 17...
- Page 5 Figure 3c. The IR cables are polarized. Line up the tab on the cable, and insert it into the receptacle. Be sure to fully insert them – they should “click” into place. Set these assemblies aside for now. Copyright © Parallax Inc. Eddie Robot Platform (28990 & 28992) v1.1 1/16/2013 Page 5 of 17...
- Page 6 Mount the standoffs in hole locations that provide the tightest fit for the batteries that you’re using. Place the Delrin shelf so that the Parallax Logo is face down, and attach the standoffs as depicted in Figure 4b. Figure 4b Set the Battery Shelf Assembly aside for now.
- Page 7 Controller for the left motor are set to “1” (both jumpers installed) and that the ID jumpers on the right Position Controller are set to “2” (A installed, B removed). (See Motor Mount and Wheel Kit for additional information). Copyright © Parallax Inc. Eddie Robot Platform (28990 & 28992) v1.1 1/16/2013 Page 7 of 17...
- Page 8 Control Board when it’s installed. It is recommended that the cables are routed across the top side of the robot platform. Figure 5c Copyright © Parallax Inc. Eddie Robot Platform (28990 & 28992) v1.1 1/16/2013 Page 8 of 17...
- Page 9 6b. Carefully thread the Red and Black wires through the hole that’s between the set of short standoffs. Double-check to make certain that the Power Switches are both “off” as shown in Figure 6b. Figure 6b Copyright © Parallax Inc. Eddie Robot Platform (28990 & 28992) v1.1 1/16/2013 Page 9 of 17...
- Page 10 This should be a nice, tight fit. Be careful to not short the terminals of the batteries against the frames of the motor assemblies. See Figure 7b. Figure 7b Copyright © Parallax Inc. Eddie Robot Platform (28990 & 28992) v1.1 1/16/2013 Page 10 of 17...
- Page 11 Connect the Switch Plate to the (4) 1.5” tall standoffs with (4) #4-40 x ½” long black, Phillips head screws, as shown in Figure 8a as well. Figure 8a Copyright © Parallax Inc. Eddie Robot Platform (28990 & 28992) v1.1 1/16/2013 Page 11 of 17...
- Page 12 Connect each of the motor drive connectors to their respective receptacles on the Control Board. Connect the Main Power connector (coming from the Switch Plate) to the large power connector on the Control Board. Figure 9a Copyright © Parallax Inc. Eddie Robot Platform (28990 & 28992) v1.1 1/16/2013 Page 12 of 17...
- Page 13 Place the Second Deck onto the 5” standoffs as shown in Figure 10, and fasten with (4) ¼ -20 Flat head Black Screws. Figure 10 Copyright © Parallax Inc. Eddie Robot Platform (28990 & 28992) v1.1 1/16/2013 Page 13 of 17...
- Page 14 “Kinect Cam Hooks” below the device. Figure 11a Place a Cam Hook into one of the rectangular slots as shown in Figure 11b. Figure 11b Copyright © Parallax Inc. Eddie Robot Platform (28990 & 28992) v1.1 1/16/2013 Page 14 of 17...
- Page 15 Do the same with the remaining cam hook in the other slot. The assembly should now look like the one shown in Figure 11d. Figure 11d Copyright © Parallax Inc. Eddie Robot Platform (28990 & 28992) v1.1 1/16/2013 Page 15 of 17...
- Page 16 Connect a USB mini-B cable to the USB connector on the Control Board, and route it up through the cable hole on the Top Plate. Figure 12a Figure 12b Copyright © Parallax Inc. Eddie Robot Platform (28990 & 28992) v1.1 1/16/2013 Page 16 of 17...
-
Page 17: Additional Specifications
Clearance in other areas is greater. Eddie is designed to be operated indoors. Additional Resources and Downloads Visit www.parallax.com/eddie for additional information and the latest product documentation and downloads, including: Eddie product documentation – this document. - Page 18 Mouser Electronics Authorized Distributor Click to View Pricing, Inventory, Delivery & Lifecycle Information: Parallax 28992...
Need help?
Do you have a question about the 28990 and is the answer not in the manual?
Questions and answers