Advertisement
Quick Links
Advertisement

Related Manuals for Kogan KA3MTANDETA


Summary of Contents for Kogan KA3MTANDETA
- Page 1 300MM DEEP TARGET WATERPROOF METAL DETECTOR KA3MTANDETA...
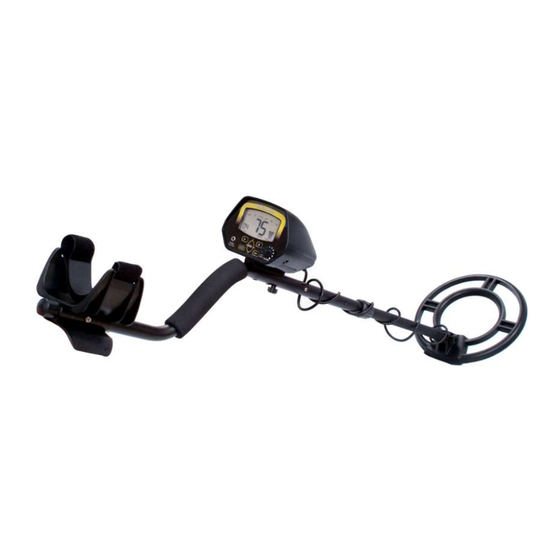
- Page 3 OVERVIEW LCD Display This shows the probable type of metal, the depth of the target, range of DISC and NOTCH, the level of SENS and battery condition. It also has numeric display for DISC and TARGET. Three tone audio discerning Sound three distinctive tones (high, medium, and low) for different types of metal.
- Page 4 Control Panel Power / Volume switch Headphone jack Control buttons Power/Volume Switch Rotate the volume switch clockwise away from the off position to power on the detector. When the detector is turned on, the backlight will be activated automatically. Rotate the volume switch fully counter-clockwise to power off the detector.
- Page 5 LCD Display Target indicator DISC/NOTCH indicator SENS/DEPTH indicator DISC numeric indicator Target numeric indicator Low BATT indicator Control buttons SENS Press SENS then + or – to increase or decrease the sensitivity. The LCD will display the current sensitivity level. If the target depth is beyond the maximum the sensitivity of the detector, the target will not be found.
- Page 6 Layout of the pin-pointer Power button Wrist strap Buzzer Battery cover LED light Vibration, sound, and light: When a target is located, the detector alerts the user with pulses of vibration, sounds from the buzzer, or both sound and vibration. The LED light can be used to illuminate dark areas.
- Page 7 ASSEMBLY Assembling the detector Insert the latch on the top of the handle into the assembly hole on the bottom of the control box. Slightly push the control box in the direction of IN marked on the handle to fix the latch in place. Secure the control box in place with the fixing screw.
- Page 8 Wind the search coil cable around the stem. Leave enough slack in the cable so that it is not taut. Insert the search coil cable plug into the five-pin jack on the control box. Turn the stem’s lock nut on the middle stem clockwise until it loosens. Adjust the stem to a length that feels comfortable when standing upright with the detector in hand, and the search coil is level with the ground, with the carrying arm relaxed at one’s side.
- Page 9 Installing the batteries The metal detector is powered by two 9V batteries (not included). Turn off the power before installing the batteries. Slide the left and right battery covers off in the direction of the arrow. Place a 9V battery into the battery compartment matching the polarity symbols (+ and -) marked inside.
-
Page 10: Operation
OPERATION Using Headphones Headphones or earphones with in-line volume controls are recommended. Insert the headphones’ 3.5mm plug into the PHONE jack. The internal speaker will automatically mute when headphones are connected. Set the volume to the desired setting. Listening safely ... - Page 11 Indoor testing and use Rotate the volume switch clockwise away from the off position to power on the detector. Set the operating mode: DISC: Press DISC, then + or – to set the DISC numeric value. If the DISC value is set to 00, the detector can detect all metals.
- Page 12 Note: Never test the detector on a floor inside a building. Most buildings have the metal of some kind in the floor, which might interfere with the objects being tested or mask the signal completely. Slowly sweep a sample of the material to be detected to find (such as a gold ring or a coin) 2-3 inches or more above the face of the search coil.
- Page 13 Target Indications Numeric ranges of target - IRON: 00-05 - 5¢: 06-17 - P-TAB: 18-26 - ZN: 27-38 - 1¢: 39-62 - 25¢: 63-99 Note: There are a wide variety of metals and no target can be identified for certain until unearthed.
- Page 14 Note: When you set the detector to DISC or NOTCH mode, the detector sounds a medium or high tone when it detects highly oxidised iron. Depending on the purity, ~15% gold rings cause the detector to sound a medium tone.
- Page 15 If the detector detects the item, it sounds a tone and the cursor above the target name will light. The LCD displays the numeric range of target as well as the depth (signal strength). If the detector does not detect the item, make sure that the mode is set correctly for the type of metal being searched for.
-
Page 16: Pinpointing The Target
Pinpointing the target Accurately pinpointing a target makes digging it up easier but takes practice. It is suggested to practice finding samples on one’s own property before searching other locations. Follow these steps to pinpoint a target: When the detector detects a buried target, continue sweeping the search coil over the target in a narrowing side-to-side motion. -
Page 17: Helpful Hints
Factors that affect detecting The angle of the target buried in the soil. The depth of the target. The level of oxidisation of the target. The size of the target. Electro-magnetic and electrical interference surrounding the target. In the area of highly mineralised ground or wet sand, the detector will sound even if there is no metal. -
Page 18: Cleaning And Care
CLEANING & CARE Handle the detector gently and carefully. Dropping it can damage circuit boards and cases and can cause the detector to work improperly. Use the detector only in normal temperature environments. Temperature extremes can shorten the life of electronic devices; damage the cases of the detector. - Page 19 NOTES...
- Page 20 Need more information? We hope that this user guide has given you the assistance needed for a simple set-up. For the most up-to-date guide for your product, as well as any additional assistance you may require, head online to help.kogan.com...
Need help?
Do you have a question about the KA3MTANDETA and is the answer not in the manual?
Questions and answers