Advertisement
Quick Links
Advertisement

Related Manuals for Bang & Olufsen Beovox S35


Summary of Contents for Bang & Olufsen Beovox S35
- Page 1 A W R I T T E N G U I D E TO U P C YC L I N G A Beovox S35...
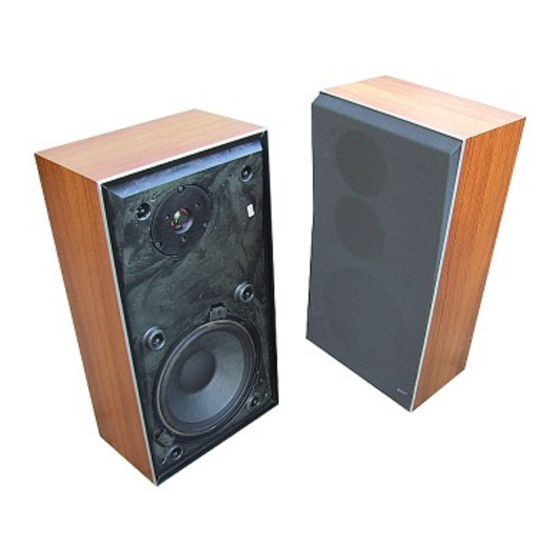
- Page 2 I N T R O D U C T I O N This is a guide on how to upcycle a Beovox S35 loudspeaker using a BeoCreate 4-Channel amplifier and a Raspberry Pi. The upcycling process will take roughly two hours and we advise you to prepare for the project by having all the required items at hand.
- Page 3 E X T R A S Recommended power supply 18-24V, about 90W https://www.hifiberry.com/shop/accessories/mean- well-gs60a18-p1j/ https://www.hi ber- Recommended power plug mouting hole diameter: Ø8mm https://www.hifiberry.com/shop/accessories/coaxi- https://www.hi berry.com/shop/ac- al-power-connector-5-5x2-1mm/ Files for 3D printing https://www.hi berry.com/beocre- https://www.hifiberry.com/beocreate/beocre- ate-doc/...
- Page 4 TA K I N G A PA R T T H E S 3 5 STEP ONE...
- Page 5 From the front of the speaker, remove the Unscrew the brackets holding the woofer. fabric covers.
- Page 6 Remove the dampening material. Cut all the wires connected to the cross- over.
- Page 7 Unscrew the old crossover and remove it. Save the screws for the step three.
- Page 8 C R E AT I N G A N E W P O W E R C O N N E C T I O N STEP TWO...
- Page 9 Remove the original plastic speaker Screw the power plug into the 3D printed connector using a dremel tool. Make sure to holder. leave enough space to press fit the 3D printed holder.
- Page 10 Strip the insulated wires you reserved for Solder wires to each positive and negative the power connector, so that approximately terminal. 1cm of wire is exposed.
- Page 11 Apply glue to the 3D printed holder. Attach it to the hole on the back plate. Make sure to cover all the inner walls with a su cient amount of glue.
- Page 12 A S S E M B L E T H E PA R T S STEP THREE...
- Page 13 Place the Raspberry Pi upon the BeoCreate 4-Channel Amplifier. The supplied spacers will not fix the Pi to the board, but just pre- vent it from flexing and touching any com- ponents on it.
- Page 14 Strip the wires coming from the drivers, so Connect the power and drivers to the Am- that again approximately 1 cm of wire is plifier. A detailed diagram is shown on the exposed. next page.
- Page 15 Using the existing mounting posts and screws, attach the 3D printed frame to the inside of the speaker.
- Page 16 A M P L I F I E R O U T P U T S W I R E S F R O M P O W E R C O N N E C T O R W O O F E R T W E E T E R...
- Page 17 C L O S I N G U P STEP FOUR...
- Page 18 Connect the power supply Plug the power supply into a wall socket.
- Page 19 Make sure a red light turns on on the Rasp- Unplug the power supply from the wall- berry Pi. If it does not turn on, you have socket to further proceed with the switched the polarety of the power supply. up-cycling.
- Page 20 Insert the SD card with the BeoCreate soft- ware installed on it, and proceed to set up the amplifier. https://www.hifiberry.com/beocreate/beo- create-doc/beocreate-first-steps/...
- Page 21 Press fit the amplifier into the 3D printed Place the dampening material inside the frame previously attached to the speaker. speaker.
- Page 22 Re-mount the woofer with the respective Attach the the fabric cover again. brackets.
- Page 23 E N J OY Your speaker is now physically upcycled. You can find the further software feachers here: https://www.hifiberry.com/beocreate/beocre- ate-doc/beocreate-software-documentation/...
Need help?
Do you have a question about the Beovox S35 and is the answer not in the manual?
Questions and answers