Table of Contents
Advertisement
Advertisement
Table of Contents

Related Manuals for Bang & Olufsen BeoLab 4000


Summary of Contents for Bang & Olufsen BeoLab 4000
- Page 1 B E O L A B 4 0 0 0...
- Page 2 CAUTION: To reduce the risk of electric shock, do not remove cover (or back). No User-serviceable parts inside. Refer servicing to qualified service personnel. WARNING: To prevent fire or electric shock, do not expose this appliance to rain or moisture. This symbol indicates that a dangerous voltage constitut- ing a risk of electric shock is...
-
Page 3: Table Of Contents
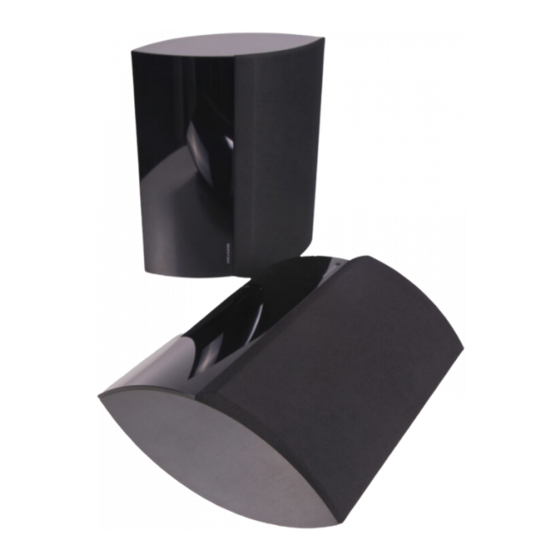
I N T R O D U C T I O N Due to its sculptural design, the BeoLab 4000 takes up very litt- le space, be it on a shelf, on the wall, on the floor, or even on the ceiling. -
Page 4: Before You Start
In fact, it can be placed in a position which suits its surroundings and your preferred listening position. The BeoLab 4000 can, of course, be used in connection with your audio system. The speaker units are magnetically shielded and... - Page 5 BeoLab 4000 (as indi- cated on the following illustration). The BeoLab 4000 fastened to a wall in a verti- cal position (using the standard wall bracket). The bracket can also be used to fasten the Beo- Lab 4000 in a horizontal position, on a wall or to the ceiling.
-
Page 6: Connection To Bang & Olufsen Products
The socket panel is located on the rear of the BeoLab 4000. Use this illustration and the graphics imprinted on the soc- ket panel for reference. LINE POWER LINK C O N N E C T I O N S LINE •... -
Page 7: Connection To Non-Bang & Olufsen Products
Connection to the mains Connect the enclosed mains cord socket marked ~ on the BeoLab 4000, but do not con- nect it to the wall socket yet. Connect one speaker to each of the sound channels. The switch marked LINE • L • R must in this case be set to LINE. -
Page 8: Wall Bracket
The lock will engage and thus secure the two parts. W A L L B R A C K E T The placement of the bracket on the rear of the BeoLab 4000 determines the angle between the speaker and the wall. -
Page 9: Light Partition Walls
(E), and one lag screw through the centre hole of the bracket. Top-view of the BeoLab 4000 and the bracket (B). Light partition walls If you intend to hang the Beo- Lab 4000 on a gypsum wall, the wall bracket must be fastened to a vertical stud. -
Page 10: Daily Use
BeoLab 4000, connect your entire Bang & Olufsen sys- tem to the mains. Turn on the power switch on each of your BeoLab 4000. The stand-by indicator (in the power switch button) lights up in red, indicating that the speaker is on stand-by, ready to be used. -
Page 11: Miscl. Information
M I S C L . International Guarantee This Bang & Olufsen product carries a guarantee against defects in workmanship and materials. The terms of the guarantee apply to the country of purchase but will be met by authorized Bang & Olufsen dealers in other countries. - Page 12 3506220 0996 Printed in Denmark by Bogtrykkergården a-s, Struer...
Need help?
Do you have a question about the BeoLab 4000 and is the answer not in the manual?
Questions and answers