Table of Contents
Advertisement
Quick Links
Syringe Pump Type SS3 OTCI
TE-SS830P
Store this instruction manual in a convenient location for future reference whenever
necessary. Read the instructions carefully before using the product, and operate in
accordance with instructions. Perform maintenance and inspections to ensure safe
use and extend the life of this product.
Instruction Manual
2019-08
Advertisement
Table of Contents

Related Manuals for Terumo TERUFUSION TE-SS830P


Summary of Contents for Terumo TERUFUSION TE-SS830P
- Page 1 2019-08 Syringe Pump Type SS3 OTCI TE-SS830P Instruction Manual Store this instruction manual in a convenient location for future reference whenever necessary. Read the instructions carefully before using the product, and operate in accordance with instructions. Perform maintenance and inspections to ensure safe use and extend the life of this product.
-
Page 2: Table Of Contents
Contents Read this instruction manual carefully to fully understand this product and ensure its safe use. For an explanation regarding the introduction of this product, consult with TERUMO trained service technicians. Conduct safety training sessions for this product before use. -
Page 3: Purpose, Overview And Features Of The Product
Purpose, Overview and Features of the Product Purpose and Overview The TERUFUSION Syringe Pump Type SS3 OTCI is intended for the infusion of general and local anesthetics, vasodilators, cardiotonics, parenteral feeding, anti-cancer drugs, labor-inducing drugs and blood transfusion at ICU, CCU, NICU, operating rooms or general wards. -
Page 4: Features
Purpose, Overview and Features of the Product The rate constants of each PK/PD model are as follows: Tốc độ Propofol Propofol (Schnider) Remifentanil (Minto) không đổi (Marsh) Vc (V1) [L] 0.228 x Weight 4.27 5.1-0.0201 x (Age-40)+0.072 x (LBM-55) [/min] 0.119 [1.89+((Weight-77) x 0.0456)+((59 x 0.0681)- [2.6-0.0162 x (Age-40)+0.0191 x (LBM-55)]/... -
Page 5: Unit Correlation
Purpose, Overview and Features of the Product Communication function • The infrared communication allows communication with the optional Communication Rack System* • The wireless LAN allows communication with the network system. : TERUFUSION Communication Rack System (Model: TE-RS800) TERUFUSION Communication Rack System (Extension) (Model: TE-RS811) Unit Correlation mcg/kg/min and μg/kg/min have the same meaning and are interchangeable. -
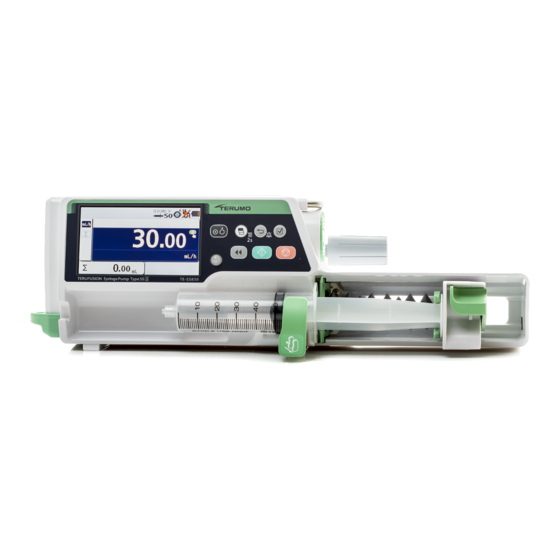
Page 6: Parts Description
Parts Description Exterior Diagram Front view ● LCD ● Operation panel ● Handle Holds the pump main unit. ● Dial ● Slit Sets the flow rate, Accepts the flange dosage, weight, etc. of a syringe. Selects (Up/Down) the item in the menu. The increase/decrease range ●... -
Page 7: Operation Panel
Parts Description Operation Panel ● Display select switch ● Back/Mute switch ● Power switch ● Confirmation switch ● Stop switch ● Operation indicator ● Start switch ● Purge switch Name Function Turns the power ON/OFF. Power switch In the stop status, press and hold this switch to perform a rapid infusion. In the bolus (Hands On/Hands Free) mode, press or press and hold the switch to start the bolus infusion. -
Page 8: Screen Description
Parts Description Screen Description In the TCI mode Graph screen Drug display Displays the drug name with a colour tag, the drug concentration, and the model. Tab display Indicates the currently selected target (plasma or effect-site targeting) and the type of TCI mode screen (graph, text, or info). Target concentration Displays the predicted concentration (Cpt or Cet) to be targeted. - Page 9 Parts Description Graph screen (detailed) Before starting solution delivery Initial infusion dose Initial infusion time Predicted plasma concentration Target concentration (Cpt or Cet) Target concentration Predicted effect-site concentration (Cpt or Cet) During solution delivery Colour tag Drug name Model Target tab Model Predicted plasma concentration (Cp)
- Page 10 Parts Description Info screen Target tab Decrement (awakening) concentration Graph axis Patient information Tab display Drug information Info tab Target concentration (Cpt or Cet) Tab display Cp: Indicates the plasma targeted TCI mode is currently selected. Ce: Indicates the effect-site targeted TCI mode is currently selected. Target tab Displays the graph screen.
- Page 11 Parts Description In other dose modes Flow rate screen Flow rate display Displays the value and information for the flow rate (mL/h), etc. Volume delivered display Displays the volume delivered. Notes • Each time you press the Display select switch, the selected items rotate as shown below. Selected item turns dark blue. •...
- Page 12 Parts Description Sensor icon display Status icon display Flow rate display Start up icon Tab display Ready for bolus icon Volume delivered display Status icon display (lit) When AC power is connected and charge is full. Battery icon and the remaining battery When AC power is connected and battery is charging.
- Page 13 Mute icon Displays when an alarm is muted. When the set time period has elapsed Maintenance icon For the setting method, contact TERUMO trained service technicians. Displays when the maintenance timer set period has elapsed. When a high priority alarm sounds.
- Page 14 Parts Description Sensor icon display Displays when a syringe displacement is detected. Syringe Displacement icon Displays when the syringe is detected to be nearly empty. Nearly Empty icon Displays when an occlusion is detected. Occlusion icon Displays when a plunger displacement or slider displacement is detected. Slider Displacement icon Note •...
- Page 15 (TCI mode only) Selects an advanced dose mode. (Displayed when a Interval/Intermittent Mode Advanced dose drug library that allows for Multi-step Mode mode advanced dose mode is Delayed Start Mode selected.) For details, contact TERUMO ― Combination dose trained service technicians. mode...
- Page 16 Selection of Communication Sets the communication environment table (up to 10) Communication environment. Wireless LAN ON/OFF environment If the password is set, some Displays the menu only special functions are password available to TERUMO trained Password protected. service technicians.
-
Page 17: Standard Accessories
• Pole clamp (Screw type) • Instruction manual Note • If an AC power cable is not included with the pump unit, please contact TERUMO trained service technicians to receive the cable suited for your region. Optional Accessories Optional accessories are sold separately. - Page 18 TERUFUSION Standard Rack System (TE-RS700) Communication box AC power box TERUFUSION Communication Rack System <Combination Examples> (Extension) (TE-RS811) Notes • Up to three rack systems can be joined for use. • To join rack systems, contact TERUMO trained service technicians.
-
Page 19: Precautions
Precautions To ensure safe and correct use of this product, please observe all precautions. Non-compliance with precautions and incorrect use may result in damage or injury. The following are signs used in this manual and their meanings: Warning This label preceding a precaution indicates that there will be a possible risk of death or personal injury if the precaution given is not complied with. - Page 20 Precautions Warnings • When infusing in the TCI mode, the following must be observed: • Do not inject the same drug before starting solution delivery in the TCI mode. • After ending the TCI mode, do not inject to the same patient again in the TCI mode during the period that the drug is assumed to remain in the patient’s body.
- Page 21 Precautions Cautions • Turn the power on before the syringe is inserted, and check that the LCD and operation indicator are flashing, and that the buzzer sounds. [If the power is turned on when a syringe is installed, this product cannot operate a normal self-check (self- diagnosis).] •...
- Page 22 • In a case where a manufacturer has made changes to their syringe, the flow rate accuracy and alarm function may not be guaranteed. If any fault is observed, immediately stop using the product and contact TERUMO trained service technicians.
- Page 23 Precautions Cautions • When using the wireless LAN communication function, the effect on other equipment by radio interference should be considered. [It may affect other equipment.] • When connecting this product with a network, the settings of this product and the network system need to be compatible. Contact a vendor specialist for the correct settings and allow only the system administrator to perform settings.
-
Page 24: Compatible Syringes
Cautions • Only use specified syringes with luer lock for the pump. • TERUMO cannot accept any responsibility for errors in flow due to modifications of the syringe specifications introduced by the manufacturer. • Differences in factors such as size and plunger force in compatible syringes may not fulfill flow rate accuracy of infusion. -
Page 25: Preparation
Preparation Prior to the initial use of the pump, set the date and time to record history correctly. (See page 110.) Before use, carefully read “Precautions” and the labels attached to the product. Prior to the Pump being Used Connect to the AC power supply and charge (8 hours or more) with the power turned off. Prior-to-use Inspection Check the following points before use. - Page 26 Preparation Notes • If the tube holder comes off, follow the procedure below to attach it. • When inserting the notch of the tube holder into the hole on the rear side, insert while pulling the tube holder towards the rear side.
-
Page 27: Attaching/Detaching A Pole Clamp
Preparation Attaching/Detaching a Pole Clamp Attach the pole clamp The pole clamp can be locked at the pole clamp lock portion only in the direction shown in the figures below. To attach to a vertical pole • Insert the pole clamp along the grooves on the back of the pump from the lower side. -
Page 28: Attaching/Detaching To The Iv Pole
Preparation Attaching/Detaching to the IV Pole Pole clamp (Screw type) • Turn the pole clamp knob to fix the pump firmly to the IV Pole clamp knob pole. Note • When removing the pump from the IV Pole, hold the main unit and turn the pole clamp knob opposite to the arrow shown in the figure. -
Page 29: Connecting To Ac Power
Connect the plug to an AC power source with an earth connection. Note • If an AC power cable is not included with the pump unit, please contact TERUMO trained service technicians to receive the cable suited for your AC power cable region. Checks AC icon •... -
Page 30: Operating By The Internal Battery
• If any fault is observed while operating using the internal battery, immediately stop using the product and contact TERUMO trained service technicians. -
Page 31: Operation Procedure
• Conduct the self-check (self-diagnosis) of this product without a syringe installed. Otherwise the self-check may not be conducted properly. • Check for any fault by conducting a self-check. If a fault is observed, immediately discontinue use and contact TERUMO trained service technicians. -
Page 32: Setting The Syringe
Operation Procedure Checks • The syringe displacement icon the slider displacement icon displayed flashing on the LCD. • The AC icon is displayed. • The battery icon is displayed, not indicating the sub-battery failure. Operation indicator • The operation indicator is off. Setting the Syringe Close the infusion line and attach a syringe filled with solution to it using aseptic technique. - Page 33 Operation Procedure While holding the clutch, move the slider until it meets the Slider hook Slider plunger, and then release the clutch. If the following guidance in the figure below does not display, perform this step again. Clutch Checks • The clutch appearing in the LCD should look as shown below. •...
- Page 34 • Even after the syringe is set in the proper position, if any fault is observed, immediately stop using the product and contact TERUMO trained service technicians. • When installing a syringe, make sure that the syringe size and brand displayed on the LCD correspond to the syringe. If they do not correspond with each other, it may cause unintended solution delivery.
-
Page 35: Selecting The Tci Mode
Operation Procedure Selecting the TCI mode Select the desired TCI mode from five available combinations of drugs, models, and targets, then set the required patient information (such as body weight) and the target concentration. These settings enable the calculation of the initial infusion dose and the time required before the target concentration level is reached. - Page 36 Operation Procedure Turn the Dial to set the gender, age, height, and weight, then Confirmation switch press the Confirmation switch. Increases value Decreases value Notes Dial • The setting range is as follows: Age: 12 to 100 (Remifentanil), 16 to 100 (Propofol) Height: 100 to 250 cm Weight: 30.0 to 200.0 kg •...
- Page 37 Operation Procedure Turn the Dial to adjust the target concentration (Cpt or Cet). Increases value Caution • When performing effect-site TCI, it is recommended to set the optimal plasma concentration overshoot before starting. There may be the cases where excessive overshoot in plasma concentration adversely affects the patient, in particular, elderly patients or patients with high blood pressure.
-
Page 38: Priming
Operation Procedure Priming Before connecting the infusion line to the patient, perform priming to extract air from the line. • Press and hold the Purge switch to perform priming. Purge switch Notes • During the priming operation, the buzzer sounds and the operation indicator flashes green. -
Page 39: Inserting A Needle
Operation Procedure Inserting a Needle Check • The pump is stopped. Insert the needle according to the internal hospital procedures. Vein Warning • This product does not have an alarm function to detect extravascular infusion due to intravenous needle coming out of vein. Periodically check the puncture site. - Page 40 Operation Procedure Start Reminder Before the first solution delivery starts (when the pump is ready to start) The Start Reminder message appears flashing in the lower section of the LCD. The buzzer sounds every minute of no operation. * When the target concentration (Cpt or Cet) is 0.0, no message is displayed and no buzzer sounds.
-
Page 41: Changing The Target Concentration (Cpt Or Cet)
Operation Procedure Changing the target concentration (Cpt or Cet) The target concentration (Cpt or Cet) can be changed during solution delivery. During solution delivery, turn the Dial with the graph or text screen displayed to change the target concentration (Cpt or Increases value Cet). -
Page 42: Changing The Decrement Concentration
Operation Procedure Changing the decrement concentration The decrement concentration can be changed. Press the Display select switch twice, then select the Info tab. Display select switch Twice Info tab Press the Confirmation switch to select DECRMNT CON. Confirmation switch Note •... -
Page 43: Changing Scales
Operation Procedure Press the Confirmation switch. Confirmation switch Notes • The display returns to the graph screen after the Confirmation switch is pressed. • The decrement time is updated. Caution • After a certain period of time of no operation in the process, the display changes as described below. In this case, the setting is not applied and the previously set value is restored. - Page 44 Operation Procedure Press the Confirmation switch. Confirmation switch X axis Note • The display returns to the graph screen and the X axis turns dark blue (selected). Turn the Dial to change the scale of the X axis (time). Increases value Decreases value Notes...
-
Page 45: Replacing The Syringe
Operation Procedure Turn the Dial to change the scale of the Y axis (plasma or effect-site concentration). Increases value Decreases value Dial Notes • The scale of the Y axis can be selected from AUTO, 0.1, 0.2, 0.5, 1, 2, 5, 10, 20, 50, 100, 200, 500, 1000, and 2000. - Page 46 Operation Procedure Remove the syringe. Note • For details on removing the syringe, see page 61. Check that the syringe brand to be used matches the syringe brand displayed on the LCD, and then place the syringe. Warning • Before using the TCI mode, make sure the correct drug name, model, and target concentration are displayed.
-
Page 47: Ending The Tci Mode
Operation Procedure Ending the TCI mode Press the Stop switch. Stop switch Note • The buzzer sounds and the operation indicator turns off, then solution delivery stops. Operation indicator Press and hold the Display select switch for 2 seconds or Display more. - Page 48 Operation Procedure Press the Confirmation switch. Confirmation switch Notes • The buzzer sounds. • The TCI mode ends and the menu 1 screen (Dose mode select screen) is displayed. • To use the mg/kg/h+DIPRIVAN mode, see “Selecting Dose Mode (Weight Mode) (except TCI) (Default: disabled)”...
-
Page 49: Turning The Power Off
Operation Procedure Turning the Power Off • When the operation ends, press and hold the Power switch for 3 seconds or more to turn the power off. Power switch Notes • While holding the Power switch, the power off buzzer sounds, then the LCD displays count-down arrows and turns off. -
Page 50: Using Other Dose Modes
• Conduct the self-check (self-diagnosis) of this product without a syringe installed. Otherwise the self-check may not be conducted properly. • Check for any fault by conducting a self-check. If a fault is observed, immediately discontinue use and contact TERUMO trained service technicians. -
Page 51: Setting The Syringe
Operation Procedure Setting the Syringe Close the infusion line and attach a syringe filled with solution to it using aseptic technique. Caution • Only use specified syringes with luer lock for the pump. Pull the clamp forward and turn. Clamp Insert the flange into the slit. - Page 52 Operation Procedure While holding the clutch, move the slider until it meets the Slider hook Slider plunger, and then release the clutch. If the following guidance in the figure below does not Clutch display, perform this step again. Checks • The clutch appearing in the LCD should look as shown below. •...
- Page 53 Operation Procedure Press the Confirmation switch. Confirmation switch Check • The syringe brand and the syringe size are displayed on the LCD correctly. Note • If the flow rate screen appears, go to step 11). Press the Back/Mute switch. Back/Mute switch Turn the Dial or press the Display select switch to select Display select switch the dose mode.
- Page 54 • Even after the syringe is set in the proper position, if any fault is observed, immediately stop using the product and contact TERUMO trained service technicians. • When installing a syringe, make sure that the syringe size and brand displayed on the LCD correspond to the syringe. If they do not correspond with each other, it may cause unintended solution delivery.
-
Page 55: Setting Flow Rate
Operation Procedure Setting Flow Rate Set the flow rate per hour. • Use the Dial to adjust the flow rate in the flow rate screen. Increases value Note • The flow rate screen appears in dark blue (selected). Decreases value Dial Start up icon Notes... -
Page 56: Setting Vtbi
Setting VTBI Set the VTBI for the solution delivery (Default: disabled). To activate this feature, contact TERUMO trained service technicians. Setting VTBI to enable (ON) also sets VTBI time to enabled (ON). Press the Display select switch to select the VTBI display. -
Page 57: Setting Vtbi Time
0.1 mL/h. If the set flow rate is lower than the flow rate of the KVO, solution delivery continues at the set flow rate. If you wish to change the flow rate of the KVO, contact TERUMO trained service technicians. -
Page 58: Priming
• With the Purge switch pressed and held, the volume delivered display shows the volume purged. • The upper limit of purge volume can be set. Contact TERUMO trained service technicians. • The priming function will not work when the syringe pump is stopped by an alarm. -
Page 59: Inserting A Needle
Operation Procedure Inserting a Needle Check • The pump is stopped. Insert the needle according to the internal hospital procedures. Vein Warning • This product does not have an alarm function to detect extravascular infusion due to intravenous needle coming out of vein. Periodically check the puncture site. -
Page 60: Starting Solution Delivery
Operation Procedure Starting Solution Delivery • Check the flow rate setting and press the Start switch to Start switch start solution delivery. Notes • The buzzer sounds. • The operation indicator flashes green. • The volume delivered increases. • Flow rate can be changed during solution delivery. Rotate the Dial in the flow rate display to change the flow rate and the confirmation message appears. -
Page 61: Stopping Solution Delivery
Operation Procedure Stopping Solution Delivery Press the Stop switch. Stop switch Notes • The buzzer sounds and the operation indicator turns off, then the operation stops. • The volume delivered stops increasing. Operation indicator Close the infusion line. Close the three way stopcock. -
Page 62: Replacing Syringe To Continue Solution Delivery
Operation Procedure Replacing Syringe to Continue Solution Delivery Press the Stop switch to stop the solution delivery. Stop switch Note • For details on stopping solution delivery, see page 61. Close the infusion line. Note • For details on stopping solution delivery, see page 61. Remove the syringe. -
Page 63: Turning The Power Off
Operation Procedure Turning the Power Off • When the operation ends, press and hold the Power switch for 3 seconds or more to turn the power off. Power switch Notes • While holding the Power switch, the power off buzzer sounds, then the LCD displays count-down arrows and turns off. -
Page 64: Other Operation Procedures
Other Operation Procedures Clearing the Volume Delivered (except the TCI mode) The volume delivered can be cleared. Press the Display select switch repeatedly until the volume Display delivered display is selected. select switch Note • The volume delivered display appears in dark blue (selected). Volume delivered display Note •... -
Page 65: Standby Function
Notes • The default standby time is 24 hours. To change this, contact TERUMO trained service technicians (the time can be changed to 24 hours or less). • Turning the Dial or pressing any switch cancels standby mode. -
Page 66: Selecting Dose Mode (Drug Library)
The dose mode can be selected from the drug library. Use the dedicated editing software (TERUFUSION Drug Library Manager or TERUFUSION Software Package) for registration. For details, contact TERUMO trained service technicians. Press and hold the Display select switch for 2 seconds or Display more when solution delivery is stopped. - Page 67 • If clinical advisory is set, a message appears. With every press of the Confirmation switch, the screen changes to the input screen of amount and solution, or the input screen of dilution . If you want to set by Dilution, contact TERUMO trained service technicians.
- Page 68 Other Operation Procedures If necessary, turn the Dial to set each parameter (amount, Confirmation switch solution, and weight), and press the Confirmation switch. Increases value Notes • When the dilution is set in the drug library, the dilution parameter cannot be changed.
- Page 69 Other Operation Procedures Check the parameter value and that “OK?” is selected, and Confirmation press the Confirmation switch. switch Notes • When the Confirmation switch is pressed, the flow rate display appears. • When the Display select switch is pressed and info tab is selected, the set information is displayed.
- Page 70 Contact TERUMO trained service technicians for details. • “Pressure alarm” is available in the library as a safety function. See “TERUFUSION Drug Library Manager or TERUFUSION Software Package” or contact TERUMO trained service technicians for details. • “Come and See ME” is available in the library as a special function. See “TERUFUSION Drug Library Manager or...
- Page 71 Other Operation Procedures Turn the Dial to adjust the dosage. Increases value Decreases Flow rate (mL/h) Dosage rate value Dial Notes • The range of the dosage rate is as follows: Dose unit = mL/h : 0.01 to 150.00 mL/h (when using syringe of 5 mL) 0.01 to 300.00 mL/h (when using syringe of 10 mL, 20 mL, 30 mL) 0.01 to 1200.00 mL/h (when using syringe of 50/60 mL) Dose unit = other than mL/h : 0.01 to 999.00...
- Page 72 Other Operation Procedures 10) Check the flow rate setting and press the Start switch to Start switch start solution delivery. Notes • The operation indicator flashes green. • The volume delivered increases. • Even after the setting is completed, the TCI mode select screen appears when the power is turned off and on again.
-
Page 73: Setting Special Functions
Other Operation Procedures Setting Special Functions The following settings are selectable by changing the internal settings of this product. Taking account of a subsequent impact on product performance, contact TERUMO trained service technicians. Setting item Description of function VTBI setting Allows you to set the VTBI. - Page 74 Other Operation Procedures Setting item Description of function Set value memory function Saves the current set values (e.g. flow rate, VTBI, dosage and weight) before the power is turned off.
- Page 75 Other Operation Procedures Selecting Dose Mode (Weight Mode) (except TCI) (Default: disabled) The dose unit setting can be selected. Warning • Be sure to select the mg/kg/h+DIPRIVAN mode when using a Diprivan pre-filled syringe for general anesthetics or sedation. Using the dose modes other than mg/kg/h+DIPRIVAN may cause errors in the flow rate accuracy and alarm function.
- Page 76 * Setting range of the dilution = : 0.01 to 999.00 mg/mL Solution • If you want to set by Dilution, contact TERUMO trained service technicians. • If the Confirmation switch is pressed after setting the drug amount, the input area moves to Solution.
- Page 77 Other Operation Procedures Check the parameter value and that “OK?” is selected, Confirmation press the Confirmation switch. switch Notes • Parameter changes can be identified by the change in background colour on the parameter confirmation screen. • When the Back/Mute switch is pressed on the parameter confirmation screen, the parameter input is cancelled and the screen returns to that of step 3.
- Page 78 • Even after the setting is completed, the TCI mode select screen appears when the power is turned off and on again. • Patient name, Patient ID, Gender, Age, Height and Weight can be acquired via communication with an external device. For the setting method, contact TERUMO trained service technicians.
-
Page 79: Changing Settings On The Menu
Changing Settings on the Menu See pages 15 and 16 for the menu list. Notes • While changing the menu settings, pressing the Start switch does not start solution delivery. • Occlusion detection pressure, keypad lock, bolus, advanced dose mode and combination dose mode on Menu 1 can be selected or set during solution delivery. -
Page 80: Occlusion Detection Pressure
Changing Settings on the Menu Occlusion Detection Pressure The occlusion detection pressure can be set in 10 levels. Setting Occlusion detection pressure Setting Occlusion detection pressure ± 10 kPa ± 70 kPa (Default) ± 20 kPa ± 90 kPa ± 30 kPa ±... - Page 81 Changing Settings on the Menu Turn the Dial or press the Display select switch to select the Display select switch occlusion detection pressure tab Note • The occlusion detection pressure setting display has appeared. Occlusion detection pressure tab Dial Press the Confirmation switch. Confirmation switch Note...
- Page 82 Changing Settings on the Menu Press the Confirmation switch to confirm the selection. Confirmation switch Note • The occlusion icon in the status icon display shows the selected occlusion detection pressure. Occlusion icon...
-
Page 83: Keypad Lock Function
Changing Settings on the Menu Keypad Lock Function The panel operation can be disabled to prevent inadvertent operation while solution delivery is stopped or in-progress. To enable the keypad lock Notes • Even if the keypad lock is enabled, the Power switch and the Start switch can be operated. The keypad lock release operation (press and hold the Back/Mute switch for 2 seconds or more) is also allowed when the keypad lock is enabled. - Page 84 Changing Settings on the Menu Turn the Dial or press the Display select switch to select ON. Display select switch Note • Turning the Dial or pressing the Display select switch moves the white frame. Dial Press the Confirmation switch to confirm the selection. Confirmation switch Checks...
- Page 85 Changing Settings on the Menu To release the keypad lock • Press and hold the Back/Mute switch for 2 seconds or more Back/Mute to release the keypad lock. switch Check • The keypad lock icon has disappeared. 2 seconds or more Note •...
-
Page 86: Bolus (Except The Tci Mode)
Changing Settings on the Menu Bolus (except the TCI mode) The bolus can be performed when solution delivery is in progress or when stopped. There are two ways for selecting bolus either through the menu or pressing the Purge switch while pressing the Back/Mute switch. In addition, every time the Purge switch is pressed while Back/Mute switch is pressed, you can switch between the Hands On Bolus and Hands Free Bolus. - Page 87 • The dose setting (flow rate) of Hands On Bolus remains set, and is used when the next Hands On Bolus is performed, until the power is turned off or the dose mode is switched. • The upper limit of bolus volume can be set. To change this, contact TERUMO trained service technicians.
- Page 88 Changing Settings on the Menu Hands Free Bolus Setting the Bolus VTBI and Bolus VTBI time enables automatic calculation of the Bolus flow rate (mL/h) and execution of bolus infusion without holding down the Purge switch. (Hands Free Bolus function) Press and hold the Display select switch for 2 seconds or Display more.
- Page 89 Changing Settings on the Menu Press the Confirmation switch. Confirmation switch Notes • The bolus setting display appears. • When the flow rate screen is displayed, the Hands Free Bolus screen can be displayed by pressing and holding the Back/Mute switch and pressing the Purge switch twice.
- Page 90 Changing Settings on the Menu Turn the Dial to set the Bolus VTBI time or the Bolus flow rate. Increases value Notes • The Bolus VTBI time or the Bolus flow rate (mL/h) has been calculated from the Bolus VTBI, and is displayed. •...
- Page 91 Changing Settings on the Menu 10) The bolus ends when the VTBI is reached. Check • The screen returns to the flow rate screen when the VTBI has been reached and the bolus has been completed. Notes • The volume delivered display area displays the amount of bolus during bolus infusion, and displays the sum of the amount of bolus and the volume delivered when the VTBI is attained and the bolus ends.
-
Page 92: Maximum Flow Rate Setting (Tci Mode Only)
Changing Settings on the Menu Maximum flow rate setting (TCI mode only) The maximum flow rate can be changed. Press and hold the Display select switch for 2 seconds or Display more. select switch 2 seconds or more Press the Confirmation switch. Confirmation switch Note... - Page 93 Changing Settings on the Menu Press the Confirmation switch. Confirmation switch Turn the Dial to select the maximum flow rate. Increases value Decreases value Dial Note • The upper limit of flow rate can be set within the range of the following values. Setting range: 0.01 to 999.00 mg/kg/h (Propofol) 0.01 to 999.00 μg/kg/min (Remifentanil)
-
Page 94: Plasma Limit Setting (Tci Mode Only)
Changing Settings on the Menu Plasma limit setting (TCI mode only) Before starting solution delivery in effect-site TCI, set the upper limit of plasma concentration for the appropriate level of overshoot. Press and hold the Display select switch for 2 seconds or Display more. - Page 95 Changing Settings on the Menu Turn the Dial or press the Display select switch to select Display select switch Plasma limit. Dial Press the Confirmation switch. Confirmation switch Turn the Dial to set the upper limit of plasma concentration. Increases value Decreases value Dial...
-
Page 96: Advanced Dose Mode
Changing Settings on the Menu Advanced Dose Mode An advanced dose mode can be selected from the three advanced dose modes in the table below according to the selected drug. A library should be registered before selecting the advanced mode. Use the dedicated editing software (TERUFUSION Drug Library Manager or TERUFUSION Software Package) for registration. - Page 97 Changing Settings on the Menu Follow step 1) to 9) on “Selecting Dose Mode (Drug Library)” to select the library name, shown as "Drug2" in the example, and set the dosage rate 1. Notes • When using an advanced dose mode, 0.00 can be set for the dosage rate. •...
- Page 98 Changing Settings on the Menu Press the Confirmation switch. Confirmation switch Note • The available advanced dose modes are displayed. Turn the Dial or press the Display select switch to select the Display select switch advanced dose mode. Note • Turning the Dial or pressing the Display select switch moves the white frame. Dial Press the Confirmation switch.
- Page 99 Changing Settings on the Menu Turn the Dial to input the parameters and press the Confirmation switch. Increases value Notes • With every press of the Confirmation switch, the input area moves to the next one. • When the Back/Mute switch is pressed, the parameter input is cancelled and the screen returns to the previous status.
-
Page 100: History Function
Changing Settings on the Menu History Function With the history function, operation history (such as date, time, set flow rate, when the solution delivery was started or stopped, or when an alarm occurred) can be checked. The latest records of max. 10,000 items are stored. If 10,000 items are exceeded, the records are deleted from the oldest first. - Page 101 Changing Settings on the Menu Turn the Dial or press the Display select switch to select the Display select switch desired operation history. Notes • Turning the Dial or pressing the Display select switch moves the white frame to the next operation history item.
- Page 102 Changing Settings on the Menu Colour of Example of operation history bottom area of Operation status Pink Operation history during stop Pink Blue Operation history during purge or bolus (Hands On Bolus, Hands Free Bolus) Blue Orange Operation history during standby Orange Press and hold the Display select switch for 2 seconds or Display...
-
Page 103: Tci Operation History Function
Changing Settings on the Menu TCI operation history function The TCI operation history provides information such as the starting dates of solution delivery, setting values, and graphs. The latest records of max. 5 items are stored. If 5 items are exceeded, the records are deleted from the oldest first. Note •... - Page 104 Changing Settings on the Menu Turn the Dial or press the Display select switch to select the Display select switch desired operation history. Note • Turning the Dial or pressing the Display select switch moves the white frame to the next operation history item.
-
Page 105: Changing The Sound Volume
Changing Settings on the Menu Changing the Sound Volume The Alarm Volume, the Key Operating Volume, and the Cable Insertion Alarm can be set on 4 levels. Type Volume setting Default setting Note 0 (very low), 1 (low), 2 (medium), 3 (high), Alarm Volume 1 to 3, Step Step (1 ... - Page 106 Changing Settings on the Menu Turn the Dial or press the Display select switch to select an Display select switch item to change. Dial Press the Confirmation switch to confirm the selection. Confirmation switch Note • The display for the item to be changed has appeared. Turn the Dial or press the Display select switch to select the Display select switch volume.
- Page 107 Changing Settings on the Menu Press the Confirmation switch to confirm the selection. Confirmation switch Check • The selected volume is displayed. Press and hold the Display select switch for 2 seconds or Display more to return to the flow rate screen. select switch 2 seconds or more...
-
Page 108: Changing The Brightness
Changing Settings on the Menu Changing the Brightness The brightness can be set in 5 levels (Default: 5). Bright Dark With the Back/Mute switch pressed and held, press and hold Display select switch the Display select switch for 2 seconds or more. Back/Mute switch Note... - Page 109 Changing Settings on the Menu Turn the Dial or press the Display select switch to select a Display select switch brightness level. Notes • Turning the Dial or pressing the Display select switch moves the white frame. • When the white frame is placed on a desired brightness level, the brightness level is shown.
-
Page 110: Setting The Date And Time
Changing Settings on the Menu Setting the Date and Time The date and time can be set. Set year, month, date, hour, and minute. With the Back/Mute switch pressed and held, press and hold Display select switch the Display select switch for 2 seconds or more. Back/Mute switch Note... - Page 111 Changing Settings on the Menu Press the Confirmation switch. Confirmation switch Note • The date setting is confirmed and hour - minute is displayed in dark blue (selected). Turn the Dial to change the time. Increases value Decreases value Dial Note •...
-
Page 112: Profile
Changing Settings on the Menu Profile Profiles allow drugs to be classified according to their use and need to be registered in the drug library software. Selecting a profile can limit the drugs available to each individual profile. Up to 30 profiles can be registered. Profiles can only be selected, if a library is uploaded to the pump. - Page 113 Changing Settings on the Menu Turn the Dial or press the Display select switch to select a Display select switch profile. Note • Turning the Dial or pressing the Display select switch moves the white frame. Dial Press the Confirmation switch to confirm the selection. Confirmation switch Check...
-
Page 114: Communication Environment
Wireless LAN can be turned ON/OFF and the communication environment can be set. Up to 10 communication environments can be registered. Communication environment setting For details about how to register the communication environment setting to the pump unit, contact TERUMO trained service technicians. With the Back/Mute switch pressed and held, press and hold Display select switch the Display select switch for 2 seconds or more. - Page 115 Changing Settings on the Menu Check that “Communication Mode Select” is selected, and Confirmation then press the Confirmation switch. switch Turn the Dial or press the Display select switch to select the Display select switch communication environment you want to set from the list of registered communication environments.
- Page 116 Changing Settings on the Menu Wireless LAN ON/OFF setting Follow Steps 1) to 3) of “Communication Environment” (page 114) to display the communication environment setting screen. Turn the Dial or press the Display select switch to select Display select switch Wireless LAN.
- Page 117 Changing Settings on the Menu Press and hold the Display select switch for 2 seconds or Display more to return to the flow rate screen. select switch 2 seconds or more...
-
Page 118: About External Communication Functions
• Operating time using the internal battery is decreased when using external communication while using with the internal battery. • The specified message (free message function) can be displayed on the pump unit via communication. (For details, contact TERUMO trained service technicians.) -
Page 119: Network System Connection
• When connecting this product with a network, the settings of this product and the network system need to be compatible. Contact a vendor specialist for the correct settings and allow only the system administrator to perform settings. Note • TERUMO cannot guarantee the connection. - Page 120 About External Communication Functions Transmission Procedure When the network system sends an instruction (REQ: REQUEST) to the pump, the pump replies (REP: REPLY) to the instruction. The pump communicates with the network system on the predefined network (TCP Server) over the wireless LAN. The following shows an example of the communication sequence.
- Page 121 About External Communication Functions • Request packet data format The following shows the request packet data format used when a network system (or TERUFUSION Communication Rack System) makes a request to the pump. Request packet data format <?xml version="1.0"?> <REQ> <DEVID></DEVID>...
- Page 122 About External Communication Functions Command Format <Request> The following shows the format of a request command received by the pump. The request command is used as the element of the CMD tag of a request packet format. Request command format Sequence Command SubCommand...
- Page 123 About External Communication Functions Data Format <Requesting basic operating status> • Overview The current basic operating status of the pump is obtained. • Command : 0x01 • SubCommand : 0x0000: Basic operating status is Request. • Data Network system Pump : None Network system : With data (See below.) Pump...
- Page 124 About External Communication Functions Item Size (Byte) Details Power status b0-b3 (low order) Battery level 0x0: (Reserved) 0x1: Remaining battery level, 1 bar 0x2: Remaining battery level, 2 bars 0x3: Remaining battery level, 3 bars 0x4: Remaining battery level, 4 bars 0x5: Remaining battery level, 5 bars 0x6-0xF: (Reserved)
- Page 125 About External Communication Functions Item Size (Byte) Details Unit of dilution 0x12: μg/mL 0x13: mg/mL Invalid value (when the function is disabled): 0x00 Drug library Ver. Version of the drug library Drug library is registered: 0x0001-0xFFFF Drug library is not registered: 0x0000 Drug library number Number of the drug library Selecting dose mode (weight mode) No.1 (μg/kg/min): 0x0FFD...
- Page 126 When the dose mode other than TCI is selected: 0x0000 Volume unit delivered 0x12: μg, 0x13: mg by TCI When the dose mode other than TCI is selected: 0x00 Total number of bytes * For more details, contact TERUMO trained service technicians.
- Page 127 About External Communication Functions Format of Transmitted and Received Packet When a network system communicates with the pump, the monitor obtains the device ID from the pump identifying itself. Then, the monitor starts to communicate with the pump. The following shows the format of communication packet. Device ID request (network system ...
-
Page 128: After Use
• Clean the AC inlet, slider and clutch on a regular basis. Failure to conduct the regular cleaning may result in damage, failure or malfunction to/of this product. • If any parts (clamp, clutch part etc.) of this product need to be removed for cleaning, contact TERUMO trained service technicians. -
Page 129: How To Clean Components
After Use How to Clean Components After use, clean all components as described below. Cleaning the AC inlet Cleaning the outside of the syringe pump and the Dial Lightly wipe off dirt with a cotton swab Wipe with a damp (not wet) soft cloth. or damp cloth (not wet). - Page 130 After Use Cleaning the pole clamp Detach the pole clamp from the pump, and wipe with a damp (not wet) soft cloth. * Do not use ethanol to disinfect the rubber cover ■ and the sliding sites as indicated by Caution •...
-
Page 131: Storage
After Use Storage After inspecting the pump, store it in an environment which conforms to the following storage conditions. Temperature: -20°C to 45°C Humidity: 10% to 95%RH (non-condensing) Atmospheric pressure: 50 to 106kPa (500 to 1060hPa) Ensure that the battery is charged in preparation for it’s next use. Warnings •... -
Page 132: Maintenance And Inspections
Maintenance and Inspection Items by TERUMO Certified Service Technicians Cautions • If any fault is observed, immediately stop using the product and contact TERUMO trained service technicians. • Do not disassemble, make alterations (including actions that interfere with the functionality or performance such as taping the LCD or a movable part) to, or repair this product. -
Page 133: Troubleshooting
Cautions • If the fault persists even after the following measures, a device failure is suspected. Contact TERUMO trained service technicians to request repair. • Even under the same condition, the alarm timing depends on the alarm sensitivity level. - Page 134 Troubleshooting 7) Confirm and restart. Start switch Check the flow rate, VTBI, etc., and resume the solution delivery.
-
Page 135: High Priority Alarm
• The malfunction of the internal • If the problem persists, contact TERUMO trained • Operation indicator: Flashes sensor of the plunger detector service technicians to request repair. red. - Page 136 Troubleshooting Slider Displacement alarm Occurrence Cause Action • LCD: The Slider Displacement • The slider has been displaced during Replace the syringe correctly. alarm display flashes red. solution delivery. (See pages 32 and 51.) • Operation indicator: Flashes 2. Prime the line, ensuring that the red.
- Page 137 (See page 62.) The time from full-press to alarm • Operation indicator: Flashes sounding varies according to the product used. The red. table below shows an example. • Buzzer: Activates. * When new TERUMO syringes are used. • Pump: Stops. 5 mL 10 mL 20 mL 30 mL...
- Page 138 • Operation indicator: Flashes • No AC power supply If the problem still persists, contact TERUMO trained red. • Battery failure service technicians. • Buzzer: Activates. • Sub-battery failure or low •...
-
Page 139: Medium Priority Alarm
(See page 96. For the combination dose mode dose or combination dose setting, contact TERUMO trained service technicians.) mode. • In the TCI mode, the target • Set the target concentration (Cpt or Cet) in the TCI concentration (Cpt or Cet) was mode, then press the Start switch. - Page 140 Troubleshooting No VTBI alarm Occurrence Cause Action • LCD: The No VTBI alarm • The Start switch was pressed • Set a VTBI and press the Start switch to start solution display lights up yellow. without having set a VTBI. delivery.
- Page 141 Troubleshooting Start Reminder Occurrence Cause Action • LCD: The Start Reminder In the TCI mode • If you want to delay operation for a while, press and display lights up yellow. • After solution delivery, the hold the Back/Mute switch for 2 seconds or more to set •...
- Page 142 Troubleshooting Nearly Empty alarm Occurrence Cause Action • LCD: The Nearly Empty alarm • The quantity of the drug • If you want to continue the solution delivery, replace the display lights up yellow. solution is low. syringe. (See page 62.) •...
-
Page 143: Other Problems
Troubleshooting Other problems When installing a syringe: Plunger displaced Occurrence Cause Action • LCD: [Place the syringe.] • The plunger has been • Place the syringe correctly. (See pages 32 and 51.) displaced. Slider displacement icon flashes. When installing a syringe: Syringe displaced Occurrence Cause Action... - Page 144 Troubleshooting Maintenance timer Occurrence Cause Action • The Maintenance timer • It is time to perform • Contact TERUMO trained service technicians. indicator lights up. maintenance. AC power detector function Occurrence Cause Action • The pump cannot be turned on •...
- Page 145 • The brightness becomes two levels lower during using the internal battery internal battery operation or night mode operation. • The equipment is in the night • If it is not the case, contact TERUMO trained service mode. (When the night mode technicians. is enabled) •...
-
Page 146: Specifications
Bơm tiêm vô trùng được chỉ định cho dùng chung và bơm tiêm có sẵn dịch. Cỡ bơm tiêm 5 mL, 10 mL, 20 mL, 30 mL, 50/60 mL Nhãn hiệu bơm tiêm TERUMO hoặc các nhãn hiệu khác Chế độ liều mL/h μg/kg/min*... - Page 147 (The hourly precision after one hour has passed since the start of solution delivery, in the case where water or a physiological saline solution is used with a TERUMO 50/60 mL syringe made in the Philippines (TERUMO_P) at a flow rate of 1.00 mL/h or more (ambient temperature: 23±2°C) according to IEC 60601-2-24:2012 (EN 60601-2-24:2015) standard.)
- Page 148 Specifications Alarms Occlusion alarm, Pressure alarm* , Nearly Empty alarm, Slider Displacement alarm, Syringe Barrel Detection alarm, Syringe Displacement alarm, Plunger Displacement alarm, Battery alarm, Re-alarm, Shutdown Notice alarm, Power Failure alarm, Start Reminder, No Flow Rate alarm, No VTBI alarm* , Flow Rate/VTBI Volume Judgment alarm* , Completion alarm*...
- Page 149 Specifications Available Stop transition buzzer Buzzer sounds when the Stop switch is pressed during solution delivery. Functions sound function LCD brightness select Changes the LCD brightness. function Maintenance timer Time to next maintenance check can be set. That information is displayed on function the LCD.
- Page 150 Specifications Available Power OFF buzzer Buzzer sounds as the power is turned off. Functions sound function Dose mode select The dose mode can be selected among mL/h, μg/kg/min, mg/kg/h, function mg/kg/h+DIPRIVAN, TCI, and drug library. Start-up dose mode The initial dose mode after the power is turned on can be selected from mL/h, select function μg/kg/min, mg/kg/h, mg/kg/h+DIPRIVAN, TCI, and drug library.
- Page 151 Wireless LAN Hereby, TERUMO CORPORATION declares that this TERUFUSION Syringe Pump Type SS3 OTCI is in compliance with the essential requirements and other relevant provisions of Directive 2014/53/EU. • Transmit frequency or frequency band: 2412 to 2472 MHz •...
- Page 152 IEC 60601-1-8:2006+A1:2012 (EN 60601-1-8:2007+A1:2013) IEC 60601-2-24:2012 (EN 60601-2-24:2015) MDD (Medical Device Directive) 93/42/EEC (Class IIb) Note • If an AC power cable is not included with the pump unit, please contact TERUMO trained service technicians to receive the cable suited for your region.
-
Page 153: Units Available
• Separate setup procedures are required for the product with voltage-plug combinations other than listed above. • If an AC power cable is not included with the pump unit, please contact TERUMO trained service technicians to receive the cable suited for your region. -
Page 154: Device Characteristics
Start-up curves and trumpet curves, which are used as typical explanations of flow rate characteristics, are shown. The data below is representative examples measured for flow rates of 1 mL/h and 5 mL/h with a new TERUMO syringe (50 mL). -
Page 155: Occlusion Characteristics
The data below is a representative example measured for flow rates of 1 mL/h and 5 mL/h, with a three-stage occlusion pressure setting value (1, 6, 10), and a new TERUMO syringe (50 mL). The measured values may vary depending on the test conditions. -
Page 156: For Medical Staff
For Medical Staff EMC Technical Information Medical electrical equipment requires particular care in regards to EMC, and it is necessary to install and use the equipment in accordance with the following EMC information. Cautions • Ensure that the power cable used is the one provided for this product. If not, this product’s emissions may increase and its immunity may decrease. - Page 157 For Medical Staff Table 201 – Guidance and manufacturer’s declaration – electromagnetic emissions – for IEC 60601-1-2:2007 (EN 60601-1-2:2007) for all EQUIPMENT and SYSTEMS (see 5.2.2.1 c) Guidance and manufacturer’s declaration – electromagnetic emissions The TERUFUSION Syringe Pump Type SS3 OTCI is intended for use in the electromagnetic environment specified below. The customer or the user of the TERUFUSION Syringe Pump Type SS3 OTCI should assure that it is used in such an environment.
- Page 158 For Medical Staff Table 203 – Guidance and manufacturer’s declaration – electromagnetic immunity – for IEC 60601-1-2:2007 (EN 60601-1-2:2007) for LIFE-SUPPORTING EQUIPMENT and SYSTEMS (see 5.2.2.2) Guidance and manufacturer’s declaration – electromagnetic immunity The TERUFUSION Syringe Pump Type SS3 OTCI is intended for use in the electromagnetic environment specified below. The customer or the user of the TERUFUSION Syringe Pump Type SS3 OTCI should assure that it is used in such an environment.
- Page 159 For Medical Staff Table 205 – Recommended separation distances between portable and mobile RF communications equipment and the EQUIPMENT or SYSTEM – for IEC 60601-1-2:2007 (EN 60601-1-2:2007) for LIFESUPPORTING EQUIPMENT and SYSTEMS (see 5.2.2.2) Recommended separation distances between portable and mobile RF communications equipment and the TERUFUSION Syringe Pump Type SS3 OTCI The TERUFUSION Syringe Pump Type SS3 OTCI is intended for use in an electromagnetic environment in which radiated RF disturbances are controlled.
- Page 160 For Medical Staff Table b) – Manufacturer’s declaration – electromagnetic immunity – for IEC 60601-1-2:2014 (EN 60601-1-2:2015) Manufacturer’s declaration - electromagnetic immunity The TERUFUSION Syringe Pump Type SS3 OTCI is intended for use in the electromagnetic environment specified below. The customer or the user of the TERUFUSION Syringe Pump Type SS3 OTCI should assure that it is used in such an environment.
-
Page 161: Symbols
Symbols This section describes the symbols (icons) used with the TERUFUSION Syringe Pump Type SS3 OTCI. Description of Symbols Description of Description of Description of Symbol Symbol Symbol Symbols Symbols Symbols “CE” means compliance Purge Atmospheric pressure with the European limitation Directive 2011/65/EU on the restriction of the use... -
Page 162: Other Information
Simplified EU Declaration of Conformity (Radio Equipment Directive, 2014/53/EU) Simplified EU Declaration of Conformity (Radio Equipment Directive, 2014/53/ Hereby, TERUMO CORPORATION declares that the radio equipment type TERUFUSION Syringe Pump Type SS3 OTCI is in compliance with Directive 2014/53/EU. The full text of the EU declaration of conformity is available at the following internet address: http://www.terumo-europe.com... -
Page 163: Memo
Memo... -
Page 164: For Information About Terumo Products
44-1, 2-CHOME, HATAGAYA, SHIBUYA-KU, TOKYO 151-0072, JAPAN TERUMO EUROPE N.V. EC REP INTERLEUVENLAAN 40, 3001 LEUVEN, BELGIUM MADE IN JAPAN is a trademark of TERUMO CORPORATION. IrDA is a trademark or registered trademark of Infrared Data Association. ® : Registered trademark ©TERUMO CORPORATION 2019-08-01 19G01...
Need help?
Do you have a question about the TERUFUSION TE-SS830P and is the answer not in the manual?
Questions and answers