Table of Contents
Advertisement
Quick Links
Advertisement
Table of Contents

Related Manuals for RADWAG C315 Series


Summary of Contents for RADWAG C315 Series
- Page 2 APRIL 2021...
- Page 3 PRECAUTIONS Prior to installation, use or maintenance activities, carefully read this user manual and follow the provided guidelines. Prior to the first use, carefully read this user manual. Use the weighing device only as intended. Place weighed loads in the centre of the weighing pan. Load the weighing pan with loads of gross weight which does not exceed the maximum capacity.
-
Page 4: Table Of Contents
CONTENTS 1. INTENDED USE ..............................5 2. WARRANTY CONDITIONS ..........................5 3. MAINTENANCE ACTIVITIES ..........................5 3.1. Cleaning ABS Components......................... 6 3.2. Cleaning Stainless Steel Components ......................6 4. SERVICE AND REPAIR ............................. 6 5. RECYCLING ............................... 7 6. MECHANICAL DESIGN ............................. 7 6.1. -
Page 5: Intended Use
1. INTENDED USE C315 series scales enable fast and accurate mass measurement in laboratory and industry. They feature plastic housing and backlit LCD. The devices are equipped with an internal battery which allows their operation in places where there is no access to the mains. Standard C315 scales feature RS232 interface for communication with external devices (printer, computer, etc.) and offers... -
Page 6: Cleaning Abs Components
In case of any sign of damage, it is necessary to disconnect the device form the mains immediately. The damaged component must be replaced or repaired by RADWAG service immediately. In case of any problems with correct operation of the scale, contact the closest manufacturer's service point. -
Page 7: Recycling
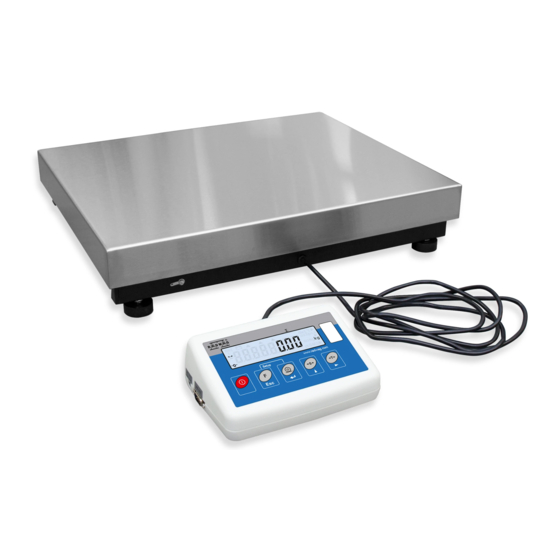
5. RECYCLING C315 scales must be recycled, they are not to be treated as a regular household waste. Scales to be decommissioned must be decommissioned in accordance with valid legal regulations. 6. MECHANICAL DESIGN 6.1. 1-Load-Cell Scales 1-load-cell scale C315 is intended to carry out fast and precise mass measurement of up to 300 kg loads. -
Page 8: Multiple Load Cell Scales
6.2. Multiple Load Cell Scales Multiple load cell scale C315 is intended to carry out fast and precise mass measurement of large loads. Its characteristic feature is a platform equipped with numerous load cells, usually four. The platform, depending on a scale model, is made of stainless steel or powder-coated steel, it features customized mechanical design suiting particular customer’s requirements (pallet, beam, platform scales). -
Page 9: Dimensions
Scale design, the main components: 1 - module, 2 - junction box. 6.4. Dimensions For overall dimensions, read product card of a respective scale, the product cards are to be found on RADWAG website www.radwag.com. 6.5. Connectors Arrangement 1 – power supply socket 3 –... -
Page 10: Pins Arrangement
6.6. Pins Arrangement Pin2 – RxD Pin3 – TxD RS232 (1) connector DB9/M (male) Pin4 – 5VDC Pin5 – GND Pin2 – RxD Pin3 – TxD RS232 (2) connector DB9/M (male) Pin4 – 5VDC Pin5 – GND 6.7. Operation panel Keys: Press to switch the weighing device on/off –... -
Page 11: Scale Installation
Upon pressing keys combination, functions of given keys change. Detailed information concerning use of the above keys combination is to be found further down this manual. 7. SCALE INSTALLATION 7.1. Unpacking and Installation Mind not to damage cable connecting the indicator and a weighing platform. -
Page 12: C315.4 Series
D. Fix the post to the scale, next fix the indicator to the post: E. Lead the cable (in excess) into the post, next fix the support foot under the post: 7.1.3. C315.4 Series A. Take the device out of the packaging (pallet). B. -
Page 13: Levelling
D. Fix the feet (if not installed): 7.2. Levelling 7.2.1. Levelling: 1-Load-Cell Platform Scales To level the weighing instrument turn its feet. Keep turning the feet until the air bubble takes central position: 7.2.2. Levelling: 4-Load-Cell Platform Scales To level the platform use the levelling feet and the level indicator. Each foot can be turned left and right, turning causes tilt. -
Page 14: Start-Up
7.3. Start-Up The weighing device can be connected to the mains only with a power supply that comes standard with the particular model. Nominal voltage of the power supply (specified on the power supply data plate) has to be compatible with the mains nominal voltage. -
Page 15: Operating The Menu
Battery power supply. Battery power given in %. Battery charge in progress. The device is connected to the power supply CHArGE charging the battery. -Err5- Battery error. Battery is damaged. Next, the home screen is displayed automatically. 8. OPERATING THE MENU In order to navigate the menu use the operation panel. -
Page 16: Weighing
9. WEIGHING Load the weighing pan. Read the result when stability marker is displayed. To assure long-term operation and correct mass measurements, follow the rules presented below: Avoid applying mechanical shocks to the weighing pan. Place the loads centrally on the weighing pan (eccentricity errors are specified by PN-EN 45501 standard, point 3.6.2). -
Page 17: Diagrams Of Connection Cables
pallet scales (load placed on EUR-pallet using pallet truck); middle block of pallet placed on the scale must remain unsupported: 10. DIAGRAMS OF CONNECTION CABLES Scale - computer cable Scale - printer cable (EPSON) -
Page 18: Technical Specifications
11. TECHNICAL SPECIFICATIONS For technical specifications of respective scales go to RADWAG website www.radwag.pl. 12. TROUBLESHOOTING Problem Cause Solution Power supply disconnected. Connect the power supply to the scale. Connect the power supply to the mains, Battery discharged. Scale start-up fail. -
Page 19: Error Messages
13. ERROR MESSAGES - E r r 2 - Value beyond zero range. - E r r 3 - Value beyond tare range. Adjustment weight or start mass out of range (1% for adjustment weight, 10 - E r r 4 - for start mass).
Need help?
Do you have a question about the C315 Series and is the answer not in the manual?
Questions and answers