formlabs Form Cure Manual
Desktop stereolithography post-cure chamber
Hide thumbs
Also See for Form Cure:
- Quick start manual (8 pages) ,
- Installation and usage instructions (40 pages)
Table of Contents
Advertisement
Advertisement
Table of Contents

Related Manuals for formlabs Form Cure


Summary of Contents for formlabs Form Cure
- Page 1 Manual Form Cure...
- Page 3 Installation and Usage Instructions Form Cure Desktop Stereolithography Post-Cure Chamber Original English instructions and translations Please read this manual carefully and keep it for future reference. November 2019 REV 01 © Formlabs...
-
Page 4: Table Of Contents
Unboxing the Form Cure . . . . . . . . . . . . . . . . . . - Page 5 Troubleshooting and Repair . . . . . . . . . . . . . . . . . . . . . . . . . . . . . . . . . . . . . . . . . . . . . . 26 Restarting with a Power Cycle .
- Page 7 Neither Formlabs nor any of its affiliates or subsidiaries shall be responsible or liable for misuse of the information that is contained herein. If you have any suggestions for improvements or amendments or have found errors in this publication, please notify us.
-
Page 8: Preface
The Form Cure shall only be used by persons who have fully read and understood the contents of this usage manual. Ensure that each person who uses the Form Cure has read these warnings and instructions and follows them. - Page 9 Formlabs and supersedes all prior or contemporaneous communications, proposals and agreements, whether electronic, oral or written, between you and Formlabs. Read the warranty for more details on the Formlabs warranty for your region: formlabs.com/support/terms-of-service/#Warranty EU (EN) formlabs.com/support/terms-of-service/eu/...
-
Page 10: Introduction
Introduction Intended Use The Form Cure provides the light and heat necessary to post-cure 3D printed parts to their optimal properties. The final performance characteristics of cured photopolymer resin may vary according to your compliance with the instructions for use, application, operating conditions, material combined with, end use, or other factors. -
Page 11: Technical Specifications
Technical Specifications Shipping Weight 7.3 kg (16.1 lb) Product Weight 5.6 kg (12.4 lb) Shipping Dimensions 35.4 × 35.4 × 45.6 cm (14 × 14 × 18 in) Product Dimensions 26.2 × 26.2 × 34.0 cm (10.3 × 10.3 × 13.4 in) Minimum Space Requirement 26.2 ×... -
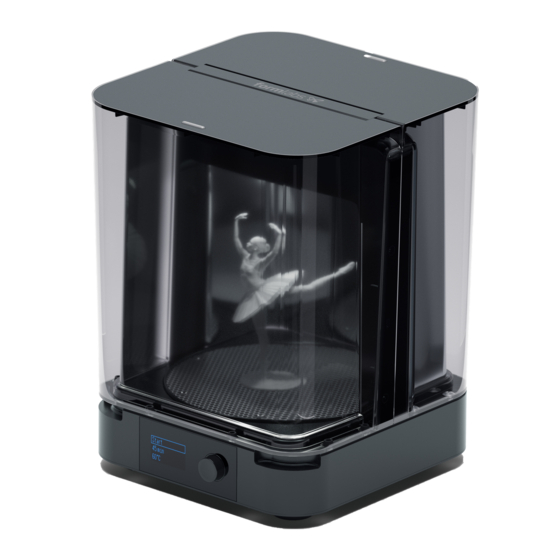
Page 12: Product Elements
See 10 Glossary for full product terminology. Form Cure Controls When connected to power, use the knob to program and operate the Form Cure: • Rotate the knob counterclockwise or clockwise to move between items in the menu. • Press the knob to select an option on the display. -
Page 13: Safety Warnings
3.1.2 Hot Surfaces The Form Cure contains a 100 W heater to help ensure parts are strong after post-curing. While the heater and fan designs limit overheating and the heater is insulated to contain heat, surfaces of the Form Cure and printed parts may be hot during and after use. - Page 14 3.1.3 Light and Heat The Form Cure uses heat and 405 nm light to post-cure 3D printed parts. The cover includes an interlock system that is designed to automatically pause heating and extinguish the cure lights when the cover is open.
-
Page 15: Personal Protective Equipment (Ppe)
Beware of flying debris. Wear eye protection and gloves to protect the skin and eyes. CAUTION Specifications of Tools to be Used The Form Cure shall only be used with supplied accessories and additional tools recommended by Formlabs. Third-party accessories and materials may cause damage. Purchase additional supplies: •... -
Page 16: Preparation And Setup
To fully open, the Form Cure requires an additional clearance of 30 cm (12 in) above the unit for a total clearance height of 64 cm (25.2 in). The Form Cure unit weighs 5.6 kg (12.4 lb). -
Page 17: Transporting Form Cure
The Form Cure is ready to use once the turntable is installed and the power is connected. Each cycle requires time to preheat before the 405 nm lights begin post-curing. The preheating time depends on the current temperature and the target post-cure temperature. -
Page 18: Using The Form Cure
5.4 Time and Temperature Settings for specific post-cure settings for each resin type. The printed part must be in the Form Cure while it heats. If the part is not placed in the Form Cure until preheating is complete, it may cause cracking. -
Page 19: Considerations For Specific Geometries
Plan for Large or Long Parts The Form Cure turntable has a diameter of 19.3 cm (7.6 in), and the maximum part height that can be post-cured in the Form Cure is 18.5 cm (7.3 in). Most parts should be post-cured before removing support structures to preserve their shape and prevent warping. -
Page 20: Time And Temperature Settings
When choosing to modify the recommended post-cure settings, the material must be able to withstand the temperature and maintain a stable material structure. Formlabs resins are designed for printing and post-curing with 405 nm light. resin type cure time (min) temperature (°C) -
Page 21: Device Management
This cure setting ensures that parts achieve both biocompatibility and optimum mechanical properties. Fill a glass container with glycerin. Preheat the glycerin to 80 °C in the Form Cure. Use heat resistant silicone tongs to fully submerge the assembled denture in the glycerin, leaving the container inside the Form Cure. Cure for 30 minutes. -
Page 22: Emergency And Exceptional Situations
(IPA) evaporate rapidly, so keep bottles closed whenever possible. Promptly clean and inspect the Form Cure if any liquid resin spills on or in it to minimize any cosmetic or functional damage to the device. If you have experienced an accidental resin spill, document the problem with photos and clean the unit as best as possible. -
Page 23: Maintenance
6.2.1 Turntable Maintenance The Form Cure relies on the turntable’s rotation to expose part surfaces to even amounts of light and heat. The turntable must have sufficient clearance to continue rotating. Periodically lift the turntable to inspect underneath it for small pieces of cured resin. Remove particles of cured resin from above and below the turntable to ensure the turntable can rotate without interruption. -
Page 24: Monthly Inspection And Maintenance Tasks
6.3.2 Light Diffuser Maintenance The 405 nm and white secondary LEDs in the Form Cure are covered by frosted light diffusing panels. These light diffusers spread the light from the LEDs and ensure that parts post-cure evenly. If the light diffusers are damaged or covered, parts may not post-cure properly. - Page 25 To update the firmware: 1. Connect the Form Cure with a USB cable to a computer running the latest version of PreForm. 2. Locate and run the Form Wash/Cure Updater tool in the PreForm installation folder to check for firmware updates and to update the firmware.
-
Page 26: Troubleshooting And Repair
3. Reconnect the power cable to restart the unit. Troubleshooting In the case of an error or abnormal activity with the Form Cure, reference the following errors, causes, and proposed solutions. Complete the initial troubleshooting steps and carefully document all results. Contact Formlabs or an authorized reseller for additional assistance. -
Page 27: Disassembly And Repair
Disassembly and Repair All steps that involve opening the Form Cure and/or investigating internal components should be done by skilled persons under the guidance of Formlabs or a NOTICE certified service provider. Contact Formlabs or a certified service provider to receive repair instructions and authorization. -
Page 28: Disposal
8.1.2 Disposal of packaging waste Keep the packaging for transporting your Form Cure. Form Cure packaging materials are designed to be kept and reused for transportation or shipping. The packaging is made of cardboard and plastic-based materials. Dispose of packaging through your local waste and recycling facilities. -
Page 29: Index
Index clean 14, 16, 22, 23, 24 safety 7, 8, 10, 13, 14, 19, 22, 30 cleaning 13 Safety Data Sheet 14 comply 10, 14 SDS 14, 22 compliance 8, 10 shipping 17, 28 cover 12, 14, 16, 17, 18, 19, 23, 24, 26, 30 solvent 18, 22, 27 specifications 10 display 12, 18, 21, 22, 24, 26, 27, 30 technical data 10, 21 temperature 12, 17, 18, 19, 20, 26, 30... -
Page 30: Glossary
The turntable is perforated to allow light to reach all surfaces of printed parts in the Form Cure. USB port The Form Cure can connect to a computer via USB. The port is connected to the motherboard and can be accessed from the back of the machine. - Page 31 Index | 31...
Need help?
Do you have a question about the Form Cure and is the answer not in the manual?
Questions and answers