Table of Contents
Advertisement
Quick Links
Examine all packaging material for small parts that may have come loose during shipment. Periodic checks are recommended to insure that all components are
in proper posi�on, �ght and free from damage. Keep this assembly instruc�on for future reference. Adult assembly is required. The product of Hillsdale Furniture,
LLC is designed for residen�al use only. Customer Service Phone Number: 502-562-0000
CODE
QTY
1
19
M6 x 30mm Allen Bolts
2
19
Spring Washers
3
19
Wood Dowels
4
3
Cam Locks
5
3
Cam Lock Pins
6
1
Allen Wrench
7
14
25mm Pan Head Bolts
8
8
25mm Wood Screws
9
30
16mm Wood Screws
10
6
Knobs
11
8
Shelf Supports
WARNING
• Do not let any sharp objects touch or rub the surface of
the product.
• When assembling, do not let children play around the
working area.
• Please confirm all parts are correct before star�ng the
assembly process.
• Do not �ghten all bolts and screws completely un�l the
en�re unit has been assembled and set up.
• Be careful if using power tools as they can over �ghten
screws and strip threads.
C
CARE & MAINTENANCE: The touch of a so� cloth is all the maintenance the finish will ever need. Please do not use harsh or abrasive cleaners for polishing, as they may
cause damage to the finish. Periodic checks are recommended to make sure that all hardware is securely �ghtened.
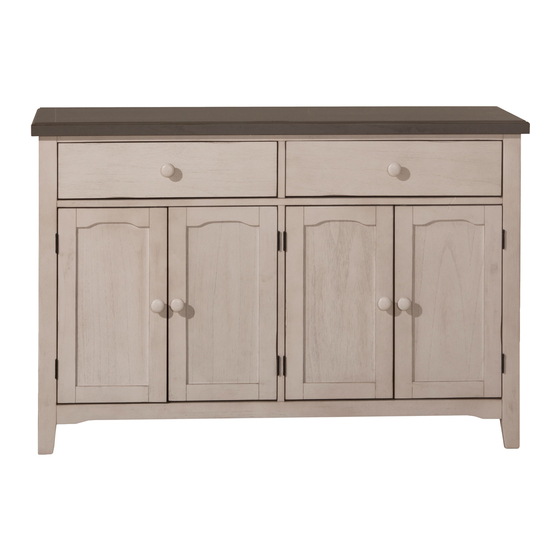
Clarion Sideboard
Model #103740-111430
HARDWARE
A
M
M
B
CODE
QTY
COMPONENTS
A
1
Top
C
1
Le� Side Panel
E
1
Middle Panel
G
1
Back Top Rail
I
2
Shelves
K
1
Le� Back Leg
M
2
Drawer Fronts
O
2
Right Drawer Sides
D
Date:07-20-2017
Page 1 of 7
CODE
QTY
COMPONENTS
B
1
Front Panel
D
1
Right Side Panel
F
1
Bo�om Panel
H
1
Back Panel
J
2
Wine Holders
L
1
Right Back Leg
N
2
Le� Drawer Sides
P
2
Drawer Back Panels
Q
2
Drawer Bo�om Panels
HDFBP
Advertisement
Table of Contents

Subscribe to Our Youtube Channel
Related Manuals for Hillsdale Furniture Clarion Sideboard


Summary of Contents for Hillsdale Furniture Clarion Sideboard
- Page 1 Examine all packaging material for small parts that may have come loose during shipment. Periodic checks are recommended to insure that all components are in proper posi�on, �ght and free from damage. Keep this assembly instruc�on for future reference. Adult assembly is required. The product of Hillsdale Furniture, LLC is designed for residen�al use only.
- Page 2 Clarion Sideboard Date: 07-20-2017 Page 2 of 7 Model #103740-111430 FIGURE 1 STEP 1 - Figure 1 Begin assembly by a�aching Middle Panel (E) to Front Panel (B) using 3 Cam Locks (4) and 3 Cam Lock Pins (5). FIGURE 2 STEP 2 - Figure 2 A�ach Bo�om Panel (F) to Front Panel (B) using...
- Page 3 Clarion Sideboard Date: 07-20-2017 Page 3 of 7 Model #103740-111430 FIGURE 3 STEP 3 - Figure 3 Secure Bo�om Panel (F) to Front Panel (B) using 2 Allen Bolts (1) and 2 Spring Washers (2) and to Middle Panel (E) using 2 Allen Bolts (1) and 2 Spring Washers (2).
- Page 4 Clarion Sideboard Date: 07-20-2017 Page 4 of 7 Model #103740-111430 FIGURE 5 STEP 5 - Figure 5 A�ach Back Top Rail (G) to Le� Side Panel (C) using 2 Wood Dowels (3). A�ach Back Top Rail (G) to Center Panel (E) using 2 Wood Dowels (3). A�ach Back Top Rail (G) to Right Side Panel (D) using 2 Wood Dowels (3).
- Page 5 Clarion Sideboard Date: 07-20-2017 Page 5 of 7 Model #103740-111430 STEP 7 - Figure 7 A�ach Top (A) to assembly using 2 FIGURE 7 Wood Dowels (3) each in the Le� Side Panel (C), the Middle Panel (E), and the Right Side Panel (D). Secure...
- Page 6 Clarion Sideboard Date: 07-20-2017 Page 6 of 7 Model #103740-111430 STEP 10 - Figure 10 FIGURE 10 A�ach Back Panel (H) to assembly using 22 Screws (9). STEP 11 - Figure 11 Assemble drawers by a�aching Le� Drawer Sides (N) and Right Drawer Sides (O) to Drawer Fronts (M) with 2 Screws (8) per side.
- Page 7 Clarion Sideboard Date: 07-20-2017 Page 7 of 7 Model #103740-111430 FIGURE 13 FIGURE 14 STEP 13 - Figure 13 Screw Knobs (10) in to place on drawers. STEP 14 - Figure 14 Screw Knobs (10) in to place on cabinet doors.
Need help?
Do you have a question about the Clarion Sideboard and is the answer not in the manual?
Questions and answers