Advertisement
Quick Links
Advertisement

Related Manuals for Audipack VCCL Series


Summary of Contents for Audipack VCCL Series
- Page 1 VCCL Installation manual Montage handleiding Camera Ceiling lift © Audipack...
- Page 2 This type of camera lift is specifically designed for larger dual camera systems. Alvorens te installeren kijk goed wat de voorzijde (lenszijde) van de lift is. Zorg dat de camera in het zwaartepunt gemonteerd wordt van de lift! Dit type lift is specifiek ontworpen voor dual camera Systemen.
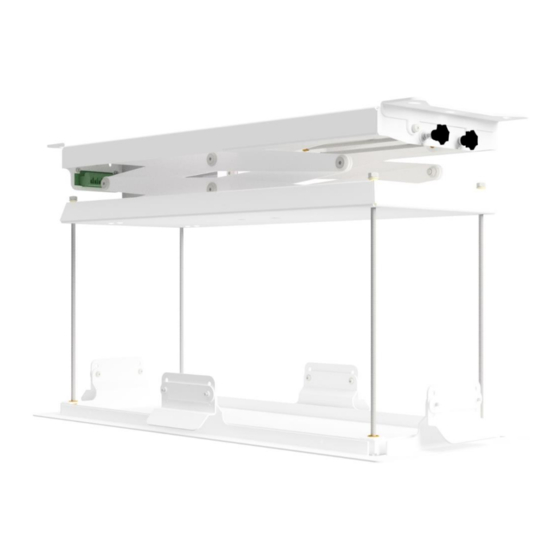
- Page 3 Mount the ceiling lift with the flanges to the constructive ceiling. Make sure the lift is mounted level. Before installing the lift, please check first the front / lens side of the lift. • Install the lift with all 4 mounting points •...
- Page 4 Bottom frame fastening material. Onderframe montage materiaal. Vulbus/Spacer Ø 6.2x10x30 Sluitring/Washer M6 DIN 125 (8X) Moer/Nut M6 DIN 934 (12X) Zelfborgende moer/Selflocking nut M6 DIN 985 (4X) Zeskantbout/Hexagon bolt M6x20 DIN 933 (4X) Draadeind/Threaded rod M6 DIN 975 (4X) Remote control (optional) Afstandsbediening (optioneel).
- Page 5 Mount the threaded rods on the lower frame of the lift as shown. Monteer de draadeinden aan het onderframe zoals weergegeven..
- Page 6 Make a cut-out of at least 594 x 244mm in the ceiling. Mount the finishing frame flush to the false ceiling. Maak een uitsparing van minimaal 594 x 244mm in het plafond. Monteer het afwerkframe gelijk aan het verlaagd plafond.
- Page 7 Electrical connections. Elektrische aansluitingen. 261325 261324 660160...
- Page 8 Adjustable maximum running time Pulse /continuous when no limit switch is activated Manual control switches Not applicable Limit switch down (NC) Input control Limit switch up (NC) “dry contacts” Power input 24 VDC DC-motor output Short circuit if not connected External circuit breaker or emergency stop...
- Page 9 Use turning knobs to fine tune stroke limits. Turn CW = + CCW=- Gebruik draaiknoppen om eind posities nauwkeurig af te stellen. Draai Rechtsom =+ Linksom=- Adjustment limit UP Adjustment limit DOWN Limiet NAAR BOVEN Daallimiet BENEDEN...
- Page 10 Technical specifications: Max. load 10 Kg incl. ceiling tile and panels Guide the camera cable free form moving parts of the lift Install the camera in the poit of gravity of the lift. Warning: Do not hold back the lift while lowering because the chain will remove it selve from the drive unit.
- Page 11 Audipack reserves the right to make changes in specifications and other information contained in this document without prior written notice. The information provided herein is subject to change without notice. In no event shall Audipack be liable for any incidental, special, indirect, or consequential damages whatsoever, including but not limited to lost profits, arising out of or related to this manual or the information contained herein, even if Audipack has been advised of, known, or should have known, the possibility of such damages.
Need help?
Do you have a question about the VCCL Series and is the answer not in the manual?
Questions and answers