Advertisement
Quick Links
Making British gardens great
Thank you for purchasing your summerhouse from Forest Garden. Simply follow these step by step instructions
and our top tips and you'll be enjoying your summerhouse for many years to come. If you have any questions or
need advice, our friendly team is here to help.
SUMMERHOUSE
INSTRUCTIONS
SIZE RANGE
Missing something?
Call our aftersales team on
0333 777 7089
Forest Garden, Oak Drive, Hartlebury Trading Estate, Hartlebury, Worcestershire, DY10 4JB
(7x5, 7x7, 8x6)
Need more information?
Call our technical team on
0333 321 3142
OPASUM75M FIXING PACK CODE: MSUM75FP
OPASUM77M/OPASUM86M FIXING PACK CODES: MSUM7786FP
OPASUM77M/OPASUM86M TRUSS FIXING PACK CODE: STPK27
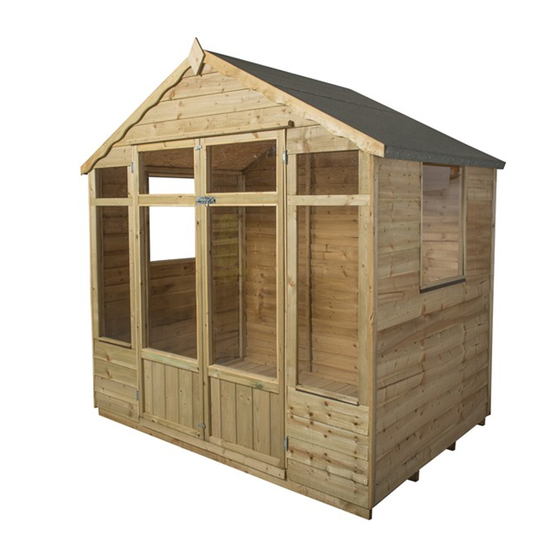
Example of 7x5 Summerhouse
Visit our website for spare
instructions and more
information
www.forestgarden.co.uk
G
ISSUE: 0121
Advertisement

Related Manuals for Forest OPASUM75M


Summary of Contents for Forest OPASUM75M
- Page 1 OPASUM77M/OPASUM86M TRUSS FIXING PACK CODE: STPK27 Thank you for purchasing your summerhouse from Forest Garden. Simply follow these step by step instructions and our top tips and you’ll be enjoying your summerhouse for many years to come. If you have any questions or need advice, our friendly team is here to help.
-
Page 2: Health And Safety
Although this is a generic set of instructions, the fixing pack contents are specific to your chosen summerhouse size and are listed below. The fixing pack codes are listed on the front page. OPASUM75M FIXING PACK If you have purchased the 7x5 summerhouse, your specific contents are listed below. You will have a slightly different roof assembly compared to the 7x7 and 8x6. -
Page 3: Before You Start
BEFORE YOU START Please read through these instructions to familiarise yourself with your summerhouse. We recommend that you check all the components using the lists found on the front and back pages before you start to build. All of our summerhouses are constructed in the same way. They simply come with different components depending on the type of summerhouse you have. - Page 4 CARE & ATTENTION To help you get the most out of our products it’s useful to know a little more about the properties of timber, what’s normal and how your summerhouse may behave as the seasons change. Wood is an extremely durable material for construction but as a natural product when used outdoors it is susceptible to changes in the environment.
- Page 5 IDENTIFY YOUR SUMMERHOUSE From the section layout below, identify your summerhouse based on the width and depth dimensions of your summerhouse – eg 7x5. You’ll need this to identify the side panel positions. 1.5ft Panel (442 x 1603mm) 2ft Panel (609 x 1603mm) PLEASE NOTE (Window) The summerhouse are made up of...
- Page 6 CONSTRUCTION PRE-DRILL FLOORS & SIDES WITH 2MM BIT FOR ALL STEPS BELOW. Position the floor in your desired location. If you have 2 Layout the panels around your We recommend to start in a back floors, turn the floors upside down to secure the sections summerhouse base.
- Page 7 WINDOWS Fix interior sills at the base of windows with L-brackets and screws at a Secure windows by screwing through the window cover strips and 1002mm distance from the floor. Repeat this for multiple windows, as shown window into the panel frame. Screw into the bottom and top of below.
- Page 8 COVER AND DOOR STRIPS PRE-DRILL WITH 2MM BIT FOR ALL STEPS BELOW. Attach the cover strips onto Attach the cover strips onto the Secure the door weather strips. Ensure Secure the door hinge strips. the corners. Ensuring they are adjoining panels. Ensuring it is they’re flush to the floor and against the Ensure they’re in contact with the flush to the bottom edge of the...
- Page 9 ROOF STRUCTURE PRE-DRILL 7X5 ROOF ASSEMBLY WITH 2MM BIT FOR ALL STEPS BELOW. Before placing the OSB roof sheets onto the roof, screw the PREPARATION: Attach the ATTACHMENT: Screw the Z-brackets onto both roof support strips along the edge of the OSB roof sheets. Z-brackets onto the face at of the Apex Section frames to secure the beams Ensuring they are flush to the edges.
- Page 10 SELECT YOUR CHOSEN SUMMERHOUSE & CHECK YOU HAVE ALL YOUR PARTS. The components provided may be heavy. Please lift with caution and with a minimum of 2 people. Overlap Apex 7' x 5' - 4 Windows (OPASUM75M) Overlap Apex 7' x 7' - 6 Windows (OPASUM77M)
Need help?
Do you have a question about the OPASUM75M and is the answer not in the manual?
Questions and answers