Sundstrom SR 562 Operating Instructions Manual
Hide thumbs
Also See for SR 562:
- Operation instruction manual (15 pages) ,
- How-to (12 pages) ,
- Manual (6 pages)

Subscribe to Our Youtube Channel
Related Manuals for Sundstrom SR 562


Summary of Contents for Sundstrom SR 562
- Page 1 Drawn up by: 2009-01-23 / RK Revision: OI06H-5118 SR 562 Reviewed: Page: 1 of 18 Operating instruction SR 562 Hood...
-
Page 2: General Information
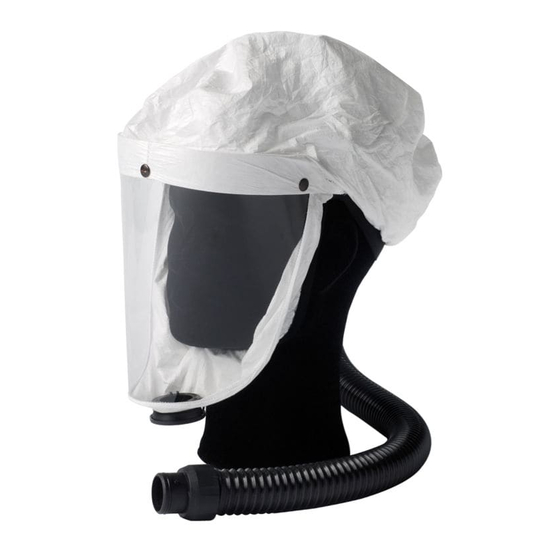
Page: 2 of 18 General information The SR 562 together with fan unit SR 500 and approved filters are included in the Sundström fan-assisted respiratory protective device system conforming to EN 12941/EN 12942:1998. Combination of SR 562-SR 500 EX is specially constructed for using in potentially explosive and fire hazardous environments. - Page 3 2009-01-23 / RK Revision: OI06H-5118 SR 562 Reviewed: Page: 3 of 18 3. Unpacking SR 562 Check that the equipment is complete in accordance with the packing list and has not been damaged in transport. Packing list: • Hood with breathing hose.
- Page 4 Drawn up by: 2009-01-23 / RK Revision: OI06H-5118 SR 562 Reviewed: Page: 4 of 18 Check that the O-ring of the hose is in place. Connect the hose to the fan unit and turn it clockwise about 1/ 8 of a turn.
- Page 5 Drawn up by: 2009-01-23 / RK Revision: OI06H-5118 SR 562 Reviewed: Page: 5 of 18 Grip the hose mounting with one hand and the neck section of the hood with the other. Insert your chin into the hood. Keep your grip of the hood and draw it over your head.
- Page 6 Drawn up by: 2009-01-23 / RK Revision: OI06H-5118 SR 562 Reviewed: Page: 6 of 18 If necessary, adjust the head harness in height by lengthening or shortening the strap for the top of the head. Make sure that the breathing hose runs along your back and is not twisted.
- Page 7 Drawn up by: 2009-01-23 / RK Revision: OI06H-5118 SR 562 Reviewed: Page: 7 of 18 Take the hood off. Switch off the fan, release the belt and take the fan unit off. 5. Maintenance Cleaning Sundström cleaning tissues SR 5226 that clean and disinfect are recommended for daily care.
- Page 8 Drawn up by: 2009-01-23 / RK Revision: OI06H-5118 SR 562 Reviewed: Page: 8 of 18 Storage After cleaning, store the equipment in a dry and clean place at room temperature. Avoid exposing it to direct sunlight. The flow meter can be turned inside out and can be used as storage bag for the head top.
- Page 9 Drawn up by: 2009-01-23 / RK Revision: OI06H-5118 SR 562 Reviewed: Page: 9 of 18 Fit the Velcro strip with the ruffled side towards the forehead strap and with relief upwards. To change the Tyvec-hood Release the face seal rubber band secured to the forehead band next to the Velcro tapes.
- Page 10 Drawn up by: 2009-01-23 / RK Revision: OI06H-5118 SR 562 Reviewed: Page: 10 of 18 Lift the head harness out of the hood and withdraw the hose. Place the new hood in front of you, with the visor facing downwards.
- Page 11 Drawn up by: 2009-01-23 / RK Revision: OI06H-5118 SR 562 Reviewed: Page: 11 of 18 During this operation, the head harness should rest with the opening facing upwards. Note that the hose should not be drawn all the way through, and around 20 cm should be left on the inside of the hood.
- Page 12 Drawn up by: 2009-01-23 / RK Revision: OI06H-5118 SR 562 Reviewed: Page: 12 of 18 Secure the hood by means of the press- studs at the top edge of the visor. Fold the Velcro tapes around the forehead band and secure them as firmly as possible.
- Page 13 Drawn up by: 2009-01-23 / RK Revision: OI06H-5118 SR 562 Reviewed: Page: 13 of 18 Secure it by pulling the rubber band into the narrow part of the slot. Check that the head harness is straight in the hood and that the hose passage of the hood is not twisted around the hose.
- Page 14 Drawn up by: 2009-01-23 / RK Revision: OI06H-5118 SR 562 Reviewed: Page: 14 of 18 Remove the Velcro tapes Release the three press studs at the top edge of the visor. Lift the head harness out of the hood and...
- Page 15 Drawn up by: 2009-01-23 / RK Revision: OI06H-5118 SR 562 Reviewed: Page: 15 of 18 Turn the locknut a quarter of a turn and remove it. Use polygrip pliers if the lock nut is stiff to turn. Thread the pin on one side of the hose...
- Page 16 Drawn up by: 2009-01-23 / RK Revision: OI06H-5118 SR 562 Reviewed: Page: 16 of 18 One coupling of the hose is fitted with an o-ring. Thread the new hose with this end first from the inside of the hood, through the passage at the rear of the hood.
- Page 17 Drawn up by: 2009-01-23 / RK Revision: OI06H-5118 SR 562 Reviewed: Page: 17 of 18 Make sure that the Velcro tape is stretched under the forehead band of the head harness and secure them as firmly as possible. Secure the hood by means of the three press-studs at the top edge of the visor.
- Page 18 Drawn up by: 2009-01-23 / RK Revision: OI06H-5118 SR 562 Reviewed: Page: 18 of 18 Take the face seal rubber band and insert the knot into the keyhole opening in the head harness. Secure it by pulling the rubber band into the narrow part of the slot.
Need help?
Do you have a question about the SR 562 and is the answer not in the manual?
Questions and answers