Table of Contents
Advertisement
Quick Links
Advertisement
Table of Contents

Subscribe to Our Youtube Channel
Related Manuals for J-Tech Digital H.264


Summary of Contents for J-Tech Digital H.264
- Page 1 J-TECH DIGITAL H.264/H.265 4K ENCODER JTD-647: JTECH-ENCH5...
-
Page 2: Table Of Contents
Catalogue Introduction ........................3 1. Features ........................3 2. Specifications ......................3 3. Package Contents ......................5 4. Panel Descriptions ...................... 5 5. Typical Application ..................... 6 5.1. Application 1 | Stream to 3 party platform ............ 6 5.2. Application 2 | Stream to media players on same network (ex: VLC Player) . 7 6. -
Page 3: Introduction
Please keep this manual for future reference. 1. Features Ø Supports H.265/H.264 Encoding Ø Supports HTTP, RTSP, RTMP/RTMPS, HLS, FLV, ONVIF(UDP/RTP) Protocol Ø CBR/VBR Rate: Up to 100Mbps Ø Supported Audio Encoding Format: AAC Ø... - Page 4 Environmental & Power Requirements Operating Temperature 23° to 95℉ | -5° to 40℃ Operating Humidity Range 5 to 90% RH (No Condensation) Power Supply 12V 1A Power Consumption 4.416W Dimensions 4.9 in x 4.5 in x 1.2in | 125mm x 115mm x 31mm Net Weight 0.97 lbs 2.1 Supported Input Resolutions &...
-
Page 5: Package Contents
VESA Resolution Frequency Resolution 800×600 1024×768 1280×768 1280×960 1280×1024 60Hz 1680×1050 1920×1080 1280×720 1360×768 1400×1050 1920×1200 3840×2160(Yuv420) 3. Package Contents 1). 1 x JTECH-ENCH5 Encoder 2). 1 x 12VDC 1A Power Adapter 3). 2 x Mounting Bracket 4). 1 x User Manual 5). -
Page 6: Typical Application
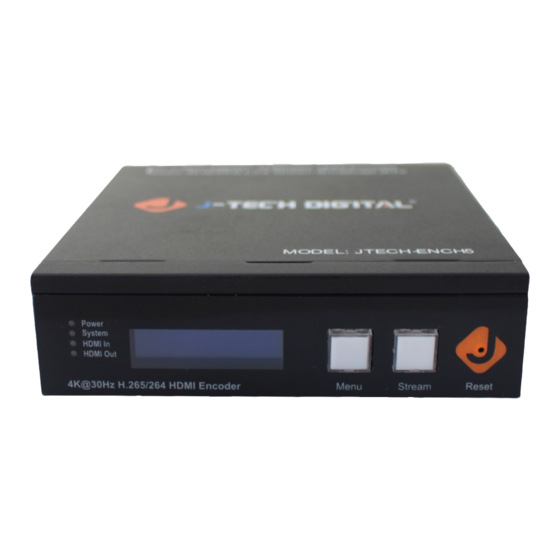
① LED Status Indicator – Power | Network | HDMI input | HDMI output ② LCD to display firmware version, IP address, MAC address, Channel etc ③ Menu button to switch LCD display info ④ Stream Enable/Disable Button ⑤ Reset button ⑥... -
Page 7: Application 2 | Stream To Media Players On Same Network (Ex: Vlc Player)
5.2. Application 2 | Stream to media players on same network (ex: VLC Player) 6. WEB Instruction: 6.1. Change the IP address of your PC Before configuring the encoder through the web GUI, it is necessary to configure the IP address of the computer used to setup the encoder (mainly to ensure that the computer and the encoder are set in the same network segment and can communicate with each other). - Page 8 2). Choose to use Static IP, with the IP address set to 196.168.1.x (x ranges from 0 to 254, but cannot be consistent with the device's IP address [192.168.1.168]). 3). Subnet mask set to 255.255.255.0 4). Gateway set to 192.168.1.1 5) .
-
Page 9: System Setting
1) To enter and access the user configuration interface, enter the correct user name and password (Default username and password: admin). Note: Encoder Static default IP: 192.168.1.168 (device and computer directly connected by network cable). If the encoder is connected to a router, your router may utilize DHCP and assign your encoder an IP address. - Page 10 2) Language Switching ● In the "System" tab, the language of the interface can be switched from English (US) to Chinese via the drop-down menu. 3) Channel ● Through channel configuration, the user can create a one-to-many broadcast or many- to-many video matrix.
- Page 11 ● “Stream” checkbox: When the "Stream" checkbox is selected, the encoder will begin to output a video stream; when it is not selected, the encoder will not output a stream Note: (1) The function of “Switch” checkbox is the same as the front panel “Stream” button of the encoder.
- Page 12 Ø View HDMI Output EDID: To view the HDMI output device’s EDID information, enter the encoder's IP address + /loop_edid.txt in a web browser (example: http://192.168.1.112/loop_edid.txt) Download the HDMI Output EDID: Enter the device's IP address + /loop_edid.bin in a web browser’s address bar and you will download the HDMI Output EDID information in a .bin file.
-
Page 13: Network Configuration
7) Reboot Device ● The parameters set before pressing the ‘Reboot’ button will be saved when performing a reboot; ● After pressing the ‘Reboot’ button, the web GUI and the device will be temporarily offline. Afterwards, the encoder will automatically power on, restore network connectivity and the web GUI will become accessible again. -
Page 14: Audio Configuration
6.4. Audio configuration Use the ‘Audio’ tab to configure your encoder’s audio settings. • Audio o HDMI – Default | The encoder will use the stream the audio from the incoming HDMI signal o ANALOG – Embedded | The encoder will embed audio from the 3-pin phoenix analog port into the stream... -
Page 15: Video Configuration
6.5. Video configuration In the "Video Configuration" tab,the following parameters are customizable: 1) Main Stream: ● Encoding: H.264 (Default) | H.265 ● Resolution: 3840×2160(Default) | 1920×1080 | 1280×720 | 640×360 ● FPS (frames per second):1 – 60 fps | 30fps (Default) ●... -
Page 16: Image Settings
● Resolution: 3840×2160(Default) | 1920×1080 | 1280×720 | 640×360 ● FPS (frames per second):1 – 60 fps | 30fps (Default) ● Bitrate Control: CBR (constant) | VBR (variable) ● Bitrate (Kbps): 64 – 102400 ● GOP (group of pictures): 5 – 300 | 30 (default) 6.6. -
Page 17: Osd Configuration
6.7. OSD Configuration... -
Page 18: Time Configuration
6.8. Time Configuration 6.9. Serial Port Configuration 1) Switch: When the ‘Switch’ checkbox is selected, the serial port is enabled. 2) Source Port: 0 – 65535 (Default 5000) 3) Destination IP: Fill in the IP address of the device to receive communication 4) Target Port: 1 –... -
Page 19: Maintenance
MAINTENANCE Clean this unit with a soft, dry cloth. Never use alcohol or paint thinner to clean this unit. PRODUCT SERVICE (1)Damage requiring service: The unit should be serviced by qualified service personnel if: (a) The DC power supply cord or AC adaptor has been damaged; (b) Objects or liquids have gotten into the unit;... - Page 20 2) THERE ARE NO EXPRESS WARRANTIES EXCEPT AS LISTED UNDER "LIMITED WARRANTY COVERAGE". THE WARRANTOR IS NOT LIABLE FOR INCIDENTAL OR CONSEQUENTIAL DAMAGES RESULTING FROM THE USE OF THIS PRODUCT, OR ARISING OUT OF ANY BREACH OF THIS WARRNTY. (As examples, this excludes damages for lost time, cost of having someone remove or re-install an installed unit if applicable, travel to and from the service, loss of or damage to media or images, data or other recorded content.
- Page 21 Published by J-Tech Digital, Inc. 12803 Park One Drive Sugar Land, TX 77478–...
Need help?
Do you have a question about the H.264 and is the answer not in the manual?
Questions and answers