Table of Contents
Advertisement
Quick Links
Advertisement
Table of Contents

Related Manuals for Larius MINIPEGASO


Summary of Contents for Larius MINIPEGASO
- Page 1 II 2 G c IIB T4 ENGLISH...
-
Page 3: Table Of Contents
WE ADVISE THE USE OF THIS EQUIPMENT ONLY BY PROFESSIONAL OPERATORS. ONLY USE THIS MACHINE FOR USAGE SPECIFICALLY MENTIONED IN THIS MANUAL. Thank you for choosing a LARIUS S.R.L. product. As well as the product purchased, you will receive a range of support services enabling you to achieve the results desired, quickly and professionally. -
Page 4: Warning
MINIPEGASO WARNINGS The table below provides the meaning of the symbols used in this manual in relation to using, earthing, operating, maintaining, and repairing of this equipment. Read this operator’s manual carefully before using the equipment. An improper use of this machine can cause injuries to people or things. -
Page 5: Aworking Principle
- Hopper constructed of non-stick material to facilitate the cleaning The MINIPEGASO pump is used in all processes requiring a high and maintenance operations. rate of productivity, the use of dense materials and aggregates, - Gentle start of material fl... -
Page 6: Btechnical Data
MINIPEGASO TECHNICAL DATA MINIPEGASO Supply Compressed air Material hose lenght da 0 a 30 mt (based on the viscosity and density of the materials used) Material hose sizes ø19X25 Standard Maximum water fl ow rate 40 L/m Weight 47 Kg with hose and gun... -
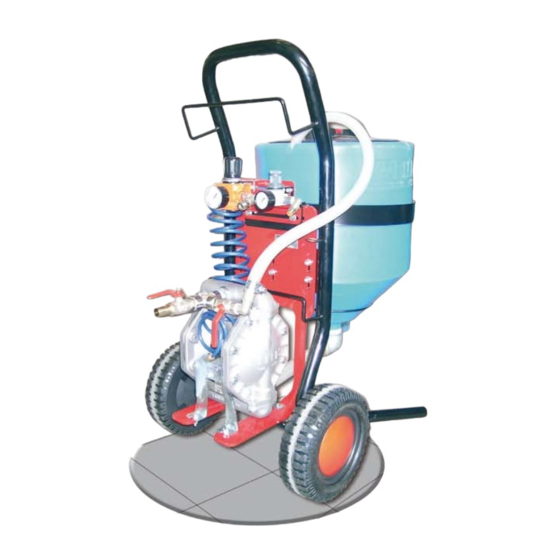
Page 7: Cdescription Of The Equipment
MINIPEGASO DESCRIPTION OF THE EQUIPMENT POS. POS. Description Description Trolley Recirculation valve Air pressure gauge for pump Gun pressure adjustment knob Manometer low pressure Cover Air intake for pump feed Tank Gun air pressure gauge Product recycling hose Product delivery valve... -
Page 8: Dtransport And Unpacking
Unpack the machine and verify if there has been PERLY. any damage due to transportation. In case of damage, call immediately LARIUS and the • ALWAYS FOLLOW THE INSTRUCTIONS ABOUT SAFETY Shipping Agent. All the notices about possible damage or AND THE REGULATIONS IN FORCE. -
Page 9: Fsetting-Up
MINIPEGASO • TIGHTEN AND CHECK ALL THE FITTINGS FOR • MAKE SURE THAT YOU KNOW HOW TO STOP THE MA- CONNECTION BETWEEN PUMP, FLEXIBLE HOSE AND CHINE IN CASE OF NEED. WE ALSO RECOMMENDED SPRAY GUN BEFORE USING THE EQUIPMENT. -
Page 10: Washing Of The New Equipment
MINIPEGASO • Connect the fl exible product delivery hose (F4) to the delivery coupling (F5) of the pump. Tighten the metal clamp(F6). NEVER use sealants on fi ttings’ threads. It is recommended to use the hose provided with the standard kit. -
Page 11: Preparing The Product To Be Applied
MINIPEGASO • Rotate the pressure setting knob (F11) slightly clockwise so Make sure the product to be used is compatible that the machine operates at minimum power. with the materials employed for manufacturing the equipment (stainless steel, aluminium and carbon steel). -
Page 12: Gworking
MINIPEGASO • After introducing the product into the tank (F13), close the product delivery valve (F14) on the gun and open the recir- culation valve (F15). Closed Open WORKING Before starting the pump, it is important to send • Turn the pressure adjustment knob (F11) clockwise to start a small amount of atomization air to the gun. -
Page 13: Starting The Spraying Operations
MINIPEGASO SPRAY ADJUSTMENT • The product application nozzle can be adjusted according to need by varying the pump operating pressure (G5) and the atomization pressure (G6) until reaching the necessary operating conditions. STARTING THE SPRAYING OPERATIONS • Use the tooling after performing all the SETTING UP operations above described. - Page 14 MINIPEGASO • Introduce water into the pump tank. • Insert the recirculation hose (H4) in the product collection receptacle. • Close the delivery valve (H1) and open the recirculation valve (H2). Closed Open • Slowly start the pump until all the liquid in the tank and the pump has drained out.
- Page 15 MINIPEGASO • Spray into a receptacle to clean the hose (H5) and the gun • Detach the hose from the gun. (H6). Repeat this operation several times until complete cleaning. • Dismantle the gun and clean the nozzles. • If necessary, change the cleaning liquid and repeat the operation several times until all the product residues have been removed.
-
Page 16: Iproblems And Solutions
Larius 2 and are Class II equipment for use in areas with the Larius 4 series for use in potentially explosive areas with the presence of gas or vapours (Category 2 G, Class presence of gas or vapours (area 1). -
Page 17: Technical Features
MINIPEGASO TECHNICAL FEATURES Low pressure transfer double diaphragm pumps series Larius 2 and Larius 4. Environment temperature: -10°C÷+50°C Max. fl uid temperature [°C]: 60°C Max. air temperature [°C]: 30°C LOW PRESSURE TRANSFER DOUBLE SERIE 2 LARIUS SERIE 4 LARIUS DIAPHRAGM PUMPS... -
Page 18: Safety Instructioins For Onstallations In Hazardous
The low pressure double diaphragm transfer pumps series Low pressure transfer double diaphragm pum- Larius 2 and Larius 4 must be connected to the ground ps - series Larius 2 and Larius 4. with a suitable connector anti-release and anti-rotation. - Page 19 SPARE PARTS SPARE PARTS Control unit Frame unit page 23 page 20 Delivey unit page 22 Complete hydraulic body page 18 Gun unit page 24...
-
Page 20: Mcomplete Hydraulic Body
MINIPEGASO COMPLETE HYDRAULIC BODY... - Page 21 MINIPEGASO LARIUS 4 LARIUS 4 Pos. Description Q.ty Aluminium Inox 8350 8350 Pump body 8351 8355 Fluid passage cover 8385 8385 Screw 8352 8356 Fluid passage sleeve 3326 3326 Inox ball 8404 8404 O Ring 8379 8379 Seat valve 8386...
-
Page 22: Nframe Unit Ref.20850
MINIPEGASO FRAME UNIT REF.20850... - Page 23 MINIPEGASO Pos. Co de Description Q.ty 20850 Frame unit 16271/1 Trolley handle 16272/1 Carriage body 37238 Wheel 91047 Flexible washers 84007 Split pin 30530 Support plate l4 18249/1 Cover tank 18249 Tank 50 l 18246 Support rack 20833 Elbow F-F...
-
Page 24: Odelivery Unit Ref.20851
MINIPEGASO DELIVERY UNIT REF.20851 Pos. Co de Description Q.ty Pos. Co de Description Q.ty 20851 Delivery unit 20809 Fitting 20817 Reduction M-M 30553 Tightening clamp 20813 Union T 20835 Delivery hose 10mt 20810 Reduction M-M 20811 Union a L M-F... -
Page 25: Pcontrol Unit Ref.20852
MINIPEGASO CONTROL UNIT REF.20852 Pos. Co de Description Q.ty Pos. Co de Description Q.ty 20852 Control unit 96259 Manometer 30531 Support plate 8167 Gun pressure gauge 510510 Pressure regulating support 3354 Union M-M 510088 Union 8063 Union M-F 91736 Regulator... -
Page 26: Qgun Unit Ref. 20853
MINIPEGASO GUN UNIT REF. 20853 Pos. Co de Description Q.ty 20853 Gun unit 5313 Quick-coupling M 9902 Valvula F-F 4004 Tap M-F 3563 Union M-M... -
Page 27: Raccessories
MINIPEGASO ACCESSORIES EXTENSION Code 153: cm 30 - Code 155: cm 60 - Code 156: cm 100 PLA 1/4” + FAST-CLEAN REVERSIBLE TIP INCLUDED Code 11420-11425-11430: cm 130-180-240 PLA M16x1,5 + FAST-CLEAN REVERSIBLE TIP INCLUDED Code 11421-11426-11431: cm 130-180-240 PAINT ROLLER TELESCOPIC... -
Page 28: Sversions
MINIPEGASO VERSIONS PEGASO Pegaso with Pressure Tex gun Ref. 30581 Pegaso with Pressure Tex gun 110 V Ref. 30595 Pegaso with Turbo gun Ref. 30580 Pegaso with Turbo gun 110 V Ref. 30591 GHIBLI 10:1 TEXTURE TURBO GUN Ref. 30592... - Page 29 Due to a constant product improvement programme, the factory reserves the right to modify technical details mentioned in this manual without prior notice.
- Page 30 MANUFACTURER: 23801 CALOLZIOCORTE - LECCO - ITALY - Via Stoppani, 21 Tel. (39) 0341/62.11.52 - Fax (39) 0341/62.12.43 E-mail: larius@larius.com - Internet http://www.larius.com DIRECT LINE CUSTOMERS TECHNICAL SERVICE Tel. (39) 0341/621256 Fax (39) 0341/621234...
Need help?
Do you have a question about the MINIPEGASO and is the answer not in the manual?
Questions and answers