
Related Manuals for laguna PX|22 Sheartec:II


Summary of Contents for laguna PX|22 Sheartec:II
- Page 1 PX|22 Sheartec:II Planer Owner's Manual MPLANPX2275-0130 MPLANPX2210-0130 3/10/2021...
- Page 2 For immediate service on any Laguna Tools products: +1 (949) 474-1200 customerservice@lagunatools.com Laguna Tools, Inc. LAGUNA® and the LAGUNA Logo® are the registered trademarks of Laguna Tools, Inc. All rights reserved. 04/01/2019 LAGUNA AMERICAN HEADQUARTERS Texas: 744 Refuge Way Suite 200, Grand Prairie, Texas 75050, U.S.A. Phone: +1-800-332-4094 Huntington Beach: 7291 Heil Ave Huntington Beach, CA 92647, U.S.A.
-
Page 3: Table Of Contents
CONTENTS PX|22 Sheartec:II Planer Safety ............4 Electrical Safety ..........9 Specifications ..........14 Machine Overview ......... 15 Setup ............17 Placement & Unboxing ......17 Inventory List .......... 19 Assembling ..........20 Operation ............. 26 Maintenance ..........27 Lubrication ........... 35 Troubleshooting .......... -
Page 4: Safety
PX|22 Sheartec:II Planer \ Safety Safety Read and understand all warnings and operation instructions before using any tool or equipment. Always follow basic safety precautions to reduce the risk of personal injury. Improper operation, maintenance or modification of tools or equipment could result in serious injury and property damage. There are certain applications for which tools and equipment are designed. - Page 5 PX|22 Sheartec:II Planer \ Safety PROP 65 WARNING SOME DUST CREATED BY POWER SANDING, SAWING, GRINDING, DRILLING, AND OTHER CONSTRUCTION ACTIVITIES CONTAINS CHEMICALS KNOWN TO THE STATE OF CALIFORNIA TO CAUSE CANCER, BIRTH DEFECTS OR OTHER REPRODUCTIVE HARM. SOME EXAMPLES OF THESE CHEMICALS ARE: ·...
- Page 6 PX|22 Sheartec:II Planer \ Safety WARNING! Machine & Workshop Safety Instructions Read and understand all warnings and operating instructions before using this equipment. Failure to follow all instructions listed below, may result in electric shock, fire, and/or serious personal injury or property damage.
- Page 7 PX|22 Sheartec:II Planer \ Safety USE RECOMMENDED ACCESSORIES. Consult this owner’s manual or the manufacturer for recommended accessories. Using improper accessories will increase the risk of serious injury. UNATTENDED OPERATION. To reduce the risk of accidental injury, turn machine OFF and ensure all moving parts completely stop before walking away.
- Page 8 PX|22 Sheartec:II Planer \ Safety SAVE THESE INSTRUCTIONS. Refer to them often and use them to instruct others.
-
Page 9: Electrical Safety
PX|22 Sheartec:II Planer \ Electrical Safety Electrical Safety WARNING! · RUNNING ON A DIFFERENT VOLTAGE THAN STATED BELOW WILL DAMAGE THE MACHINE. NEVER RUN THE MACHINE IN WET OR DAMP CONDITIONS. · ELECTROCUTION, FIRE, SHOCK, OR EQUIPMENT DAMAGE MAY OCCUR IF MACHINE IS NOT PROPERLY GROUNDED AND CONNECTED TO POWER SUPPLY. - Page 10 PX|22 Sheartec:II Planer \ Electrical Safety MPLANPX2210-0130 PLUG/RECEPTACLE Not Included WIRING (Gauge) See Jacket Printing CIRCUIT BREAKER 35 AMP If this information is different than what is stated on the Motor Specification Plate - omit this information. It is possible that the documentation is outdated to a machine change - such as a different motor. Always check the motor plate prior to any wiring.
- Page 11 PX|22 Sheartec:II Planer \ Electrical Safety Grounding Methods DANGER! THIS MACHINE MUST BE GROUNDED WHILE IN USE TO PROTECT THE OPERATOR FROM ELECTRIC SHOCK. IN ALL CASES, MAKE CERTAIN THAT THE RECEPTACLE IN QUESTION IS PROPERLY GROUNDED. IF YOU ARE NOT SURE, HAVE A QUALIFIED ELECTRICIAN CHECK THE RECEPTACLE.
- Page 12 PX|22 Sheartec:II Planer \ Electrical Safety Check with a qualified electrician or service personnel if the grounding instructions are not completely understood, or if in doubt as to whether the tool is properly grounded. Use only 3-wire extension cords that have 3-prong grounding plugs and 3 pole receptacles that accept the tool's plug.
- Page 13 PX|22 Sheartec:II Planer \ Electrical Safety Extension Cords Use proper extension cords. Make sure your extension cord is in good condition and is a 3- wire extension cord which has a 3-prong grounding type plug and matching receptacle which will accept the machine’s plug.
-
Page 14: Specifications
PX|22 Sheartec:II Planer \ Specifications Specifications PX|22 Sheartec:II Planer MPLANPX2275-0130 MPLANPX2210-0130 VOLT HP PHASE HERTZ AMP 230V 7.5HP 1PHASE 60HZ/32 AMP. 230V 10HP 3PHASE 60HZ /28 AMP. BED SIZE 22 X 28" 22 X 28" PULL-OUT EXTENSION 6" 6" WHEELS BUILT-IN... -
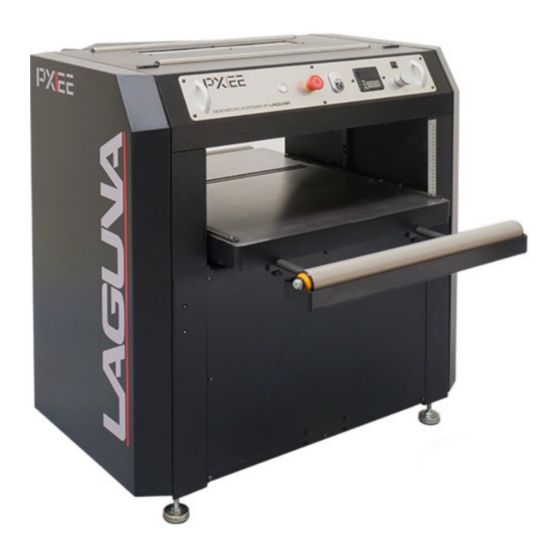
Page 15: Machine Overview
PX|22 Sheartec:II Planer \ Machine Overview Machine Overview PX|22 Sheartec:II Planer Figure 6: Main Components of PX22 A. On Light Indicator B. Emergency Stop (E-STOP); stops all functions of machine, however, power continues to machine. A second E-STOP is on the outfeed (back) of machine. - Page 16 PX|22 Sheartec:II Planer \ Machine Overview Table Rollers The Rollers act as a stop to reduce the chance of stock from sliding past the edge of the cutterhead or table. Extension Rollers Adjustable rollers that extend for increased workpiece support.
-
Page 17: Setup
Setup Setup Overview (MUST READ) When setting up your PX|22 Sheartec:II Planer, please take a moment to read this overview prior to starting. The machine comes mostly assembled. You will have to assemble the leveling feet, the dust chute, and calibrate the height. - Page 18 ATTEMPT ANY PROCEDURE THAT YOU FEEL IS UNSAFE, OR THAT YOU DO NOT HAVE THE PHYSICAL CAPABILITY OF ACHIEVING. This step requires a forklift. The PX22 is heavy, be careful when lifting and handling it! Failure to comply may cause serious injury and/or damage to the machine and/or property! Use a forklift to remove PX22 from pallet and place on floor.
-
Page 19: Inventory List
PX|22 Sheartec:II Planer \ Setup Inventory List Inventory List The following depicts items shipped with your machine. Before assembling, ensure that you have received all parts shown below. Machine parts should arrive sealed in plastic bags. Remove parts from plastic bags before laying them out to inventory them. -
Page 20: Assembling
PX|22 Sheartec:II Planer \ Setup Assembling Assembling Machine Preparation and Setup: 1. Level machine using the four leveling feet on each of the four corners. Lock leveling feet into position with the nut on the leveling foot stud (Fig. 3). - Page 21 PX|22 Sheartec:II Planer \ Setup Assembling 2. 2. Clean all rust protected surfaces with a commercial de-greaser. DO NOT use acetone, gasoline, lacquer thinner or any type of cleaner that could damage paint. Coat cleaned surfaces with WD-40® or 20W machine oil.
- Page 22 PX|22 Sheartec:II Planer \ Setup Assembling Power Supply Circuit Requirements The power source circuit for your machine must be grounded and rated for the amperage given below. Never replace a circuit breaker on an existing circuit with one of higher amperage without consulting a qualified electrician to ensure compliance with wiring codes.
- Page 23 PX|22 Sheartec:II Planer \ Setup Assembling Calibrating the Thickness Scale NOTICE! The following procedures describe the use of a “calibrating board”. It is a piece of hardwood which has been surfaced on one side with a jointer, drum sander or wide belt sander.
- Page 24 PX|22 Sheartec:II Planer \ Setup Assembling Calibrating the DRO (Digital Read Out) 1. Remove the battery cover of the DRO and install 2 AAA batteries. FIGURE 9: DRO BATTERIES DRO Button Reference and Use It is helpful to familiarize these buttons and their purpose with the Wixey™ DRO...
- Page 25 PX|22 Sheartec:II Planer \ Setup Assembling FIGURES 10-12: DRO ADJUSTMENT...
-
Page 26: Operation
PX|22 Sheartec:II Planer \ Operation Operation CAUTION! PLACE THE PLANER ON A SECURE AND STABLE SURFACE FOR OPERATION. CLAMP OR BOLT THE PLANER INTO POSITION. 1. Establish the proper depth of cut (typically less than 1/16”), using either the DRO or scale. -
Page 27: Maintenance
PX|22 Sheartec:II Planer \ Maintenance Maintenance General Keep your machine clean. At the end of each day, clean the machine. Wood contains moisture, and if sawdust or wood chips are not removed they will cause rust. In general, we recommend that you only use a Teflon-based lubricant on the planer. Regular oil attracts dust and dirt. - Page 28 PX|22 Sheartec:II Planer \ Maintenance Sheartec II Knife rotation/replacement CAUTION! KNIFE INSERTS ARE DANGEROUSLY SHARP. USE EXTREME CAUTION WHEN INSPECTING, REMOVING, OR REPLACING KNIFE INSERTS. WARNING · TURN PLANER OFF AND DISCONNECT POWER BEFORE PERFORMING ANY MAINTENANCE OR ADJUSTMENTS! ·...
- Page 29 PX|22 Sheartec:II Planer \ Maintenance Conveying Rollers WARNING · TURN PLANER OFF AND DISCONNECT POWER BEFORE PERFORMING ANY MAINTENANCE OR ADJUSTMENTS! MAINTENANCE: Keep rollers clean to help prevent slippage of material. Be careful not to contact cutterhead knives as they are very sharp! ADJUSTMENTS: The planer comes set-up from the factory and typically will not need adjustment.
- Page 30 PX|22 Sheartec:II Planer \ Maintenance Anti-Kickback Fingers WARNING · TURN PLANER OFF AND DISCONNECT POWER BEFORE PERFORMING ANY MAINTENANCE OR ADJUSTMENTS! Anti-kickback fingers help prevent stock from being kicked out of the machine towards the user. Keep the fingers clean and free from sawdust, pitch gum, etc., so they operate smoothly.
- Page 31 PX|22 Sheartec:II Planer \ Maintenance Adjustment of Pressure Bar WARNING · TURN PLANER OFF AND DISCONNECT POWER BEFORE PERFORMING ANY MAINTENANCE OR ADJUSTMENTS! The pressure bar should be set even with the lowest point of knife. Make sure the knives are set properly see the “Setting / Changing Knives”...
- Page 32 PX|22 Sheartec:II Planer \ Maintenance 1. Disconnect machine from power source. 2. Place a hard wood gauge (Fig.17, A) under a knife in the cutterhead. Place a 0.02” feeler gauge (Fig. 17, B) on top of wood block and raise table until the gauge contacts the knife in its lowest position.
- Page 33 PX|22 Sheartec:II Planer \ Maintenance Poly-V-Belt Adjustment WARNING · TURN PLANER OFF AND DISCONNECT POWER BEFORE PERFORMING ANY MAINTENANCE OR ADJUSTMENTS! Poly-V-belt (Fig. 22, D) tension has been set at the factory. If the belt has stretched and needs adjustment.
- Page 34 PX|22 Sheartec:II Planer \ Maintenance Adjusting Table Rollers WARNING · TURN PLANER OFF AND DISCONNECT POWER BEFORE PERFORMING ANY MAINTENANCE OR ADJUSTMENTS! The table rollers come pre-set from the factory and shouldn’t need any adjustment. If adjustment is necessary, follow the below listed steps.
-
Page 35: Lubrication
PX|22 Sheartec:II Planer \ Lubrication Lubrication Regular monitoring and replacement of lubrication is needed. POSITION GREASE GEAR BOX CHAIN CHAIN CHAIN CHAIN BUSHING LEAD SCREW FIGURE 25: LUBRICATION FIGURE 26: LUBRICATION · The Gear Box oil must be changed after 2500 hours of work. -
Page 36: Troubleshooting
PX|22 Sheartec:II Planer \ Troubleshooting Troubleshooting Symptom Possible Cause Possible Solution Machine will not 1. Fuse blown or circuit breaker tripped 1. Replace fuse or reset circuit breaker start 2. Cord damaged 2. Have cord replaced 3. Not connected to power source 3. -
Page 37: Wiring
PX|22 Sheartec:II Planer \ Wiring Wiring WARNING REVIEW ELECTRICAL SAFETY PRIOR TO ANY WIRING PROCEDURES. MPLANPX2275-0130 VOLTAGE 220V PHASE HERTZ 60Hz FULL LOAD AMPERAGE 32 AMP Below are RECOMMENDATIONS to be used for this machine based on the above information. Variables that may affect this are: ·... - Page 38 PX|22 Sheartec:II Planer \ Wiring...
- Page 39 PX|22 Sheartec:II Planer \ Wiring...
-
Page 40: Replacement Parts Diagram
PX|22 Sheartec:II Planer \ Replacement Parts Diagram Replacement Parts Diagram Cutterhead & Drivetrain... - Page 41 PX|22 Sheartec:II Planer \ Replacement Parts Diagram Table & Lift...
- Page 42 PX|22 Sheartec:II Planer \ Replacement Parts Diagram Stand & Motor...
-
Page 43: Replacement Parts Table
PX|22 Sheartec:II Planer \ Replacement Parts Table Replacement Parts Table REF NO PART NUMBER DESCRIPTION SPECIFICATION 000804-107 ROUND HEAD HEX SCREW M5-0.8X12 174567-000 DUST CHUTE 000302-201 ROUND HEAD PHILLIPS SCREW M4-0.7X6 230409-905 BUCKLE CT-22 340007-615 BLOCK 174557-000 TOP COVER 200103-000... - Page 44 PX|22 Sheartec:II Planer \ Replacement Parts Table REF NO PART NUMBER DESCRIPTION SPECIFICATION 000301-101 ROUND HEAD PHILLIPS SCREW M3-0.5X6 001202-602 SELF-TAPPING SCREW M3-1.06X6 174750-000 FIXING PLATE 000302-103 ROUND HEAD PHILLIPS SCREW M4-0.7X10 021101-100 WIRE FIXING BUCKLE ACC-2-B 016306-000 CHAIN #06B-63P...
- Page 45 PX|22 Sheartec:II Planer \ Replacement Parts Table REF NO PART NUMBER DESCRIPTION SPECIFICATION 030104-001 BALL BEARING 6005 043337-000 O-RING 043401-000 PLUG PT1/4”-19 000203-104 SET SCREW M6-1.0X12 380200-901 SCREW 280090-000 SPRING 051412-000 COLUMN-R 381405-902 FIXING PLATE 000801-101 ROUND HEAD HEX SCREW M6-1.0X10...
- Page 46 PX|22 Sheartec:II Planer \ Replacement Parts Table REF NO PART NUMBER DESCRIPTION SPECIFICATION 006001-032 FLAT WASHER 6.6-13X1.0 008304-100 HEX LOCK NUT M6-1.0(10B-7H) 000802-101 ROUND HEAD HEX SCREW M8-1.25X16 174553-902 GUIDE PLATE 051413-000 TABLE 006305-100 SPRING WASHER 8.2-13.7 000003-104 HEX SCREW M8-1.25X20...
- Page 47 PX|22 Sheartec:II Planer \ Replacement Parts Table REF NO PART NUMBER DESCRIPTION SPECIFICATION 174763-904 ADJUSTABLE PLATE 006001-045 FLAT WASHER 8.5-16X1.0 006704-100 WAVE WASHER WW-12 361365-902 GUIDE BLOCK 361364-902 ROLLER SHAFT 030007-001 BALL BEARING 6201 190288-000 TABLE ROLLER 000303-207 ROUND HEAD PHILLIPS SCREW M5-0.8X20...
- Page 48 PX|22 Sheartec:II Planer \ Replacement Parts Table REF NO PART NUMBER DESCRIPTION SPECIFICATION 000103-107 CAP SCREW M6-1.0X20 000104-104 CAP SCREW M8-1.25X16 000104-104 CAP SCREW M8-1.25X16 290040-901 IDLER SHAFT 150001-000 IDLER 170413-901 CHAIN TENSIONER BRACKET 006001-068 FLAT WASHER 10X20X2.0 008007-100 HEX NUT M10-1.5(17B-8H)
- Page 49 PX|22 Sheartec:II Planer \ Replacement Parts Table REF NO PART NUMBER DESCRIPTION SPECIFICATION 901164-000 MOTOR 10HP/220- 240V/60HZ/3PH/2P 381426-902 MOTOR PULLEY 006001-043 FLAT WASHER 8.2(+0.2/-0)-30X4.0 002601-102 CAP LOCKING SCREW M8-1.25X20 021323-000 STRAIN RELIEF MGB25-16B 014366-000 POLY-V-BELT 610J-12 174559-000 SIDE COVER - L...
- Page 50 PX|22 Sheartec:II Planer \ Replacement Parts Table REF NO PART NUMBER DESCRIPTION SPECIFICATION 310575-909 BEVEL GEAR BASE 010507-000 RETAINING RING ISTW-25 174568-156 HOOK 070071-902 SPROCKET 001903-101 SET LOCK SCREW M8-1.25X25...
-
Page 51: Warranty
This machine is covered by a warranty and the purchasing dealer can answer any questions you may have. Additionally, you can contact Laguna: +1 (949) 474-1200 customerservice@lagunatools.com. Every product sold is warranted to be free of manufacturers’ defective workmanship, parts, and materials. - Page 52 Minnesota: 5250 West 74th St, Edina, MN 55439, U.S.A Phone: +1-949-474-1200 DAKE CORPORATION 724 Robbins Road, Grand Haven, MI 49417, United States +1-800-937-3253 LAGUNA EUROPE Walker Rd, Bardon Hill, Coalville LE67 1TU, United Kingdom. Phone: +44-1530-516921 © 2021 Laguna Tools...
Need help?
Do you have a question about the PX|22 Sheartec:II and is the answer not in the manual?
Questions and answers