Table of Contents
Advertisement
Quick Links
PROFESSIONAL MEDICAL PRODUC TS
PULSOXIMETRO OXY 110
OXY 110 PULSE OXIMETER
PULSIOXÍMETRO OXY 110
OXYMÈTRE DE POULS OXY 110
SP-20 (Gima 34341)
Shenzhen Creative Industry Co., Ltd.
Floor 5, BLD 9, BaiWangxin High-Tech Industrial Park,
Songbai Road, Xili Street, Nanshan District,
518110 Shenzhen, P.R. China
Made in China
Shanghai International
Holding Corp. GmbH (Europe)
Eiffestrasse 80, 20537, Hamburg, Germany
Importato da / Imported by / Importé par / Importado por
Gima S.p.A.
Via Marconi, 1 - 20060 Gessate (MI) Italy
gima@gimaitaly.com - export@gimaitaly.com
www.gimaitaly.com
0123
Advertisement
Table of Contents

Subscribe to Our Youtube Channel
Related Manuals for Gima SP-20


Summary of Contents for Gima SP-20
- Page 1 PULSOXIMETRO OXY 110 OXY 110 PULSE OXIMETER PULSIOXÍMETRO OXY 110 OXYMÈTRE DE POULS OXY 110 SP-20 (Gima 34341) Shenzhen Creative Industry Co., Ltd. Floor 5, BLD 9, BaiWangxin High-Tech Industrial Park, Songbai Road, Xili Street, Nanshan District, 518110 Shenzhen, P.R. China...
- Page 2 ENGLISH Dear Customer, Thank you for purchasing this quality product. Please read the manual very carefully before using this device. Failure to follow these instructions can cause measuring abnormality or damage to the Oximeter. No part of this manual may be photocopied, reproduced or translated into another language without the prior written consent.
- Page 3 ENGLISH tional allergic patients may still have anaphylaxis. Do not apply to those who have anaphylaxis. For the individual patients, there should be a more prudent inspecting in the placing process. The sensor can not be placed on the edema and tender tissue. ...
-
Page 4: Table Of Contents
ENGLISH Table of Contents 1 Overview ...................... 40 1.1 Appearance .................... 40 1.2 Product Name and Model ..............42 1.3 Structure ....................42 1.4 Features ....................42 1.5 Intended Use ..................42 1.6 Working Environment ................42 2 Power Supply ....................43 3 Make Measurement .................. -
Page 5: Overview
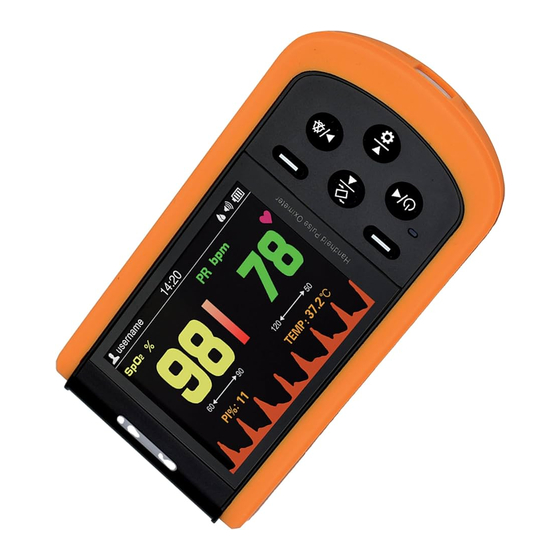
ENGLISH 1 Overview 1.1 Appearance Alert indicator Display screen Menu/Confirm Record/Back Auto-rotate /Up Power indicator Right /Sound Power/Left Setting/Down Figure 1.1 Front view TEMP: Temperature probe probe connector connector Figure 1.2 Upper-side view USB connector DC power input contact shoes with polarity Figure 1.3 Bottom side view indication... - Page 6 ENGLISH 1. Display screen: Display measurement result, trends and menus. (Power/Left): Power on/off the device by longtime pressing; On menu or sub-menu screen, short time press it to move the cursor left or adjust the param- eter values. (Right/Sound): On data recall screen, longtime press this key, then the de- lete dialog pops up;...
-
Page 7: Product Name And Model
DC power input for charging the built-in rechargeable bat- tery via the base. 1.2 Product Name and Model Name: Handheld Pulse Oximeter Model: SP-20 1.3 Structure It consists of the main unit and SpO probe. (Note: with optional temperature prob, this Oximeter can make temperature meas- urement.) - Page 8 ENGLISH 3. The Base: Input: Micro USB connector, 5VDC/1A Output: Contact pins. 5VDC/1A Micro USB connector Polarity markings Figure 2.1A Base--front view Figure 2.1B Base--top view Description: The base is used to hold the oximeter, and also for charging the oximeter. You can charge the oximeter by the following methods: 1) When the oximeter is held by the base, you can connect one end of the USB cable to the USB connector on the back of the base marked with “DC 5V/1A”, and the...
- Page 9 ENGLISH Oximeter Insert the oximeter into the base by this direction Base Figure 2.2 Connection between oximeter and base...
-
Page 10: Make Measurement
ENGLISH 3 Make Measurement 3.1 SpO Measurement Operation procedures: 1. Connect the SpO probe to the connector on the upper-side of the device marked with “SpO ”. (Note: When disconnecting the connector, be sure to hold the head of the connector firmly and pull). 2. -
Page 11: Temperature Measurement (Optional)
ENGLISH The fingernail should be of normal length. The SpO sensor cannot be immersed into water, liquid or cleanser. The SpO sensor can be repeatedly used. Please clean and disinfect before reuse. Connector with the label “SpO ”... -
Page 12: Operation
ENGLISH on the display screen and the probe will not enter into measuring mode. Press the measuring key to restart the measurement. The ear thermometer probe will switch to stand by automatically if there is no oper- ation for 1 minute. If a further measurement is needed, press the measuring key and repeat step 2 and step 3. -
Page 13: Default Display Screen
ENGLISH Figura 4.1 4.2 Default Display Screen Press “ ” power key for 2 seconds to start up the Oximeter, then the screen will display the default screen, as shown in Figure 4.2. Auto-rotate icon Wireless icon Auto power off Recording mode disable icon Sound indicator... - Page 14 ENGLISH Description: • During measurement, if the finger is not inserted properly, or the probe is not con- nected or the probe is off from the finger, then “Check Probe” message prompts and keeps blinking on the screen, and “bibibi...” alert sound appears simultaneously. Alert sound is sustaining for about 3 minutes, and if there is no any key operation in this period, then the device will power off automatically (if the auto power off func- tion is enabled).
-
Page 15: Menu
ENGLISH 4.3 Menu On the default measuring screen, short time press “ ” Menu/Confirm key for entering into main menu screen (as shown in Figure 4.3). There are 9 functional icons in main menu screen, press Up/Down/Left/ Right key can move the cursor to make selection and press “... - Page 16 ENGLISH 4.3.1 User ID On main menu screen, move the cursor on “User ID” and press Confirm key “ ”, then the oximeter enters into User ID Setup screen, as shown in figure 4.4. Figure 4.4A User ID setup screen Move the cursor on “Edit”...
- Page 17 ENGLISH 4.3.3 Recording Mode On main menu screen, move the cursor on “Recording Mode” and press Confirm key “ ”, then the oximeter enters into Re- cording Mode Setup screen, as shown in figure 4.6. Figure 4.6 Recording mode setup screen Note: When selecting “Spot-check Record”...
- Page 18 ENGLISH Figure 4.8 TEMP record list screen 4.3.6 Date On main menu screen, move the cursor on “Date” and press Confirm key “ ”, then the oximeter enters into date setup screen, as shown in figure 4.9. Figure 4.9 Date setup screen Date setting procedure: 1) Move the cursor stays on the Year of the date, press Confirm key “...
- Page 19 ENGLISH Off, Power Saving etc.) are the same with date setting. 4.3.7 Settings On main menu screen, move the cursor on “Settings” and press Confirm key “ ”, then the oximeter enters into system setting screen, as shown in figure 4.10. Figura 4.10 System setting screen...
- Page 20 ENGLISH • Version: For viewing version number of the software, as shown in figure 4.10J. • Demo: Enter into the Demonstration mode, as shown in figure 4.10K. Figure 4.10A Brightness setup Figure 4.10B Volume setup Figure 4.10C Pulse beep setup Figure 4.10D Language setup Figure 4.10E Auto Power OFF setup Figure 4.10F Wireless setup...
- Page 21 ENGLISH Figure 4.10H Version info Figure 4.10J Default setting Notes: • When the Auto Power Off is set to “On” op- tion, if there is no key operation for 3 minutes, then the oximeter will power off automatically. • When the Power Saving Mode is set to “On” option, during the measurement, if there is no key operation for 1 minute, the screen dis- play will be dim for power saving.
- Page 22 ENGLISH • SpO Lo-Limit: SpO low limit setting; range: 50%~99%, the step is 1%. The factory default value for adult is 90% and 95% for Neonate. • PR Hi-Limit: High limit setting of pulse rate; range: 100~240bpm. From 100 to 150, the step is 1bpm, and from 150 to 240, the step is 5bpm.
-
Page 23: Record
ENGLISH 4.4 Record 4.4.1 Data Recall On main default screen, short time press Record/Back key “ ” to enter into data recall screen, as shown in figure 4.13. Figure 4.13 SpO2 record records include two types, Spot-check and Trend Record, Spot-check Re- cord is a list showing the recording time, SpO value and pulse rate value for each spot-checking event, as shown in figure 4.14... - Page 24 ENGLISH The corresponding User and User ID for the selected record Figure 4.15 Trend record- --List The corresponding User and Recording User ID for the time selected record trend graph PR trend graph Figure 4.16 Trend record---Trend graph...
- Page 25 When the wireless transmission function is on, the Handheld Pulse Oximeter can com- municate with a host (such as computer or mobile) for viewing and management. a. Open the host’s wireless function and procedure and start to scan the SP-20 Oxi- meter.
-
Page 26: Technical Specifications
ENGLISH If the host can’t pair with the SP-20, you will try to narrow the distance between the host and SP-20. The SP-20 can pair and transmit with the host under the wireless coexistence envi- ronment, but other wireless device may still interface with pairing and transmission between the host and the SP-20 device under uncertain environment. - Page 27 ENGLISH ±0.3°C for the rest. Response time: ≤5s Patient Group: Adult and Neonate Measuring site: earhole Deviation: ≤0.1°C G. Operating Environment Operating Temperature: 5°C ~40°C Operating Humidity: 15%~93% Atmospheric pressure: 70kPa~106kPa Note: portable and mobile RF communications equipment may affect the perfor- mance of the Oximeter.
-
Page 28: Over-Limit Indication
ENGLISH 6 Over-limit Indication 6.1 Limit settings • SpO low limit setting range: 50% ~ 99%. • Pulse Rate limits setting range: High: 100bpm--240bpm Low: 30bpm--99bpm During the measurement, if the measured value exceeds the preset value, the alert beeping sound will be activated, the value that is over-limit will blink at the same time. 6.2 Over-limit indication sound mute setting •... -
Page 29: Repair And Maintenance
ENGLISH Notes: 1. The accessories are subject to change. See the package in your hand for detailed items and quantity. 2. All the parts of the device should NOT be replaced at will. If necessary, please use the components provided by the manufacture or those that are of the same model and standards as the accessories along with the device which are provided by the same factory. -
Page 30: Troubleshooting
ENGLISH 9 Troubleshooting Trouble Possible Reason Solution Unstable SpO 1. The finger is not placed 1. Place the finger and Pulse Rate far enough inside. correctly inside and try display 2. The finger is shaking again. or the patient is moving. 2. -
Page 31: Frequently Asked Questions
ENGLISH 10 Frequently Asked Questions 1. Q: What’s SpO A: SpO means the saturation percentage of oxygen in the blood. 2. Q: What’s the normal range of SpO value for healthy people? A: The normal range varies by individual, but usually over 95%, otherwise, please consult your physician. -
Page 32: Appendix
ENGLISH Appendix I. Key of Symbols Symbols on the screen Symbol Description %SpO The oxygen saturation Perfusion Index Pulse rate (Unit: beats per minute) Pulse bar graph Low battery voltage Battery is full Alert reset icon Speaker mute icon Speaker volume icon spot-check record memory full trend record memory full Temperature memory full... - Page 33 ENGLISH Symbols on the panels Symbol Description Symbol Description Caution: read instructions probe connector (warnings) carefully Temperature probe TEMP Keep in a cool, dry place connector Power/Left Key Product code Right/ Sound Key Lot number Auto-rotate/Up Key Keep away from sunlight Setting/Down Key Date of manufacture Menu/Confirm key...
-
Page 34: Common Knowledge
ENGLISH II. Common Knowledge 1 Meaning of SpO is the saturation percentage of oxygen in the blood, so called O2 concentration in the blood; it is defined by the percentage of oxyhemoglobin ( HbO ) in the total hemoglobin of the arterial blood. SpO is an important physiological parameter to reflect the respiration function;... - Page 35 Disposal: The product must not be disposed of along with other domestic waste. The users must dispose of this equipment by bringing it to a specific recycling point for electric and electronic equipment. GIMA WARRANTY TERMS The Gima 12-month standard B2B warranty applies.
Need help?
Do you have a question about the SP-20 and is the answer not in the manual?
Questions and answers