Advertisement
Quick Links
Advertisement

Related Manuals for HDTV Supply FIX1818E

Summary of Contents for HDTV Supply FIX1818E
- Page 1 User Manual FIX1818E 4K30 HDMI1.4, 18x18 fixed HDMI Matrix Switcher Version:V20.001...
- Page 2 Safety Reminder To protect the device and operating personnel from electrostatic discharge, you need to check and ensure that the device is grounding well before the device is powered on. Please observe the following when you install, use, maintain this equipment. Make sure the device ground connection.
- Page 3 Contents 1. Product Introduction ..................4 2. Product Features ....................4 3. Technical Datasheet ..................5 4. Panel diagram ....................5 5. Packing Datials ....................5 6. Product Operation and Instruction ............. 7 6.1 Front Panel Switching Operation ..................7 6.1.1 Switch .......................
- Page 4 All front buttons with background light, easier for switching status recognition Opening Web control codes enabling secondary development Spiral power connectors guaranteed stable power supplying 3. Specifications Model FIX1818E Description 18x18 HDMI matrix switcher Input 18×HDMI, 1×RS232, 1×RJ45, 1×AC Output 18×HDMI...
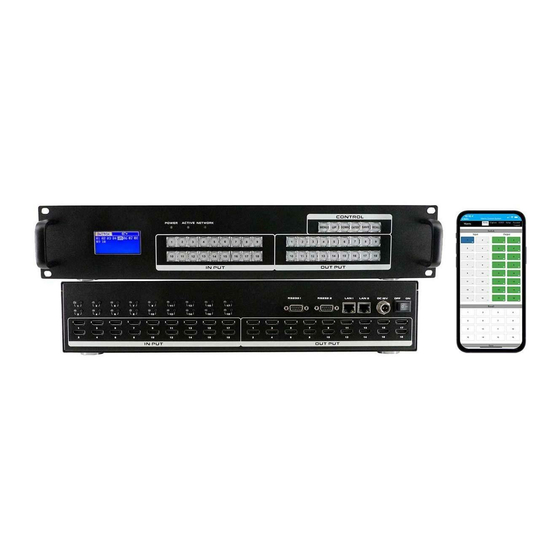
- Page 5 4. Panels Front panel Name Function ACTIVE Flashing while using the buttons/ WEB switching successfully POWER light up after power on, it will light off after power off INPUT Input buttons with background light, from 1~9 output buttons MENU Select between View, Switch, Scene Save/ Recall and Setup Upward and short cut button for switching to ALL outputs SAVE For saving the scene or setup...
- Page 6 INPUT 9 female HDMI input ports OUTPUT 9 female HDMI output ports 5. Packing FIX1818E Unit Power adapter 6. Control 6.1 Font buttons switching operation 6.1.1 Switching operation Switching with industry 2-key fast switching, first press the input button and then select/press output button.
- Page 7 6.2.2 Switch Switch interface: Users can do the input sources switching by clicking the Input buttons first, then pressing the Output buttons. Or users can use the shortcut buttons on the right for the fast switching: Switch one input to all the outputs Close one input to all the outputs Switch all inputs on all outputs Close all inputs to all outputs...
- Page 8 For changing the input, output and scenes’ name Users can rename the scenes, input and output names here, users can change all the names and then need to click the “Save” button on the right. After renamed the names, users will see the input, output and the scenes names have changed once click to the “Switch”...
- Page 9 6.2.6 More: For the more interface, users mainly can do the firmware upgrade here. Screen is for the other matrix models which with the touch screen, so users can monitor the touch screen switching status. For the upgrade, users need to check with the factory to get the firmware, the firmware is “.zip”...
- Page 10 Step 1: Make sure the matrix well connected with the WIFI router, and the iPad/Android devices are connected to this same WIFI. Then open on the MCS (matrix control system) APP and Enter the IP address of the matrix switcher(the default IP addresses are: 192.168.0.80 or 192.168.1.80): Step 2: After Enter the IP address, it will need to login, the default username and password both are the admin: Step 3: After log in successfully, users can do the same functions as the WEB GUI operation:...
- Page 11 6.4 RS232 control command RS232 cable with straight-through connection (USB-RS232 can be used directly to control) Communication protocol: Baud rate: 115200 Data bit: 8 Stop bit: 1 Check bit: None Commands Explanation Function description Switch Input Y to all the outputs YAll.
- Page 12 Check the display switcher and make sure it’s in good condition Make sure the the DVI cable between the device and display are short than 7 meters Reconnect the DVI cable and restart the system Make sure the signal sources are on Check the cables between the devices and displays are connected correctly.
Need help?
Do you have a question about the FIX1818E and is the answer not in the manual?
Questions and answers