Table of Contents
Advertisement
Quick Links
Advertisement
Table of Contents

Related Manuals for Evolveo Detective WN8


Summary of Contents for Evolveo Detective WN8
- Page 1 Detective WN8 www.evolveo.com...
-
Page 2: Safety Caution
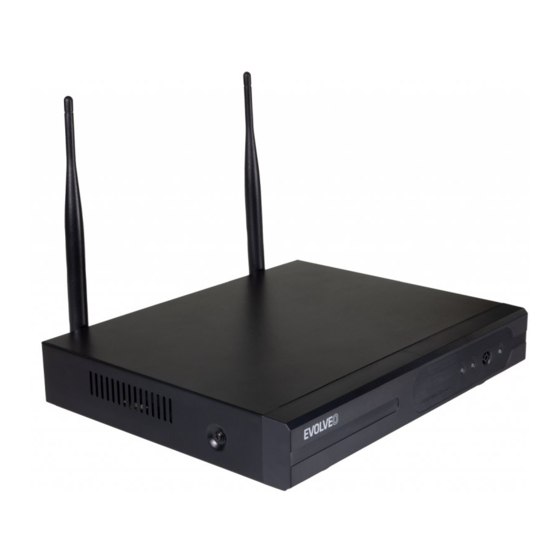
Statement Thank you for purchasing our product! This quick user guide will talk about main usages of the product. More information can be found on our website and the help center. This user guide may contain inaccurate content due to hardware and software upgrade. It is subject to change without previous notice. Safety Caution 1.Please do not put any fluid container on the product. 2.Please use the product in ventilated environment and prevent blocking the vents. 3.Please use included power supply with the product to prevent damage to the product. 4.Please use the product under its standard working temperature and humidity.(advised in this manual or distributor’s website) 5.Dust on PCB may cause short circuit. It is suggested to clean the dust on PCB timely to make the product work properly. 6.Please obey the regulation and policy in your country and area during the installation of this. Out Of Box Audit After receiving the product, please check all products and accessording to distributor’s Package ... - Page 3 NVR 1. WIRELESS Antenna Ports: Double antennas to WIRELESS range 2. WAN Port: Connect your NVR to Internet 3. VGA Port: For viewing on VGA monitor 4. HDMI Port: For viewing on HDTV 5. USB Ports: For mouse and backup 6. Power Input IPC IPC without RJ45 connector IPC with RJ45 connector 1. WIRELESS antenna: Wireless connection with NVR; 2. DC Port: input power 12V 1A; 3. RJ45 Port:For matching code and wired connection between IPC and NVR. Anyway, there is range limitation for the wireless signal from NVR. When cameras are out of this range, they can't be connected to NVR wirelessly. Then users can use network cable to connect cameras and NVR. 4. Reset button: Press reset button for 5 seconds to restore factory setting and enter into matching‐code mode. 5. Status light: Unbright: IPC system is not ready or abnormal Flash: IPC is in the code‐matching state ...
-
Page 4: Setup The System
turned off to prevent light interference. Installation Instruction Of WIRELESS NVR KIT Display device Power IP Camera VGA Output Power USB interface CONNECT TO ROUTER Mouse Setup The System This system is standalone with embedded Linux Operating System in the NVR. Just like a desktop PC, need to hook a screen to the NVR to enter the OS. Any TV, monitor with VGA or HDMI input should work for it. ... - Page 5 HD Install The system may not include hard disk depending on the kit you selected. The NVR works most 3.5" SATA HDD or 2.5"SATA HDD 1. Unplug your NVR from power, unscrew and remove the top cover. 2. Connect the SATA power and data cables from the NVR to the corresponding ports on your HDD (as shown). 3. Holding the hard drive and the DVR, gently turn it over and line up the holes on the hard drive with the holes on the NVR. Using a screwdriver, screw the provided screws into the holes and assemble the cover. Note:New HDD have to be formatted before recording. ...
-
Page 6: Record Video
To get better WIRELESS signal, it had better place the NVR in open area and high position. Record Video Record video is very easy on camera system. 1. Time Recording: Setup period of time of recording on NVR GUI .Right click mouse→ System Setup→Record setup→Record Plan. Click “time”and put mouse icon on the upper left corner (for example“1”as picture shows),press and drag the mouse to the right to choose the time. The list will turn to red. 2. Motion Recording: Only detect motion and then start recording. Right click mouse→ System Setup→Record setup→Record Plan. Click“motion”and put mouse icon on the ... -
Page 7: Video Backup
of the recording, click “play”to play to recording file; 3. Video backup: Choose the recording file in file list, as number“1”shown in picture. Insert the U flash disk, click “video backup”to backup the file; 4. Timeline: Click “date”and “time”at left bottom to check the timeline of recording, as number“2”shown in picture; 5. On the timeline with recording file, left click the mouse, the can playback the file. Video Backup Use U disk to copy video, so easy and convenient! 1. 2 USB ports: Plug U flash disk into the USB port of NVR. Right click on main menu→Video backup→choose backup channel→choose video mode→setup searching time→search→choose recording file on the list→video backup (support 32G U flash disk at max. Recording file is packed one hour per time.) 2. 1 USB port: Right click on main menu→video backup→choose backup channel→choose video mode→setup searching time→search→choose recording file on the list→video backup, insert U flash disk within reminding 1 minute, then the system will backup recording file to U flash disk. ... - Page 8 View On Mobile 1. Download the APP “IP PRO” Users can use cellphone to scan the QR code below to install the APP free of charge, or users can search “IP Pro”on APP store or Google Play then install the APP . Note: For IOS system, it requires IOS 8.0 version or above.For android, android 4.4 or above. 2. Add the NVR system to your APP device list Run the APP “IP PRO”, login with your account or choose Trial→Click“+”to “Add device by ID” (find it the NVR’s Network setup, or right bottom corner on screen), Description (e.g. Home Camera), User name (default user name is “admin”) and password(default is empty)→Submit to get back to your device list→Click the device to view the cameras. Tips: if you’ve set a password on your NVR system, please update your password on APP to view. ...
- Page 9 Playback On Mobiles In the IP PRO APP,while viewing live video of the system, click Playback, you will enter the remote playback menu. The APP automatically playback camera 1, you can switch channels the CH. Tips: Videos in playback are HD@real time which requires very good transmission condition. We suggest to playback in LAN. Remote playback out of LAN may not 100% work due to connection & network condition. ...
-
Page 10: System Setup
MENU‐DO What Menu bar Click right button you can enter the main menu; click right button again you can exit the current menu or return. Split screen: Change status of live view. You can choose to view multiple cameras or any single camera. Video Manage: Manage IP cameras and NVR channels. System setup: All system settings. Video playback: Playback recorded videos. Video backup: Backup recorded videos. Color adjust: Adjust the image setting of each camera. PTZ Control: Control or set up camera (PTZ camera only). Volume: Adjust volume of audio cameras (works only for audio cameras). Setup Wizard: Step by step guide of 1st time general settings. Fast Network: Shortcut to network settings. Wifi add: Add IP cameras into NVR channels wirelessly. Exit System: Logout, reboot, close screen output and shut down the system. System Setup Click right button→Choose System setup; you then shall enter the menu that enables you to do all settings related to this system. General setup(This enables you to set) Language Time Display resolution HDD information System admin(This enables you to set) System version System maintenance including system upgrade User and password management Restore to default settings ... - Page 11 System log Record setup (This enables you to set) Record plan for each channel video detection Network setup (This enables you to set) All network related settings Channel setup (This enables you to set) Manage channels and cameras Add wireless camera Step 1: plug NVR and cameras to power, after NVR start, right click mouse→Wireless add→match‐code interface, NVR will search camera under matching code model automatically. Step 2: wireless camera has two kinds, including camera with RJ45 connector and camera without RJ45 connector, their way to match code as below: ① for camera with RJ45 connector, after start, use network cable to connect with NVR, match code automatically, no need to restore. ...
- Page 12 1. Position The Antenna Correctly As can be seen from the gain graph of the rod antenna below, the signal coverage of the antenna is similar to an apple. The antenna is located in the center of the apple and surrounds the antenna. The signal is strong, and the upper and lower ends of the antenna are recessed, and the signal is weak. IP Camera Rod antenna gain vs. coverage According to the transmission characteristics of the antenna to the signal, in order to ensure the optimal image transmission effect of the wireless set, Claim: NVR and IPC antennas should be placed in high places, not on the walls, metal, Obstructions such as glass affect the signal to diverge outward. The antenna of IPC should be placed in parallel with the NVR antenna to maximize the respective radiation direction angles. In contrast, the maximum coverage of the signal is formed, as shown in the following figure. ...
- Page 13 Correct method Fault method 2. Use Antenna Extension Cord to prolong WIRELESS distance Installation method of antenna extension cord Antenna Extension Cord IP Camera Window Wall Notes: When WIRELESS signal is not strong enough against walls, users can take off the original antenna and subtitute antenna extension cord. Drill a hole on the wall to let the extension cord go through and simply it where WIRELESS signal is strong. Set up cascading connection in a reasonable solution, extend wireless signal transfer distance ...
-
Page 14: Repeater Setup
range. Users can choose one according to real situation. Repeater Setup Step 1: Right click on NVR’S GUI, left click “video management” → then left click “repeater” Step 2: Add repeater As picture shown below, click icon + besides channel 3, choose other channel. Step 3: As picture shown below, it means IPC1 is connected to NVR through IPC2 and IPC3. IPC2 is connected to NVR through IPC3. IPC3 is connected to NVR directly. ... -
Page 15: Delete Repeater
Step 4: Click “Apply” and then click “refresh” to check if the setting is successful. Delete Repeater Move the mouse to targeted channels, left click to delete, and then click “Apply” and “OK”. Application Example As picture shown above, when IPCAM1 is put somewhere is out of NVR WIRELESS range, and there is IPCAM2 between them with strong WIRELESS signal, users can put IPCAM1 close to NVR ... -
Page 16: Fcc Compliance Statement
and power it, setup IPCAM1 repeated by IPCAM2, and then install IPCAM1 to the presupposed place. Warning Notes: Device will not in guarantee if caused by below reason: A. Accident;negligence;disaster; mis‐operation. B. Do not conform to the environment and conditions, such as power improper, working temperature Too high or too low, lightning stroke.ect. C. Ever be maintained by other center which not belong to the real factory. D. Goods already sold more than 12 months. FCC RADIATION NORM FCC This device complies with Part 15 of the FCC Rules. Operation is subject to the following two conditions: (1) this device may not cause harmful interference, and (2) this device must accept ... - Page 17 —Reorient or relocate the receiving antenna. —Increase the separation between the equip mentand receiver. —Connect the equipment into an outlet on acircuit different from that to which the receiveris connected. —Consult the dealer or an experienced radio/TV technician for help. Do you still need an advice after reading this guide? First read “Frequently Asked Questions” at www.evolveo.com or contact the EVOLVEO technical support. The warranty DOESN´T APPLY to: using the device for other purposes than it was designed to installation of another firmware then the one that was installed as the original from the factory or that is to be downloaded at ftp://ftp.evolveo.com mechanical damage of caused by inappropriate using damage caused by the natural elements as fire, water, static electricity, overvoltage and so on damage caused by unauthorized repair ...
- Page 18 DECLARATION OF CONFORMITY Hereby, the company Abacus Electric, s.r.o. declares that the EVOLVEO Detective WN8 is in compliance with the requirements of the standards and regulations, relevant for the given type of device. Find the complete text of Declaration of Conformity at ftp://ftp.evolveo.com/ce Dovozce / Dovozca / Importer / Importőr Abacus Electric, s.r.o. Planá 2, 370 01, Czech Republic Výrobce / Výrobca / Manufacturer / Gyártó Naxya Limited No.5, 17/F, Strand 50, 50 Bonham Strand, Sheung Wan, Hong Kong Made in China Copyright © Abacus Electric, s.r.o. www.evolveo.com www.facebook.com/EvolveoCZ All rights reserved. Design and specification may be changed without prior notice. ...
Need help?
Do you have a question about the Detective WN8 and is the answer not in the manual?
Questions and answers