Table of Contents
Advertisement
Available languages
Available languages
Quick Links
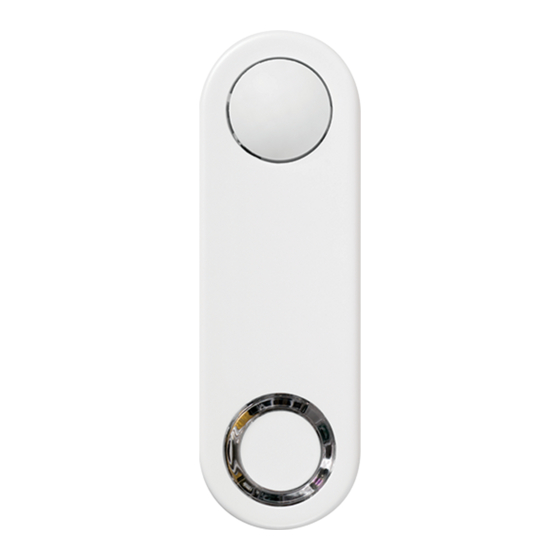
Vive Integral Fixture Controls
Part of the Vive System
041600
Please read before installing
Rev. B
04/2018
DFCSJ-OEM-OCC Vive Integral Fixture Control with Sensor
DFCSJ-OEM-RF Vive Integral Fixture Control (RF only)
9.5 – 20.5 V-
IEC SELV / NECR Class 2
UL2043 Plenum Rated
250 mA max
Vive Integral Fixture Controls
Controls up to 4 drivers (IEC 60929 Annex E.2 requires each driver to limit the sink/
source current draw to 2.0 mA maximum). See wiring diagrams for more details.
Important Notes:
• Use copper conductors only.
• Check to see that the device type and rating is suitable for the application.
• DO NOT install if product has any visible damage.
• If moisture or condensation is evident, allow the product to dry completely
before installation.
• Operate between 32 °F and 131 °F (0 °C and 55 °C), ambient.
• 0% to 90% humidity, non-condensing.
• For indoor use only.
• Sensor should be mounted to fixture in orientation that makes it parallel to
the floor when fixture is installed in ceiling.
• Clean only with soft, damp cloth, no chemical cleaners.
• DO NOT paint.
• Intended for installation in fixture manufacturer's facility only.
Default Functionality
Fixture Controls
Auto On level: DFCSJ-OEM-OCC only
(not applicable for DFCSJ-OEM-RF)
Varies with ambient light level when occupancy is triggered
(e.g., 100% for a dark room, 10% for a bright room).
Timeout period: 15 minutes
For more information, see
www.lutron.com/TechnicalDocumentLibrary/3691039.pdf
www.lutron.com/TechnicalDocumentLibrary/048642.pdf
www.lutron.com/TechnicalDocumentLibrary/ApNote106.pdf
*
For set-up, programming, and
Troubleshooting with a Vive system,
please refer to the installation
instructions included with the Vive hub
or at www.lutron.com
FCC information and IC information
This device complies with part 15 of the FCC Rules and Industry Canada
license-exempt RSS standard(s). Operation is subject to the following
two conditions: (1) This device may not cause interference, and (2) this
device must accept any interference, including interference that may
cause undesired operation. Modifications not expressly approved by
Lutron Electronics Co., Inc. could void the user's authority to operate this
equipment.
NOTE: This equipment has been tested and found to comply with
the limits for a Class B digital device, pursuant to part 15 of the FCC
Rules. These limits are designed to provide reasonable protection
against harmful interference in a residential installation. This equipment
generates, uses and can radiate radio frequency energy and, if not
installed and used in accordance with the instructions, may cause
harmful interference to radio communications. However, there is no
guarantee that interference will not occur in a particular installation. If
this equipment does cause harmful interference to radio or television
reception, which can be determined by turning the equipment off and on,
the user is encouraged to try to correct the interference by one or more
of the following measures:
• Re-orient or relocate the receiving antenna.
• Increase the separation between the equipment and receiver.
• C onnect the equipment into an outlet on a circuit different from that to
which the receiver is connected.
Lutron Electronics Co., Inc. 7200 Suter Road
Coopersburg, PA 18036-1299 USA
Required Components
For each fixture, you will need:
One Fixture Control
PIR lens
LED/Daylight sensor lens
Button
OR
Vive Integral Fixture Control (RF only)
Vive Integral Fixture Control with Sensor
(DFCSJ-OEM-RF)
(DFCSJ-OEM-OCC)
Note: Neither Daylighting functionality nor occupancy
sensing is available in the DFCSJ-OEM-RF
Start Here
Review the Vive Integral Fixture Controls App Note (048642) at www.lutron.com for Wiring
and Fixture Construction Guidelines.
1. Connect Wires using Diagrams Below
• V ive Integral Fixture control contains two 18 AWG (0.75 mm
2
), solid copper wires.
Fixture Control
120 – 277 V~
digital link interface
Vive Integral Fixture Controls with
EcoSystem or DALI Driver*
Driver
Maximum Number
per Fixture Control
EcoSystem driver
4
* P lease see the Notes section for additional details
SR+/DALI+
Driver with self-powered DALI link
SR-/DALI-
120 – 277 V~
Fixture Control with Driver with
Self-powered DALI Link
Driver
Maximum Number per
Fixture Control
PhilipsR SR driver
2
OsramR DEXALT
3
driver
2. Install Integral Fixture Control
• E nsure knockout and adjacent surfaces are free from burrs, oil, chemicals, debris, etc.
• D o not push on the PIR lens or button to install the Fixture Control. Push on the center of the Fixture Control.
• P ush firmly on the Fixture Control around the entire perimeter until it sits flush against the intended fixture mounting surface.
A special tool from Lutron can be provided to facilitate installation.
• D o not fully enclose within the metal fixture.
Customer Assistance | 1.844.LUTRON1 USA, Canada, and the Caribbean | +1.888.235.2910 Mexico | +1.610.282.3800 Others | www.lutron.com
At least one EcoSystem driver + Fixture Control digital link interface (DFC-OEM-DBI)
EcoSystem driver
LED lens
Button
+
OR
At least one driver with self-powered DALI link
(see 3691039 or 048642 on www.lutron.com for list)
Driver with self-powered DALI link
S+
S-
Vive Integral
Fixture Control
E1
E2
EcoSystem driver
120 – 277 V~
E1
E2
EcoSystem driver
120 – 277 V~
Vive Integral
Fixture Control
For applications that require more drivers than shown here,
contact the driver manufacturer.
Note: When using multiple drivers with self-powered DALI link, SR+/
DEXAL+ from the drivers must be tied together and the SR-/DEXAL-
from the drivers must be tied together. Do NOT mix "+" and "-" when
using multiple drivers."
+
Fixture Control
digital link interface
3. Fixture Control Self-Test (REQUIRED)
The Vive integral fixture control supports a self-test mode in order to verify proper RF communication after
being installed in a fixture. In case of self-test failure, the fixture must not be released to customers until the
wiring and/or fixture construction is adjusted to improve RF performance until the fixture passes the self-test.
See Wiring Best Practices section on the Vive Integral Fixture Controls App Note (048642) at
www.lutron.com for details.
Until one or more of the following conditions are met, the fixture control automatically enters self-test on
power-up:
• The fixture control has previously been powered continuously for more than 60 minutes.
• The fixture control is associated to any other devices or a Vive system.
Resetting the fixture control to factory defaults will reset the above conditions and re-enable automatic
self-test entry.
The Fixture Control Self-Test is conducted as follows:
1. W hile the test is in progress, the status LED alternates between green and red. During the test, the Vive
integral fixture control will not respond to button presses or commands from other Lutron
Clear Connect devices.
2. Fixture will turn ON to full intensity for 5 seconds and then will turn OFF for 5 seconds.
3. Once the self-test is complete:
a. I f the fixture passes, the status LED blinks green twice, repeating every 2 seconds, and the fixture will
turn ON.
b. I f the fixture fails, the status LED blinks red twice, repeating every 2 seconds, and the fixture will
remain OFF.
4. To exit the self-test mode after completion, press the button or wait 5 minutes to exit automatically.
Note: Do NOT disconnect power to the fixture until the pass/fail determination has been made.
4. Basic Functionality End-of-Line Test
1. Provide power to the fixture.
2. Fixture will go to the driver's previous light level.
3. P ress the button to toggle the load state. Light will fade to ON (or OFF) over 1 second. Green LED
will stay lit for 2 seconds after releasing the button.
4. T oggle the load again (if necessary) to ensure the lights are on. This will make sure the lights turn ON when
power is applied the next time (at job site).
5. Remove power.
Notes:
1. E- and E+ from the DFC-OEM-DBI can go to either the E1 or E2 terminal on the EcoSystem driver.
2. S- and S+ from the DFC-OEM-DBI can go to either wire from the Vive Integral Fixture Control.
Advertisement
Table of Contents

Related Manuals for Lutron Electronics Vive DFCSJ-OEM-OCC


Summary of Contents for Lutron Electronics Vive DFCSJ-OEM-OCC
- Page 1 2. Install Integral Fixture Control this equipment does cause harmful interference to radio or television reception, which can be determined by turning the equipment off and on, the user is encouraged to try to correct the interference by one or more • E nsure knockout and adjacent surfaces are free from burrs, oil, chemicals, debris, etc. of the following measures: • D o not push on the PIR lens or button to install the Fixture Control. Push on the center of the Fixture Control. • Re-orient or relocate the receiving antenna. • P ush firmly on the Fixture Control around the entire perimeter until it sits flush against the intended fixture mounting surface. • Increase the separation between the equipment and receiver. A special tool from Lutron can be provided to facilitate installation. • C onnect the equipment into an outlet on a circuit different from that to • D o not fully enclose within the metal fixture. which the receiver is connected. Lutron Electronics Co., Inc. 7200 Suter Road Coopersburg, PA 18036-1299 USA...
- Page 2 2. W ait for Fixture Control Self-Test to complete (10 seconds) specifications. and press the button to exit the self-test. Press the button until the light is in the ON state. Wireless Transmitter(s) cannot be associated to the The maximum number of Wireless Transmitters have been associated to the Vive Integral Fixture Control. To remove a previously set Vive Integral Fixture Control. up Wireless Transmitter, tap the button used for association on the Wireless Transmitter three times, on the third tap hold for three 3. S hine a light source (flashlight) directly into daylight sensor seconds and then tap three more times. lens. Fixture lights will dim down over 1 minute (hold flashlight steadily in place). *Note: These could apply to either the OEM or to the end customer. 4. C over daylight sensor lens/button with opaque material. 5-year Warranty: http://www.lutron.com/TechnicalDocumentLibrary/3601321.pdf Fixture light will dim up over 1 minute (hold opaque material steadily in place). Lutron, Pico, Vive, Clear Connect, and EcoSystem are trademarks of Lutron Electronics Co., Inc. registered in the U.S. and other countries. Radio Powr Savr is a trademark of Lutron Electronics Co., Inc. App Store is a service mark of Apple, Inc. Lutron Electronics Co., Inc. 7200 Suter Road Android and Google Play are trademarks of Google LLC. NEC is a registered trademark of the National Fire Protection Association, Quincy, Massachusetts. PHILIPS is a trademark of Koninklijke Philips N.V. Coopersburg, PA 18036-1299 USA OSRAM and DEXAL are trademarks of OSRAM Opto Semiconductors GmbH. iOS is a trademark or registered trademark of Cisco in the U.S. and other countries and is used under license. ©2017-2018 Lutron Electronics Co., Inc.
- Page 3 2. Installation de la commande de luminaires intégrale interférences ne surviendront dans une installation particulière. Si cet équipement provoque des interférences nuisibles pour la réception radio • A ssurez-vous que les entrées à perforer et les surfaces adjacentes sont dépourvues de bavures, d’huile, de produits chimiques, de débris, etc. et télévisuelle, ce qui peut être déterminé en allumant et en éteignant l’équipement, il est recommandé que l’utilisateur tente de corriger ces • N ’appuyez pas sur la lentille PIR ou le bouton pour installer la commande de luminaires. Appuyez au centre de la commande de luminaires. interférences en utilisant une ou plusieurs des mesures suivantes : • A ppuyez fermement sur la commande de luminaires sur tout son périmètre jusqu’à ce qu’elle soit encastrée dans la surface de montage du • Réorientez ou repositionnez l’antenne réceptrice. luminaire prévue. Un outil spécial de Lutron peut être fourni pour faciliter l’installation. • Augmentez la séparation entre l’équipement et le récepteur. • N e l’intégrez pas complètement dans le luminaire métallique. • C onnectez l’équipement à une prise électrique se trouvant sur un circuit différent de celui où le récepteur est connecté. Lutron Electronics Co., Inc. 7200 Suter Road, Coopersburg, PA 18036-1299, États-Unis...
- Page 4 Les transmetteurs sans fil ne peuvent pas être associés à la Le nombre maximal de transmetteurs sans fil a été associé à la commande de luminaire intégrée Vive. Pour supprimer un soit allumée. 3. D irigez une source de lumière (lampe torche) directement sur la commande de luminaire intégrale Vive. transmetteur sans fil précédemment configuré, pressez trois fois le bouton utilisé pour associer un transmetteur sans fil et lentille du détecteur de lumière du jour. Les lumières du luminaire se maintenez-le pendant trois secondes à la troisième pression, puis pressez-le trois fois de nouveau. tamiseront pendant 1 minute (maintenez la lampe torche en place). 4. R ecouvrez la lentille/le bouton du détecteur de lumière du jour avec * Remarque : Ceci s’applique au fabricant d’équipement d’origine ou au client final. un matériau opaque. La lumière du luminaire augmentera pendant Garantie de 5 ans : http://www.lutron.com/TechnicalDocumentLibrary/3601321.pdf 1 minute (maintenez le matériau opaque en place). Lutron, Pico, Vive, Clear Connect, et EcoSystem sont des marques commerciales de Lutron Electronics Co., Inc., enregistrées aux États-Unis et dans d’autres pays. Radio Powr Savr est une marque commerciale Lutron Electronics Co., Inc. App Store est une marque de Lutron Electronics Co., Inc. 7200 Suter Road, service de Apple, Inc. Android et Google Play sont des marques commerciales de Google LLC. NEC est une marque déposée de la National Fire Protection Association, Quincy, Massachusetts. PHILIPS est une marque commerciale de Koninklijke Philips N.V. Coopersburg, PA 18036-1299, États-Unis OSRAM et DEXAL sont de marques commerciales de OSRAM Opto Semiconductors GmbH. iOS est une marque commerciale ou une marque déposée de Cisco aux États-Unis et dans d’autres pays, utilisée sous licence. ©2017-2018 Lutron Electronics Co., Inc.
- Page 5 2. Instale el control integral de artefactos Sin embargo, no hay garantía de que no ocurran interferencias en una instalación en particular. Si este equipo ocasionara interferencias perjudiciales • A segúrese de que la tapa ciega y las superficies adyacentes estén libres de rebabas, aceite, productos químicos, residuos, etc. para la recepción de radio o televisión, lo que puede ser determinado encendiéndolo y apagándolo, se recomienda al usuario que intente corregir la • N o presione la lente o el botón PIR para instalar el control de artefactos. Presione en el centro del control de artefactos. interferencia adoptando una o más de las siguientes medidas: • P resione firmemente el control de artefactos alrededor de todo el perímetro hasta que quede a ras contra la superficie de montaje • Reorientar o reubicar la antena receptora. prevista para el artefacto. Puede suministrarse una herramienta especial de Lutron para facilitar la instalación. • Aumentar la separación entre el equipo y el receptor. • N o lo encierre completamente dentro del artefacto metálico. • C onectar el equipo a un tomacorriente que corresponda a un circuito diferente de aquel al cual está conectado el receptor. Lutron Electronics Co., Inc. 7200 Suter Road Coopersburg, PA 18036-1299, E.U.A.
- Page 6 2. E spere a que finalice la autocomprobación del control del artefactos especificaciones de Lutron. (10 segundos) y pulse el botón para salir de la autocomprobación. Los transmisores inalámbricos no pueden ser asociados al control Ha sido asociado al control integral de artefactos Vive el número máximo de transmisores inalámbricos. Para eliminar un transmisor Pulse el botón hasta que la luz esté en el estado ENCENDIDA. integral de artefactos Vive. inalámbrico previamente configurado, pulse tres veces el botón utilizado para la asociación en el transmisor inalámbrico; la tercera 3. H aga brillar una fuente luminosa (linterna) directamente sobre la vez manténgalo pulsado durante tres segundos y luego púlselo tres veces más. lente del sensor de luz diurna. Las luces del artefacto se atenuarán durante 1 minuto (mantenga la linterna firmemente en su lugar). 4. C ubra la lente/botón del sensor de luz diurna con material opaco. *Nota: Esto podría regir tanto para el OEM como para el cliente final. La luz del artefacto aumentará continuamente durante 1 minuto Cinco años de garantía: http://www.lutron.com/TechnicalDocumentLibrary/3601321.pdf (mantenga el material opaco firmemente en su lugar). Lutron, Pico, Vive, Clear Connect y EcoSystem son marcas comerciales de Lutron Electronics Co., Inc. registradas en E.U.A. y otros países. Radio Powr Savr es una marca comercial de Lutron Electronics Co., Inc. App Store es una marca de servicio de Lutron Electronics Co., Inc. 7200 Suter Road Apple Inc. Android y Google Play son marcas comerciales de Google LLC. NEC es una marca comercial registrada de la National Fire Protection Association, Quincy, Massachusetts. PHILIPS es una marca comercial de Koninklijke Philips N.V. Coopersburg, PA 18036-1299, E.U.A. OSRAM y DEXAL son marcas comerciales de OSRAM Opto Semiconductors GmbH. iOS es una marca comercial o una marca comercial registrada de Cisco en E.U.A. y en otros países y se utiliza bajo licencia. ©2017-2018 Lutron Electronics Co., Inc.
Need help?
Do you have a question about the Vive DFCSJ-OEM-OCC and is the answer not in the manual?
Questions and answers