
Subscribe to Our Youtube Channel
Related Manuals for Kramer KIT-400


Summary of Contents for Kramer KIT-400
- Page 1 USER MANUAL MODEL: KIT-400 4K Auto-Switcher/Scaler Kit P/N: 2900-301408 Rev 2 www.kramerAV.com...
-
Page 2: Table Of Contents
Kramer Electronics Ltd. Contents Introduction Getting Started Overview Typical Applications Defining KIT-400 4K Auto-Switcher/Scaler Kit Defining KIT-400T Defining KIT-400R Mounting KIT-400 Connecting KIT-400 Connecting the Output to a Balanced/Unbalanced Stereo Audio Acceptor Connecting to KIT-400 via RS-232 Connecting an Occupancy Sensor to the TOGL Pin... -
Page 3: Introduction
Kramer Electronics Ltd. Introduction Welcome to Kramer Electronics! Since 1981, Kramer Electronics has been providing a world of unique, creative, and affordable solutions to the vast range of problems that confront the video, audio, presentation, and broadcasting professional on a daily basis. In recent years, we... -
Page 4: Overview
European Advanced Recycling Network (EARN) and will cover any costs of treatment, recycling and recovery of waste Kramer Electronics branded equipment on arrival at the EARN facility. For details of Kramer’s recycling arrangements in your particular country go to our recycling pages at www.kramerav.com/support/recycling. - Page 5 Kramer Aware interface on the KIT-400 embedded webpages, and access the interface using the Kramer Aware app on a compatible Kramer touch panel. • Convenient Unit Control and Configuration Options – Local control via front panel source selection buttons, DIP-switches for audio configuration, and an OSD driven menu for configuration of the receiver.
-
Page 6: Typical Applications
Navigation buttons to access the OSD menu on KIT-400R. • RS-232 serial commands transmitted by a touch screen system, PC, or other serial. • The Ethernet using built-in user-friendly webpages. • Kramer Aware app from a compatible Kramer touch panel. KIT-400 – Introduction... -
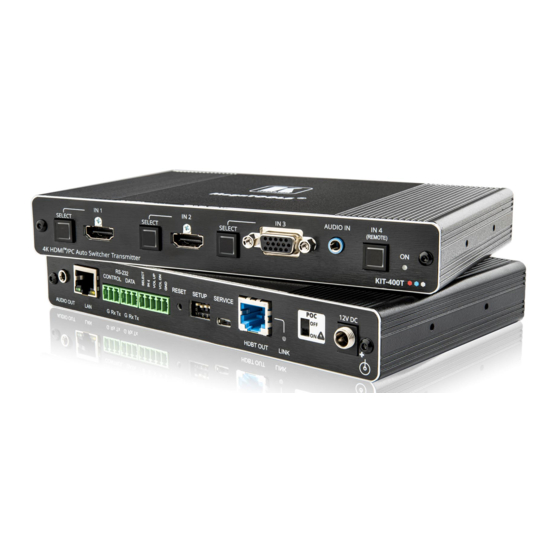
Page 7: Defining Kit-400 4K Auto-Switcher/Scaler Kit
12). RESET Button Short press: sends a reset command to KIT-400R and then reboots KIT-400T. Long press: resets KIT-400R to its factory default parameters and then resets KIT-400T to its factory default parameters. KIT-400 – Defining KIT-400 4K Auto-Switcher/Scaler Kit... -
Page 8: Defining Kit-400R
Connect to contact closure switches, an occupancy sensor Terminal Block Connector and/or toggle switches (contact between the desired pin and GND pin), to turn the display on or off. (See Using Remote Control Switches on page 12). KIT-400 – Defining KIT-400 4K Auto-Switcher/Scaler Kit... - Page 9 PoC (Power Over Cable) Switch Set the PoC switch to ON on both KIT-400T and KIT-400R. 12V DC Connector Connect to the supplied power adapter, unless the power adapter is connected to KIT-400T. KIT-400 – Defining KIT-400 4K Auto-Switcher/Scaler Kit...
-
Page 10: Mounting Kit-400
Kramer Electronics Ltd. Mounting KIT-400 This section provides instructions for mounting KIT-400. Before installing, verify that the environment is within the recommended range: • Operation temperature – 0 to 40C (32 to 104F). • Storage temperature – -40 to +70C (-40 to +158F). -
Page 11: Connecting Kit-400
Kramer Electronics Ltd. Connecting KIT-400 Always switch off the power to each device before connecting it to your KIT-400. After connecting your KIT-400, connect its power and then switch on the power to each device. Figure 3: Connecting to the KIT-400 To connect KIT-400 as illustrated in the example in Figure 3: 1. -
Page 12: Connecting The Output To A Balanced/Unbalanced Stereo Audio Acceptor
Figure 4: Connecting to a Balanced Stereo Audio Figure 5: Connecting to an Unbalanced Stereo Audio Acceptor Acceptor Connecting to KIT-400 via RS-232 You can connect to the KIT-400 via an RS-232 connection using, for example, a PC. KIT-400 features two RS-232 3-pin terminal block connectors: •... -
Page 13: Connecting An Occupancy Sensor To The Togl Pin
For HDBT cables, it is recommended that the cable ground shielding be connected/soldered to the connector shield. EIA /TIA 568B Wire Color Orange / White Orange Green / White Blue Blue / White Green Brown / White Brown KIT-400 – Connecting KIT-400... -
Page 14: Operating And Controlling Kit-400
(for example, when using an occupancy sensor). Defining the TOGGLE PIN on KIT-400R on page 22. Turn off the display. Turn on the display. KIT-400 – Operating and Controlling KIT-400... -
Page 15: Setting Kit-400T Dip-Switches
RS-232 data between the transmitter and receiver in any of the following ways: • Controlling Via a Control System on page 14. • Controlling a Sink Device Via the DATA Ports on page 15. • Controlling Via Maestro on the Transmitter on page 15. KIT-400 – Operating and Controlling KIT-400... - Page 16 For example, to turn the display off (DISPLAY OFF), send the #TUNNEL-CTRL 1,1,”TUNNEL-232 ‘DISPLAY OFF’9600”<CR> command from the control system, via HDBT to the KIT-400R. Figure 8: Controlling a Sink Device Connected to the Receiver KIT-400 – Operating and Controlling KIT-400...
- Page 17 To control the receiver via Maestro at the transmitter, send a command via the RS232_HDBT port in Maestro. For example, to open the relay contacts (RELAY-STATE 1,0), send the RELAY-STATE 1,0 command from Maestro, via HDBT to the KIT-400R. Figure 10: Controlling the Receiver via Maestro KIT-400 – Operating and Controlling KIT-400...
-
Page 18: Using The Osd Menu On Kit-400R
2. Press: ▪ ENTER to accept changes and to change the menu settings. ▪ Arrow buttons to move through the OSD menu, which is displayed on the video output. ▪ EXIT to exit the menu. KIT-400 – Operating and Controlling KIT-400... - Page 19 SHARPNESS – set the sharpness of the picture. NR (Noise Reduction) – select the noise reduction filter: Off (default), Low, Middle or High. Color Set the Red, Green and Blue shades. Image parameters are adjusted. KIT-400 – Operating and Controlling KIT-400...
- Page 20 3840x2160P @25Hz 1280x1024 @60Hz 1280x720 @60Hz 3840x2160P @30Hz 1360x768 @60Hz 2048x1080 @50Hz 1920x1080P @24Hz 1920x1080P @25Hz 3840x2160P @50Hz 1400x1050 @60Hz 2048x1080 @60Hz 1920x1080P @30Hz 3840x2160P @60Hz 1440x900 @60Hz 2560x1440 @60Hz RB Output parameters are defined. KIT-400 – Operating and Controlling KIT-400...
- Page 21 Set the OSD background between 100 (transparent) and 0 (opaque). DISPLAY Select the information displayed on-screen during operation: Info (default) –Information appears for 10 seconds. On –Information appears constantly. Off – Information does not appear. OSD parameters are set. KIT-400 – Operating and Controlling KIT-400...
- Page 22 3. Define Auto Sync Off according to the information in the following table: Menu Item Function Disable Leave outputs active always. Enable Disable outputs after ~ 2 minutes of no input detection. Sleep mode is defined. KIT-400 – Operating and Controlling KIT-400...
- Page 23 For the HDMI input, select a built-in EDID file and press enter: Def.1080P, Def. 4K2K(3G), Def. 4K2K(6G) (default), USER 1, USER 2 or Output. The selected built-in EDID file is saved on the selected input. KIT-400 – Operating and Controlling KIT-400...
- Page 24 (see Connecting an Occupancy Sensor to the TOGL Pin on page 11). INPUT Set to select between inputs (HDBT or HDMI). SELECT TOGGLE pin functionality is defined. KIT-400 – Operating and Controlling KIT-400...
- Page 25 CEC on and off commands). KIT-400R either passes CEC commands between its HDMI input and the display, or it initiates and sends on and off commands to the display. CEC is enabled/disabled. KIT-400 – Operating and Controlling KIT-400...
- Page 26 To reset the device: 1. On the front panel press MENU. The menu appears. 2. Click Factory and select RESET ALL. Wait for completion of factory reset (resolution is set to Native). Device is reset. KIT-400 – Operating and Controlling KIT-400...
-
Page 27: Operating Via Ethernet
The Local Area Connection Properties window for the selected network adapter appears as shown in Figure Figure 12: Local Area Connection Properties Window 4. Highlight either Internet Protocol Version 6 (TCP/IPv6) or Internet Protocol Version 4 (TCP/IPv4) depending on the requirements of your IT system. KIT-400 – Operating and Controlling KIT-400... - Page 28 5. Click Properties. The Internet Protocol Properties window relevant to your IT system appears as shown in Figure 13 Figure Figure 13: Internet Protocol Version 4 Properties Window Figure 14: Internet Protocol Version 6 Properties Window KIT-400 – Operating and Controlling KIT-400...
- Page 29 You can connect the Ethernet port of KIT-400 to the Ethernet port on a network hub or using a straight-through cable with RJ-45 connectors. Configuring Ethernet Port You can set the Ethernet parameters via the embedded webpages. KIT-400 – Operating and Controlling KIT-400...
-
Page 30: Using Embedded Webpages
25. • Ensure that your browser is supported. The following operating systems and Web browsers are supported: Operating Systems Browser Firefox Windows 7 Chrome Safari Edge Windows 10 Firefox Chrome Safari Safari Android KIT-400 – Using Embedded Webpages... - Page 31 Kramer Electronics Ltd. To browse the KIT-400 webpages: 1. Open your Internet browser. 2. Type the IP address of the device in the address bar of your browser. For example, the default IP address: The Authentication window appears (if set, security is enabled): Figure 16: Using the Embedded Webpages –...
-
Page 32: Switching And Adjusting Port Signals
When selecting the VGA input, adjust the phase of the VGA input sampling by entering the value or using the slider. ▪ Remote HDMI IN 4. The remote HDMI IN 4 input is located on the KIT-400R. An input is selected. KIT-400 – Using Embedded Webpages... -
Page 33: Defining General Settings
• Changing the device name (click Set to save the name). • Defining Remote Buttons Functionality on page 32. • Saving and Loading Settings on page 33. • Performing a Factory Reset on page 33. KIT-400 – Using Embedded Webpages... - Page 34 Maestro Triggers to send Maestro Script (e.g., closing the lights and opening a projector screen upon HDMI trigger). See Configuring Device Automation on page 43. Remote contact closure switches behavior is defined. KIT-400 – Using Embedded Webpages...
-
Page 35: Configuring Network Settings
3. Click OK to start factory reset and follow the instructions on-screen. The device resets to its default parameters. Configuring Network Settings KIT-400 enables you to configure network settings for your device. For proper settings and before changing to DHCP, consult your Network administrator. KIT-400 – Using Embedded Webpages... - Page 36 If you want the device to obtain an IP address via DHCP server, click DHCP ON. 4. Verify that the TCP/UDP port is correct. 5. Click Set. The webpage logs out and the browser reloads with the new network information. KIT-400 – Using Embedded Webpages...
-
Page 37: Defining Time And Date
4. If required, change the: ▪ Device date. ▪ Device time. ▪ Time zone. 5. Select the time zone. 6. Set daylight savings time status (YES or NO). 7. Click Save Changes. The device date and time is set. KIT-400 – Using Embedded Webpages... -
Page 38: Upgrading The Firmware
1. In the Navigation pane, click Device Settings. The Device Settings page appears. 2. Select the FW Upgrade tab. The FW Upgrade tab appears. Figure 21: Device Settings Page – FW Upgrade Tab 3. Click Update. The Windows browser opens. KIT-400 – Using Embedded Webpages... - Page 39 5. Click OK. The firmware files are uploaded and a progress bar is displayed. Do not interrupt the process or the KIT-400 may be damaged. 6. When the process is complete reboot the device. KIT-400T firmware is upgraded. KIT-400 – Using Embedded Webpages...
-
Page 40: Setting Authentication
3. Click the Disabled button for Active Security. A confirmation message appears. Figure 24: Authentication Tab – Confirmation Message. 4. Enter current password. 5. Click OK. The webpage refreshes, the password fields disappear, and the upper right icon changes to KIT-400 – Using Embedded Webpages... - Page 41 Figure 26: Authentication Page – Changing the Password Message The webpage refreshes and the password fields are visible, and a confirmation message appears. 7. Click OK. The password has changed, and the page is reloaded. KIT-400 – Using Embedded Webpages...
-
Page 42: Defining Video And Audio Settings
1. In the Navigation pane, click Video & Audio Settings. The Device Settings page appears. Figure 27: Video & Audio Settings Page 2. View the audio selection mode and the current selection. Audio selection mode is viewed. KIT-400 – Using Embedded Webpages... - Page 43 2. Set the timeout in seconds for delaying: ▪ Switching upon signal loss when 5V power is left on. ▪ Switching in case a cable is unplugged. 3. Click Set Timeout. Video and audio timeouts are set. KIT-400 – Using Embedded Webpages...
-
Page 44: Defining Receiver Settings
▪ Set the HDMI output resolution. ▪ Set the output aspect ratio. ▪ Enable or disable HDCP support on the HDBT and HDMI inputs. The selected button momentarily turns blue. KIT-400R basic parameters are set. KIT-400 – Using Embedded Webpages... -
Page 45: Configuring Device Automation
Note that all the ports, actions and triggers that are relevant to KIT-400 are included in the Kramer Maestro, as well as ports, actions and triggers that are relevant to other Kramer devices. The Panel tab in the Automation page is currently unavailable. This section describes the following actions: •... - Page 46 1. In the Navigation pane, click Automation. The Maestro page appears. Figure 29: Automation Page 2. Configure the ports, actions, scripts and triggers as described in the Kramer Maestro User Manual. Once the triggers are defined the trigger activates the scripts configured in the automation page.
- Page 47 We recommend keeping the Power On trigger. 7. On the KIT-400T rear panel, set both video DIP-switches 1 and 2 to ON (down), (see Setting KIT-400T DIP-switches on page 13). 8. Power-cycle the device. Auto-switching is disabled. KIT-400 – Using Embedded Webpages...
-
Page 48: Operating Via Room Automation Panel
DIP-switches 1 and 2 to OFF (up), (see Setting KIT-400T DIP-switches on page 13). 12. Power-cycle the device. Auto-switching is enabled. Operating via Room Automation Panel via any of Kramer’s touch panels (for example, KT-1010) which You can control KIT-400 include the Kramer Aware app. KIT-400 enables performing the following actions: •... - Page 49 2. Click the Panel tab (by-default, in Action mode). The default KIT-400 Device Control Panel appears. Figure 31:Automation Page – Panel Tab The resolution of the panel fits the designated touch-panel, therefore it appears in large-scale. KIT-400 – Using Embedded Webpages...
- Page 50 52. • Modifying a Frame on page 54. • Adding a New Button on page 55. • Adding a New Text Field on page 57. • Adding a New Frame on page 58. KIT-400 – Using Embedded Webpages...
- Page 51 Figure 32: Automation Page – Editing Panel Window 4. From Panel Model drop-down list (in General Properties), define the panel model. If Custom is selected, set Panel Size (in pixels). 5. Click Save Changes. Panel model is defined. KIT-400 – Using Embedded Webpages...
- Page 52 1. In the Navigation pane, click Automation. The Automation page appears (see Figure 29). 2. Click the Panel tab. The KIT-400 Device Control Panel appears (see Figure 31). 3. Click EDIT. Edit Panel window appears (see Figure 32). KIT-400 – Using Embedded Webpages...
- Page 53 Border Color, Border Width and Color, and Border Radius). ▪ Click to paste button properties to a selected frame. ▪ Change the button name. ▪ Select the script to run when this button is pressed. KIT-400 – Using Embedded Webpages...
- Page 54 (in this example, VolumeUp appears in the Object List 4. Click the relevant Text Field, for example, Presentaton (in this example, newTextField appears in the Object List). Figure 35: Edit Panel – Text Field Selected KIT-400 – Using Embedded Webpages...
- Page 55 Enter Border Width to change the border width (or use up/down arrows). ▪ Enter Border Radius to change the border edge radius (or use up/down arrows). 8. Click Save Changes. Presentation text field is configured. KIT-400 – Using Embedded Webpages...
- Page 56 Figure 37: Edit Panel – Video Frame Selected The Properties (Frame) and Video Frame Object list appear: Figure 38: Edit Panel – Properties (Button) Area 5. Click next to Video Frame to remove the frame from the panel. KIT-400 – Using Embedded Webpages...
- Page 57 1. In the Navigation pane, click Automation. The Automation page appears (see Figure 29). 2. Click the Panel tab. The default KIT-400 Device Control Panel appears (see Figure 31). 3. Click EDIT. The Edit panel appears (see Figure 32). KIT-400 – Using Embedded Webpages...
- Page 58 6. Assign a script (for example, MeetingOFF) to this button from the drop-down list. Figure 40: New Button – Assigning a Script 7. Design the button appearance by selecting the button: ▪ Position and size. ▪ Background fill. ▪ Icon and icon color. KIT-400 – Using Embedded Webpages...
- Page 59 Figure 41: Adding a new Text Field 5. Enter the text field name. For example, use “Meeting Space” to define meetings on/off area. 6. Enter the text caption. KIT-400 – Using Embedded Webpages...
- Page 60 5. Enter the frame name. For example, use “Meeting frame” to define meetings on/off area. 6. Design the frame appearance by selecting its: ▪ Position and size. ▪ Border color and background fill. ▪ Border width and radius. KIT-400 – Using Embedded Webpages...
-
Page 61: Managing Edid
You can also load a customized EDID file from your PC. The selected EDID can be copied to the selected input/s. View the currently selected EDID source Bytemap by clicking Bytemap on the right side. KIT-400 – Using Embedded Webpages... - Page 62 1. In the Navigation pane, click EDID Management. The EDID Management page appears. Figure 43: EDID Management Page 2. Under Read from, select Output 1 if not selected. Make sure that that output is connected to an acceptor. KIT-400 – Using Embedded Webpages...
- Page 63 Figure 44: EDID Management Page – Select the Inputs (Copy to) 4. Click COPY. The Output 1 EDID is copied to the selected inputs. Figure 45: EDID Management Page – EDID Copied from Output EDID is copied from the output to the selected input/s. KIT-400 – Using Embedded Webpages...
- Page 64 1. In the Navigation pane, click EDID Management. The EDID Management page appears (see Figure 43). 2. Under Read from Input, Select an input (for example, Input 1). Figure 46: EDID Management Page – Copy from Input KIT-400 – Using Embedded Webpages...
- Page 65 Figure 47: EDID Management Page – Select an EDID Input (Read From) 4. Click COPY. Figure 48: EDID Management Page – EDID Copied from Input EDID is copied from a selected input to the selected input/s. KIT-400 – Using Embedded Webpages...
-
Page 66: Viewing About Page
5. Click Copy and follow the instructions on-screen. Custom EDID is copied to the selected inputs. Viewing About Page KIT-400T About page lets you view the Webpage version and Kramer Electronics Ltd details. Figure 49: About Page KIT-400 – Using Embedded Webpages... -
Page 67: Upgrading Firmware
The latest version of K-UPLOAD and installation instructions can be downloaded from our website at: www.kramerav.com/support/product_downloads.asp. Note that in order to use the micro USB port, you need to install the Kramer USB driver, available at: www.kramerav.com/support/product_downloads.asp. Upgrading KIT-400R KIT-400R can be upgraded via a memory stick. -
Page 68: Technical Specifications
300 to 115200 User Interface Controls Input selection buttons, DIP–switches, remote contact–closure switches, relay switches. Kramer API via RS–232 serial commands transmitted by a PC, touch screen system or other serial controller, embedded webpages via LAN for configuration and control Indicators... - Page 69 (7.38" x 4.53" x 1.00") Shipping Dimensions (W, D, H) 45.4cm x 23.6cm x 5.4cm (17.9" x 9.3" x 2.1") Net Weight KIT-400: 1.2 kg (2.7lbs) Shipping Weight KIT-400: 2kg (4.4lbs) Accessories Included 1 Power adapter, 8 rubber feet, 2 bracket sets Specifications are subject to change without notice at www.kramerav.com...
-
Page 70: Default Communication Parameters
2560x1440 @60Hz RB 1920x1080P @30Hz 3840x2160P @60Hz Default EDID This section includes the: • KIT-400T Default EDID on page 69. • KIT-400R Default EDID for HDMI on page 70. • KIT-400R Default EDID for HDBT on page 72. KIT-400 – Technical Specifications... - Page 71 Modeline...."1920x1080" 148.500 1920 2008 2052 2200 1080 1084 1089 1125 +hsync +vsync Detailed timing #2..1920x1080i at 60Hz (16:10) Modeline...."1920x1080" 74.250 1920 2008 2052 2200 1080 1084 1094 1124 interlace +hsync +vsync Detailed timing #3..1280x720p at 60Hz (16:10) KIT-400 – Technical Specifications...
- Page 72 Red chromaticity..Rx 0.611 - Ry 0.329 Green chromaticity..Gx 0.313 - Gy 0.559 Blue chromaticity..Bx 0.148 - By 0.131 White point (default)..Wx 0.320 - Wy 0.336 Additional descriptors... None Timing characteristics Horizontal scan range..15-136kHz KIT-400 – Technical Specifications...
- Page 73 CE speaker allocation data Channel configuration..2.0 Front left/right..Yes Front LFE....No Front center..... No Rear left/right..No Rear center....No Front left/right center.. No Rear left/right center... No Rear LFE....No CE vendor specific data (VSDB) KIT-400 – Technical Specifications...
- Page 74 Blue chromaticity..Bx 0.148 - By 0.131 White point (default)..Wx 0.320 - Wy 0.336 Additional descriptors... None Timing characteristics Horizontal scan range..15-136kHz Vertical scan range..23-61Hz Video bandwidth..300MHz CVT standard..... Not supported GTF standard..... Not supported KIT-400 – Technical Specifications...
- Page 75 Front left/right center.. No Rear left/right center... No Rear LFE....No CE vendor specific data (VSDB) IEEE registration number. 0x000C03 CEC physical address..1.0.0.0 Supports AI (ACP, ISRC).. No Supports 48bpp... Yes Supports 36bpp... Yes Supports 30bpp... Yes KIT-400 – Technical Specifications...
- Page 76 Data payload..... 030C001000783C20008001020304 Reserved video related data Data payload..... 0E6160 Report information Date generated... 11/3/2020 Software revision..2.60.0.972 Data source....File - NB: improperly installed Operating system..6.2.9200.2 Raw data 00,FF,FF,FF,FF,FF,FF,00,2D,B2,1D,03,31,00,00,00,06,1C,01,03,80,24,24,8C,E2,90,20,9C,54,50,8F,26, 21,52,56,2F,CF,00,A9,40,81,80,90,40,D1,C0,31,59,45,59,61,59,81,99,04,74,00,30,F2,70,5A,80,B0,58, 8A,00,BA,88,21,00,00,1E,02,3A,80,18,71,38,2D,40,58,2C,45,00,BA,88,21,00,00,1E,00,00,00,FC,00,4B, 49,54,2D,34,30,30,52,0A,20,20,20,20,00,00,00,FD,00,17,3D,0F,88,1E,00,0A,20,20,20,20,20,20,01,4A, 02,03,30,F0,50,10,1F,04,13,05,14,02,11,06,15,22,21,20,5D,5E,5F,23,09,07,07,83,01,00,00,6E,03,0C, 00,10,00,78,3C,20,00,80,01,02,03,04,E3,0E,61,60,9A,29,A0,D0,51,84,22,30,50,98,36,00,10,0A,00,00, 00,1C,66,21,56,AA,51,00,1E,30,46,8F,33,00,10,09,00,00,00,1E,28,3C,80,A0,70,B0,23,40,30,20,36,00, 10,0A,00,00,00,1A,00,00,00,00,00,00,00,00,00,00,00,00,00,00,00,00,00,00,00,00,00,00,00,00,00,52 KIT-400 – Technical Specifications...
-
Page 77: Protocol 3000
• Result and Error Codes on page 92. Kramer devices can be operated using Kramer Protocol 3000 commands sent via serial or Ethernet ports. Understanding Protocol 3000 Protocol 3000 commands are a sequence of ASCII letters, structured according to the following. -
Page 78: Protocol 3000 Commands
– Number that indicates io_index FEEDBACK the specific input or output port: ~nn@AUD-LVLio_mode,io_index,vol_level<CR><LF> 1 – AUDIO OUT – Volume level -83db vol_level to 24dB; ++ (increase current value by 1dB); -- (decrease current value by 1dB) KIT-400 – Protocol 3000... - Page 79 Get device build date. COMMAND Get the device build date: DATE? #BUILD-DATE?<CR> #BUILD-DATE?<CR> where YYYY = Year FEEDBACK MM = Month ~nn@BUILD-DATEdate,time<CR><LF> DD = Day time – Format: hh:mm:ss where hh = hours mm = minutes ss = seconds KIT-400 – Protocol 3000...
- Page 80 – FPGA id FPGA-VER? Get current FPGA COMMAND Get current FPGA version: expected_ver – Expected FPGA version. #FPGA-VER?fpga_id<CR> #FPGA-VER?1<CR> version for current firmware FEEDBACK – Actual FPGA version ~nn@FPGA-VERfpga_id,expected_ver,ver<CR><LF> KIT-400 – Protocol 3000...
- Page 81 Get EDID lock state for Input EDID? #LOCK-EDID?in_index,<CR> the specific input: 1 – IN 1 #LOCK-EDID?2<CR> FEEDBACK 2 – IN 2 ~nn@LOCK-EDIDin_index,lock_mode<CR><LF> 3 – IN 3 – On/Off lock_mode 0 – Off unlocks EDID 1 – On locks EDID KIT-400 – Protocol 3000...
- Page 82 – Number that MUTE? Get audio mute. COMMAND Get mute status of output 1 #MUTE?out_index<CR> indicates the specific output: #MUTE1?<CR> 1 – AUDIO OUT FEEDBACK – On/Off mute_mode ~nn@MUTEout_index,mute_mode<CR><LF> 0 – Off 1 – On KIT-400 – Protocol 3000...
- Page 83 RS-232 protocol port, if available. For proper settings consult your network administrator. For Backward compatibility, the parameter can be omitted. In this case, the Network ID, by default, is 0, which is the Ethernet control port. KIT-400 – Protocol 3000...
- Page 84 0 – Default behavior button mode. #PROG-BTN-MOD?<CR> state: 1 – Programmable #PROG-BTN-MOD?<CR> FEEDBACK ~nn@PROG-BTN-MODmode<CR><LF> – XX.XX where X is a version PROT-VER? Get device protocol COMMAND Get the device protocol version. version: #PROT-VER?<CR> decimal digit #PROT-VER?<CR> FEEDBACK ~nn@PROT-VER3000:version<CR><LF> KIT-400 – Protocol 3000...
- Page 85 – Format: hh:mm:ss where 2018,14:30:00<CR> hh = hours The device does not mm = minutes validate the day of ss = seconds week from the date. Time format - 24 hours. Date format - Day, Month, Year. KIT-400 – Protocol 3000...
- Page 86 3 – IN 3 #VGA-PHASE?3<CR> FEEDBACK Response answers value – Phase parameter in LSB ~nn@VGA-PHASEin_id,value<CR><LF> with absolute value units (1 to 30) after decreasing or ++ increase current value increasing value. – decrease current value KIT-400 – Protocol 3000...
- Page 87 Set bypass device state: 0 – Off #CEC-PASSstate<CR> #CEC-PASS1<CR> 1 – On FEEDBACK ~nn@CEC-PASSstate<CR><LF> state – CEC state CEC-PASS? Get CEC device bypass COMMAND Get bypass device state: 0 – Off state. #CEC-PASS?<CR> #CEC-PASS?<CR> 1 – On FEEDBACK ~nn@CEC-PASSstate<CR><LF> KIT-400 – Protocol 3000...
- Page 88 HDCP not supported - 1 – HDMI OUT HDCP OFF. – HDCP mode mode Input: HDCP support changes 0 – Off following detected sink - 1 – On MIRROR OUTPUT. Output: 2 – Follow input 3 – Follow output KIT-400 – Protocol 3000...
- Page 89 To avoid locking the FEEDBACK port due to a USB bug ~nn@RESETok<CR><LF> in Windows, disconnect USB connections immediately after running this command. If the port was locked, disconnect and reconnect the cable to reopen the port. KIT-400 – Protocol 3000...
- Page 90 COMMAND Get output freeze status: status. #VFRZ?out_index<CR> indicates the specific output: 1 #VFRZ?1<CR> – freeze_flag FEEDBACK 0 – Off ~nn@VFRZout_index,freeze_flag<CR><LF> 1 – On 2 – Freeze Only 3 – Freeze and Mute 4 – Mute Only KIT-400 – Protocol 3000...
- Page 91 28 – 1920x1080P 50 29 – 1920x1080P 60 30 – 2560x1080P 50 31 – 2560x1080P 60 32 – 3840x2160P 24 33 – 3840x2160P 25 34 – 3840x2160P 30 35 – 3840x2160P 50 36 – 3840x2160P 60 KIT-400 – Protocol 3000...
- Page 92 ▪ – Signal ID <signal_type> ROUTEout.sdi.5.v attribute: ideo.1,in.sdi.1.v o VIDEO ideo.1<CR> ▪ <index> – Indicates a specific channel number when there This is an Extended are multiple channels of the Protocol 3000 same type: 1 command. KIT-400 – Protocol 3000...
- Page 93 VIDEO ▪ <index> – Indicates a specific channel number when there are multiple channels of the same type: 1 – Input Signal Status status 0 – No signal 1 – There is a signal KIT-400 – Protocol 3000...
-
Page 94: Result And Error Codes
(Reserved) ERR_RESERVED_8 (Reserved) ERR_RESERVED_9 (Reserved) ERR_RESERVED_10 (Reserved) ERR_RESERVED_11 (Reserved) ERR_RESERVED_12 (Reserved) ERR_EDID_CORRUPTED EDID corrupted ERR_NON_LISTED Device specific errors File has the same CRC – not changed ERR_SAME_CRC ERR_WRONG_MODE Wrong operation mode ERR_NOT_CONFIGURED Device/chip was not initialized KIT-400 – Protocol 3000... - Page 95 This limited warranty gives you specific legal rights, and you may have other rights which vary from country to country or state to state. This limited warranty is void if (i) the label bearing the serial number of this product has been removed or defaced, (ii) the product is not distributed by Kramer Electronics or (iii) this product is not purchased from an authorized Kramer Electronics reseller.
- Page 96 SAFETY WARNING Disconnect the unit from the power supply before opening and servicing For the latest information on our products and a list of Kramer distributors, visit our website where updates to this user manual may be found. We welcome your questions, comments, and feedback.
Need help?
Do you have a question about the KIT-400 and is the answer not in the manual?
Questions and answers