Advertisement
Scan for full manual
Step 1: Check what's in the box
KIT-400, including:
KIT-400T 4K HDMI/PC Auto Switcher Transmitter
and
KIT-400R 4K HDBT/HDMI Receiver/Scaler
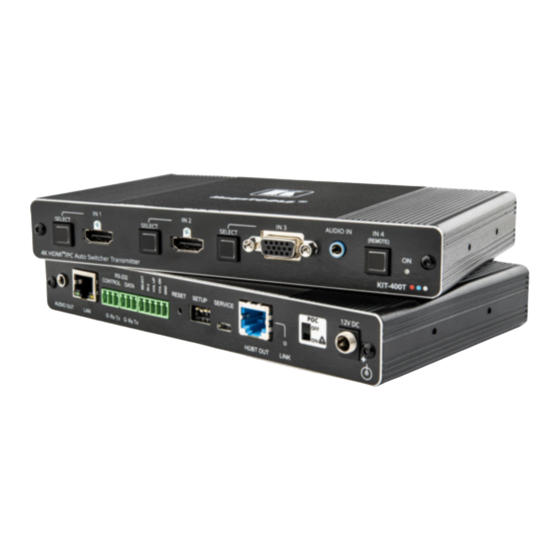
Step 2: Get to know your KIT-400
#
Feature
1
IN 1
SELECT Button
2
HDMI Connector
3
IN 2
SELECT Button
4
HDMI Connector
5
IN 3
SELECT Button
6
15-pin HD Connector
7
AUDIO IN 3.5mm Mini Jack
8
IN 4 (REMOTE) Button
9
ON LED
10
AUDIO OUT 3.5mm Mini Jack
11
LAN RJ-45 Connector
12
RS-232
CONTROL 3-pin Terminal
Block Connector
13
DATA 3-pin Terminal
Block Connector
14
Remote Contact-closure 4-pin
Terminal Block Connector
15
RESET Button
16
SETUP 4-way DIP-switch
17
SERVICE Mini USB Connector
KIT-400 Quick Start
KIT-400 Quick Start Guide
This guide helps you install and use your
Go to
www.kramerav.com/downloads/KIT-400
upgrades are available.
Function
Press to select the IN 1 input.
Lights red when the analog audio is selected; lights green when the embedded
audio is selected.
Connect to an HDMI source.
Press to select the IN 2 input.
Lights red when the analog audio is selected; lights green when the embedded
audio is selected.
Connect to an HDMI source.
Press to select the IN 3 input.
Lights red when the analog audio is selected; lights green when embedded audio
from embedded HDMI is selected, see
Connect to a PC graphics source.
Connect to an unbalanced, stereo audio source (for example, the audio output of
the laptop).
Press to select the inputs on KIT-400R:
•
Button lights – HDMI INPUT on
•
Button off – The selected input on
Lights green when the device is powered by a power adapter; lights red when
power is provided via PoC.
Connect to the unbalanced, stereo audio acceptor (for example, active speakers).
Connect to the LAN (Ethernet traffic or PC controller).
Connect to a serial controller or PC.
Connect to a serial data source or acceptor.
Connect to contact closure switches (by momentary contact between the desired
pin and GND pin) to select an input, the remote IN 4 and audio volume (up or
down), see
Short press: sends a reset command to
Long press: resets
KIT-400T
Set the device behavior, see
Connect to a PC to perform a firmware upgrade.
KIT-400
for the first time.
to download the latest user manual and check if firmware
2 Bracket sets
2 Power adapters and cords
KIT-400R
Step 6: Operate
KIT-400.
KIT-400R
to its factory default parameters and then resets
to its factory default parameters.
Step 4: Connect inputs and
P/N: 2 9 0 0 - 3 0 1 2 9 3 QS
8 Rubber feet
1 Quick start guide
Step 4: Connect inputs and
outputs.
is selected as the input.
KIT-400T
is routed via HDBT.
KIT-400R
and then reboots KIT-400T.
outputs.
Rev: 1
Advertisement
Table of Contents

Related Manuals for Kramer KIT-400


Summary of Contents for Kramer KIT-400
- Page 1 8 Rubber feet KIT-400T 4K HDMI/PC Auto Switcher Transmitter 2 Power adapters and cords 1 Quick start guide KIT-400R 4K HDBT/HDMI Receiver/Scaler Step 2: Get to know your KIT-400 Feature Function IN 1 SELECT Button Press to select the IN 1 input.
- Page 2 Feature Function HDBT OUT RJ-45 Connector Connect to KIT-400R. LINK LED Lights green when a link is established with the receiver. Follow powering instructions in Step 5: Connect power. Failure to use PoC and power connector correctly may destroy the devices! PoC (Power over Cable) Switch To use PoC, set PoC switch to ON on both KIT-400T...
- Page 3 • Reliable earthing of rack-mounted equipment should be maintained. • Maximum mounting height for the device is 2 meters. Step 4: Connect inputs and outputs Always switch OFF the power on each device before connecting it to your KIT-400. Connecting the audio output Wiring the RJ-45 connectors...
- Page 4 • Failure to use PoC and power connector correctly may destroy the devices! • Use only the power cord that is supplied with the unit. • Disconnect the power and unplug the unit from the wall before installing. Step 6: Operate KIT-400 RS-232 Control / Protocol 3000 Operate...
Need help?
Do you have a question about the KIT-400 and is the answer not in the manual?
Questions and answers