
Related Manuals for Fermax MEET Concierge


Summary of Contents for Fermax MEET Concierge
- Page 1 MEET CONCIERGE INSTALLER’S MANUAL ENGLISH Version Cod. 970136Ic V07_19 This manual corresponds to MEET Concierge firmware version V02.10.
- Page 2 FERMAX ELECTRÓNICA S.A.U. http://www.fermax.com MEET Concierge manual available at https://meet.fermax.com/guard-unit/ Copyright Notice Fermax and Fermax MEET concierge are trademarks of Fermax Electronica S.A.U. registered in the European Union and other countries. © FERMAX ELECTRÓNICA S.A.U., 2019. Page 2...
-
Page 3: Table Of Contents
INDEX Product Introduction ....................... 4 Overview ........................ 4 Concierge Interface ....................4 Functions Overview ......................5 Call Receptions ...................... 5 Call Apartment ....................... 6 Call to Concierge ....................6 ... -
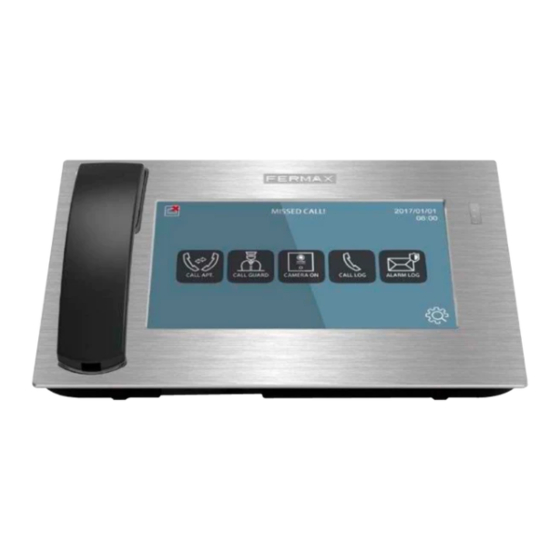
Page 4: Product Introduction
1 Product Introduction 1.1 Overview Alarm notification LED Handset Touch screen Base 1.1 Concierge Interface Network Status Page 4... -
Page 5: Functions Overview
Support auto answer, audio and video record in SD card automatically, or record manually the audio from monitor. 2.1 Call Receptions The MEET Concierge can receive calls from: Outdoor panels Monitor call Other concierges from the same installation The concierge establish a conversation, capture pictures and release lock when the concierge communicates with panel. -
Page 6: Call Apartment
2.2 Call Apartment The concierge is able to contact any apartment of the community using the concierge's call to apartment function. If the apartment is on the same block, and DIAL COMPLEMENT number has been set up (see section 3.2), only apartment number will be necessary to enter. (E.g. 101 when calling apartment 101 in the same block). -
Page 7: Panel Auto On
2.4 Panel Auto On The concierge is able to contact any panel in the installation and open the video channel if necessary. For this, only to dial the corresponding panel number will by necessary. If the panel is on the same block, and DIAL COMPLEMENT number has been set up (see section 3.2), only panel number will be necessary to enter. -
Page 8: Alarm Log
The concierge can delete one single record, selecting it, or the complete list of register as well, tapping the “trash” icon during a few seconds (Confirmation is required). REMARK: The call log relates only to calls sent or received from the Concierge, and lost calls as well (answering machine). -
Page 9: Function Setting
2.7 Function Setting The functions restrictions interface is used to activate or deactivate functions. CAMERA: no use in this version. VIDEO RECORD, AUDIO RECORD Function During the call, the concierge is able to record audio and video. (SD card needed) if the concierge does not answer. -
Page 10: Date/Time Setting
2.9 Date/Time Setting If the project has no MEET management software installed, the installer can set date, time and time zone manually. If the project has MEET management software, and it is not connected to internet, the date and time of concierge will synchronize automatically with the management software. -
Page 11: Screen Setting
2.11 Screen Setting The user can adjust brightness and contrast of the screen by the screen settings menu. 2.12 About In this option is it possible to access to the following information: device name, firmware version, device info, MAC address, IP address. Page 11... -
Page 12: Configuration Via Web Server
3 Configuration via Web Server The Concierge has an integrated web server, allow to configure parameter. This web server is accessed via the concierge’s IP address. Use preferably Chrome web server As a first step, username and password are required. REMARKS: Default IP: 10.201.100.0 Username: admin... -
Page 13: General Settings
3.2 General Settings CONCIERGE NO.: Concierge number, between 01 and 98 (default option 1). DEVICE NO.: The extension concierge with the same concierge number. Possible options between 0 and 7(default option 0). Concierges with the same CONCIERGE NO. but different DEVICE NO. -
Page 14: Network Settings
MEET allows the installer to define the IP range according to the project needs and make the network management easier. MEET concierge network mode is static mode. Ensure that each device has a unique IP address in same installation. The devices (digital panel, monitor and concierge) will show IP conflict if there same IP is used on the same LAN. -
Page 15: Sip Settings
3.4 SIP Settings ENABLE SIP: Enable or disable sip function. SIP SERVER: SIP server IP address. DOMAIN: Sip server domain. OUTBOUND: Some servers are used when NAT. STUN IP: Audio and video NAT traversing public network server IP. STUN PORT: The port of audio and video NAT traversing public network server. SIP USER: The username of sip account. -
Page 16: Advanced Settings
3.5 Advanced Settings ALARM: Enable or disable alarm function reception. When the function is disabled, the concierge no longer receives alarm information. SIP EXTENSION: Enable or disable sip extension function. The SIP extension is used as the extension of the Concierge. When the panel or monitor call the Concierge, the SIP extension will ring too. -
Page 17: Unlock Settings
3.6 Unlock Settings DTMF UNLOCK: Enables or disables DTMF unlock function This function will usually used with SIP devices (FERMAX MMET panel configured as SIP, or third party devices), where the opening door action is made by means of DTMF commands. -
Page 18: Restore
3.8 Restore RESTORE FACTORY SETTINGS: All the settings are restored to the factory settings. The IP address will be changed to the default IP: 10.201.100.0 REBOOT DEVICE: The guard unit will be restarted and will keep all the previous settings. 3.9 Log Out Log out the web server Page 18... -
Page 19: Installation
4 Installation 4.1 Schematic Diagram of Concierge Installation Fit support on the base plate. Support installation. Assembly direction. Installation is complete. Display screen is stuck from up and down. Page 19... - Page 20 The steps for removing concierge Take down the direction. The display screen is removed from the bottom up from the bracket. Use a screwdriver to force the direction of the arrow angle can be separated from the bracket and a base. Remove the support from the base.
-
Page 21: Connectors
4.2 Connectors 12Vdc Power Input. The inner terminal is the positive In the jack included, the wire with white line is the positive. 10/100Mbps RJ45 Port. 4.3 Technical Parameters Power supply: 12Vdc Standby current: 200mA Working current: 500mA Screen: 9"...
Need help?
Do you have a question about the MEET Concierge and is the answer not in the manual?
Questions and answers