Table of Contents
Advertisement
Quick Links
Advertisement
Table of Contents
Troubleshooting

Related Manuals for Ametek WDG-V UOP


Summary of Contents for Ametek WDG-V UOP
- Page 1 USER MANUAL WDG-V UOP Combustion Analyzer ATEX-IECEx PN 9000-280-VE_Rev C...
- Page 2 AMETEK Process Instruments assumes no responsibility or liability for any errors or inaccuracies that may appear in this document. AMETEK Process Instruments is not responsible for any infringement of patents or other rights of third parties that may result from the use of this document. The content of this document is furnished for informational purposes only, is subject to change without notice, and does not represent a commitment or guaranty by AMETEK Process Instruments.
-
Page 3: Table Of Contents
UOP CCR Platforming Process ......................1-1 History ..............................1-1 CCR (Continuous Catalyst Regeneration) ................ 1-1 Thermox and WDG UOP Series ................... 1-3 About the WDG-V UOP Analyzer ....................... 1-4 Basic Elements of the Analyzer ....................1-5 Analyzer I/O ..........................1-5 Analyzer Communications ....................1-5 How the Oxygen Measuring Cell Works .................1-6... - Page 4 Connecting a Single Analyzer ...................2-31 Connecting Multiple Analyzers ..................2-31 Final Daisy Chain Connection Configuration Setting ..........2-32 Customer I/O Connections ....................... 2-33 Replacing a WDG-IV UOP Analyzer With a WDG-V UOP Analyzer......2-34 AMEVision Communication Troubleshooting Checks ..........2-36 No Communications ....................2-36 Intermittent Communications ..................2-36...
- Page 5 WDG-V UOP Analyzer Specifications ....................4-2 Remote Calibration Unit (RCU) Specifications ................4-3 Approvals and Certifications ......................4-4 WDG-V UOP Analyzer Directives and Standards ..............4-4 WDG-V UOP Analyzer Marking ....................4-4 Remote Calibration Unit (RCU) Directives and Standards ..........4-5 WDG-V UOP Series Analyzer Rating Labels ...................4-6...
-
Page 6: Safety Notes
Instrument grounding is mandatory. Performance specifications and safety protection are void if instrument is operated from an improperly grounded power source. Verify ground continuity of all equipment before applying power. PN 9000-280-VE, Rev B vi | WDG-V UOP ATEX-IECEx Combustion Analyzer... -
Page 7: Personnel And Equipment Safety Information
Personnel and Equipment Safety Information This section describes important safety information to avoid personal injury and dam- age to the equipment while installing, operating, maintaining, or servicing the equip- ment. All safety regulations, standards, and procedures at the analyzer location must be followed. - Page 8 Do not operate this product from a power source that applies more than the voltage specified. Do Not Operate with Suspected Failures If you suspect there is damage to this product, have it inspected by qualified service personnel. PN 9000-280-VE, Rev B viii | WDG-V UOP ATEX-IECEx Combustion Analyzer...
-
Page 9: Special Conditions For Safe Use
Special Conditions for Safe Use The WDG-V UOP is designed to be used in Category 3 hazardous locations where explosive gases may be present. Protection against explosion is provided by purge technique. There are four rules that must always be followed: 1. -
Page 10: Warning Labels
Achtung – Heiße Oberfläche Environmental Information – WEEE This AMETEK product contains materials that can be reclaimed and recycled. In some cases the product may contain materials known to be hazardous to the environ- ment or human health. In order to prevent the release of harmful substances into the environment and to conserve our natural resources, AMETEK recommends that you arrange to recycle this product when it reaches its “end of life. -
Page 11: Overview
Overview UOP CCR Platforming Process “The CCR Platforming process uses naphtha boiling in the range of 180–400 °F to produce high-octane gasoline or petrochemical precursors. This technology is the world’s leading reforming process. It is also the technology of choice for new reforming applications, providing refiners with proven, ultra-low-pressure (50 PSIG reactor pressure) operation and producing the highest reforming yields. - Page 12 UOP-type system. The oxygen analyzer is critical to the UOP-patented CCR process and designed specifically to monitor oxygen levels during catalyst regeneration. 1-2 | Thermox ® WDG-V UOP ATEX-IECEx Analyzer PN 9000-280-VE, Rev B...
-
Page 13: Thermox And Wdg Uop Series
2019 Thermox updated the instrument’s electronics package and renamed the product WDG-V UOP. The new electronics package includes additional diagnostics and meets the ROHS compliance directive. The AMEVision Controller replaces the Series 2000 Con- troller for the instrument as well. It includes a color LED display and additional communications options. -
Page 14: About The Wdg-V Uop Analyzer
About the WDG-V UOP Analyzer Designed for fast response in a wide range of flue gas applications, the analyz- er mounts directly on the combustion process to provide continuous measure- ment of oxygen. A sample is drawn from the process stream by means of an air-operated aspirator and is immediately returned to the process. -
Page 15: Basic Elements Of The Analyzer
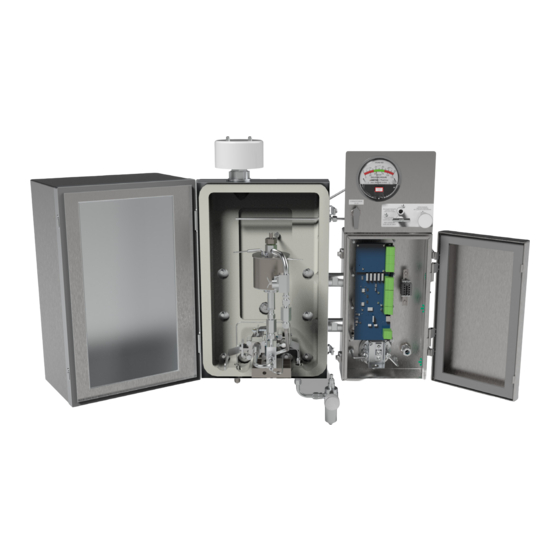
Basic Elements of the Analyzer The WDG-V UOP analyzer is a complete standalone unit; no separate controller is required. The unit consists of three basic systems: • Plumbing Includes all inlet and outlet tubing, O Cell Housing, the calibration gas inlet and aspirator assembly, flow sensor, and the aspirator used to pull the sample into the analyzer. -
Page 16: How The Oxygen Measuring Cell Works
Cell indicates the oxygen content of the other gas. A reference gas, usually air (20.9 % O ), is used for one of the gases. Figure 1-1. Zirconium oxide Cell principle of operation. 1-6 | Thermox ® WDG-V UOP ATEX-IECEx Analyzer PN 9000-280-VE, Rev B... -
Page 17: Measuring Non-Combustible Gases
The voltage of the Cell depends on temperature, and so the Cell is maintained at a constant temperature. The oxygen content is then determined from the Nernst equation: where R and F are constants, T is absolute temperature, and O and O are the oxygen partial pressures on either side of the Cell. -
Page 18: About The Analyzer Sample System
About the Analyzer Sample System The WDG-V UOP was designed for meeting the purpose of low level oxygen measurement during the regeneration cycle in which coke deposits are re- moved from the catalyst by oxidation. The WDG-V UOP analyzer has a specially treated Zirconium Oxide Cell which is used to survive the destructive effects of halogen-oxidation. - Page 19 There is no distinction between the two thermocouples. Flame Arrestors The WDG-V UOP analyzer contains two flame arrestors to prevent the analyzer from becoming an ignition source for the process when there are short periods of high combustible levels (25 % of LEL –...
-
Page 20: About The Analyzer Electronics
• Three (3) configurable process alarm relays • One (1) RS-485, 2-wire, MODBUS RTU interface (57.6K baud) Current Outputs There are three (3) current outputs on the WDG-V UOP Analyzer. Refer to “Current Output Connections” in Chapter 2 for details. Optional Remote Calibra-... -
Page 21: Communicating With The Analyzer
Communicating With the Analyzer The analyzer is configured, calibrated, and monitored using the MODBUS RTU interface. AMETEK provides two options for communicating with the analyzer: Component Function WDG-V UOP PC Configu- This PC-based software option (standard with each unit) can be rator Software used to communicate with the analyzer via a laptop computer. -
Page 22: Working In This Manual
These reminders indicate related information about the topic, certain actions that See “Leak Check” in Chapter 3. are necessary before continuing with the current procedure, or information that is recommended by AMETEK. See example at left. User Interface Navigation icon:... -
Page 23: Installation And Start-Up
Installation and Start-up Safety Considerations Before beginning the installation of the analyzer and before powering it up, review and follow all safety information following the Table of Contents near the beginning of this manual. This information de- scribes procedures to follow to avoid personal injury and/or damage to the equipment. -
Page 24: Pre-Installation Requirements
If the ambient temperature is outside the specified limits or the vibration is excessive, contact your AMETEK representative to dis- cuss solutions and special options to address ambient temperatures. -
Page 25: Unpacking And Inspecting The Equipment
Unpacking and Inspecting the Equipment Remove any packing material from the WDG-V UOP Analyzer. Check for dam- age. If equipment is damaged, notify the carrier and contact AMETEK Service (https://www.ametekpi.com/customersupport/requestsupport) immediately if parts are missing or damage is found, and to verify if damaged parts will require replacement prior to safely installing and operating the analyzer/ equipment. -
Page 26: Installing The Mechanical Components
Installing the Mechanical Components “Part No.” refers to AMETEK Part Number. Installing the Sample Inlet Probe For some applications, you must first connect the sample inlet probe to the analyzer before mounting the analyzer. The same applies if you are installing the probe heater or exhaust tube. Therefore, these sub- jects are discussed before the sections on how to mount the analyzer to the process. - Page 27 Assembly Gasket 3"-300# Backplate part of Sensor Long Venturi Hook Inlet Tube with RTD Flow Sensor Figure 2-1.1. WDG-V UOP Probe and optional TOP VIEW Exhaust Tube installation. Figure 2-1.2. Rear view, analyzer. Installation and Start-Up PN 9000-280-VE, Rev B...
-
Page 28: Installing The Exhaust Tube (Optional)
To install the exhaust tube, thread the its into the exhaust port on the rear of the analyzer as shown in Figures 2-1.1 and 2-2. Figure 2-2. Mounting dimensions and Exhaust tube location. 2-6 | Thermox ® WDG-V UOP ATEX-IECEx Analyzer PN 9000-280-VE, Rev B... -
Page 29: Installing The Analyzer
Installing the Analyzer • The analyzer ambient temperature range is -20 °C to 60 °C. • When installing the exhaust tube, attach it to the back of the analyzer before mounting the analyzer to the process. • Mounting dimensions are provided in Figure 2-2. Do not open a Z-purge, hinged-analyzer enclosure door until you first verify that the area has been classified as non-hazardous. - Page 30 Figure 2-3. Analyzer Mounting. A 7/16" wrench is required to open both enclosure doors. 2-8 | Thermox ® WDG-V UOP ATEX-IECEx Analyzer PN 9000-280-VE, Rev B...
-
Page 31: Calibration/Aspirator Air
, balance N Flow Calibration A flow calibration must be performed upon analyzer startup. The WDG-V UOP analyzer should be mounted on the process, fully up to normal operating tem- perature, and have typical process gas flowing prior to performing the calibra- tion. -
Page 32: Rapid Exchange Purge System
• The WDG-V UOP analyzer contains a flame arrestor to prevent it from being an ignition source to the process for short periods of high combustible lev- els (25 % of LEL – lower explosive limit) in the process. The flame arrestor is not, however, intended to protect the process where the combustibles levels are always high. - Page 33 Figure 2-4.1. UOP Rapid Exchange Purge System (Front). Figure 2-4.2. UOP Rapid Exchange Purge System (Rear). Installation and Start-Up 2-11 PN 9000-280-VE, Rev B...
-
Page 34: Purging Instructions
9. Wait for the Enclosure Pressure Gauge to return to a “Safe” pressure and en- ergize the protected enclosure(s) power using the local disconnect switch. 10. Ensure the Enclosure Pressure Indicator maintains a “Safe” pressure before leaving the system unattended. 2-12 | Thermox ® WDG-V UOP ATEX-IECEx Analyzer PN 9000-280-VE, Rev B... -
Page 35: Aspirator And Manual Calibration Connections
Aspirator and Manual Calibration Connections The WDG-V UOP processes run at either atmospheric pressure, 35 PSI, or 110 PSI. Aspirator, calibration, and reference gas pressures must be set relative to the process pressure. Reference gas pressure is required for High Pressure (110 PSI) only. -
Page 36: Manual Calibration
RCU. 3. Connect the combustibles span calibration gas to the combustibles span gas inlet on the RCU. For a WDG-V UOP analyzer with RTD-type combus- tibles detector, the combustibles span calibration gas would also include the methane span calibration concentration. - Page 37 Figure 2-5.1. RCU Mounting Dimensions. Figure 2-5.2. RCU Schematic Flow Diagram. Installation and Start-Up 2-15 PN 9000-280-VE, Rev B...
-
Page 38: Installing The Amevision Display User Interface
9.14 232.19 KEYPAD 1.44 1.44 36.48 36.48 (3) 3/4" (2.70cm) CONDUIT ENTRIES 2.58 1.58 65.53 40.13 1.44 (2) 1/2" (2.22cm) 36.48 CONDUIT ENTRIES Figure 2-6. AMEVision dimension, installation. 2-16 | Thermox ® WDG-V UOP ATEX-IECEx Analyzer PN 9000-280-VE, Rev B... -
Page 39: Ac Power And Signal Connections
• Use only the applicable NEMA-approved conduit fittings or cable fittings to maintain the NEMA rating for the analyzer enclosure or WDG-V UOP. If not using a conduit entry, leave the factory NEMA-approved plugs intact. Never leave any holes unplugged. - Page 40 Figure 2-7. Conduit Entries. 2-18 | Thermox ® WDG-V UOP ATEX-IECEx Analyzer PN 9000-280-VE, Rev B...
- Page 41 Figure 2-8. Terminal Block Detail (customer connections located in the center section. Installation and Start-Up 2-19 PN 9000-280-VE, Rev B...
-
Page 42: Wdg-V Uop Ac Mains Supply Connections
N – Neutral connection (USA) • Chassis Stud – Equipment ground (protective conductor) Use the 1/2" conduit entry hole in the WDG-V UOP for AC mains supply wiring. Use the chassis stud next to the 1/2" conduit entry hole for equipment ground (protective conductor). -
Page 43: Emc Grounding, Shielding And Noise Protection
EMC Grounding, Shielding and Noise Protection For EMC purposes, under no circumstances should you leave cable shields disconnected at one end or both ends of the cable (analyzer or control unit, or other device). You must use twisted-pair cable in rigid metal conduit or use twisted pair cable with an overall braided shield. -
Page 44: Transient And Rfi Interference
As an example, do not run motors, blowers, or air conditioners using the same mains supply circuit or conduit as the analyzer unit’s mains supply circuit or conduit. 2-22 | Thermox ® WDG-V UOP ATEX-IECEx Analyzer PN 9000-280-VE, Rev B... -
Page 45: Current Output Connections
Current Output Connections Standard Current Outputs There are three current outputs on the WDG-V UOP Analyzer. The current out- put connections are labeled as follows on the Sensor board terminals: Analog Output #1 => +I1- Analog Output #2 => +I2- Analog Output #3 =>... -
Page 46: Alarm Contact Connections
Flow Alarm • For WDG-V UOP analyzers, Relay 5 (ALM 3) is reserved for the Flow Alarm. It can be configured as Energize on Alarm or De-energize on Alarm from the Alarm Configuration menu. It triggers when the flow temperature reading falls 100 °C below the normal process temperature. -
Page 47: Remote Calibration Unit (Rcu) Connections
This section discusses the electrical connections for the optional Remote Cali- bration Unit (RCU): Oxygen-Only Remote Calibration Unit Connections Oxygen-Only Remote Calibration Unit (RCU) connections on the WDG-V UOP Wiring board, and their RCU connections, include: ZERO GAS WDG-V UOP Terminal Z to Pin 13 on RCU... -
Page 48: Notes About Ducting
Enclosure Maximum Overpressure The user should limit the pressure as specified by the manufacturer. 2-26 | Thermox ® WDG-V UOP ATEX-IECEx Analyzer PN 9000-280-VE, Rev B... -
Page 49: Installing The User Interface/Communications Options
Enable Communications Between the Analyzer and the PC Configurator Software) The address on the WDG-V UOP analyzer is set using the dip switch on the front of the Sensor board. When connecting a single analyzer, the address is “1”. -
Page 50: Connecting The Pc To The Analyzer
“WDG-V PC Configurator Software Manual.” Figure 2-12. Connecting analyzer using USB converter and PC Software. 2-28 | Thermox ® WDG-V UOP ATEX-IECEx Analyzer PN 9000-280-VE, Rev B... -
Page 51: Installing The Amevision Display User Interface (Secondary Communication Option)
The AMEVision Display User Interface is an intuitive remote, graphical user in- terface and communications link that provides easy configuration, calibration, and monitoring of data for up to eight (8) WDG-V UOP Analyzers using a single display unit. Communication options include: •... -
Page 52: Setting The Analyzer Address Using The Dip Switch (To Enable Communications Between The Analyzer And The Amevision Display User Interface Unit)
Figure 2-11 (and 2-14 for a close-up view of the dip switch). Figure 2-14. Dip switch settings on User Interface PCB. 321 Switch Address 1 = ON (UP) 0 = OFF (DOWN) 2-30 | Thermox ® WDG-V UOP ATEX-IECEx Analyzer PN 9000-280-VE, Rev B... -
Page 53: Connecting Analyzers To The Amevision Display Unit
When only one analyzer is connected, set the address to “1”. Connecting Multiple Analyzers Up to eight (8) analyzers can be connected to a single AMEVision Display User Interface. The WDG-V UOP analyzer has extra terminal connections for daisy- chain connections. Figure 2-16. -
Page 54: Final Daisy Chain Connection Configuration Setting
For instructions on how to work from the AMEVision Display User Interface to configure and calibrate the analyzer, and to view analyzer status readings, refer to the “AMEVision Display User Interface Installa- tion and User Manual” (AMETEK PN 9000-165-VE). 2-32 | Thermox ®... -
Page 55: Customer I/O Connections
Customer I/O Connections Figure 2-17. Customer I/O Connections. Installation and Start-Up 2-33 PN 9000-280-VE, Rev B... -
Page 56: Replacing A Wdg-Iv Uop Analyzer With A Wdg-V Uop Analyzer
AMEVision Display Unit connection diagram (Figure 2-18). Follow these instruction when replacing a WDG-IV UOP that uses the Series 2000 Controller with a WDG-V UOP using AMEVision and the AMEVision Dis- play Unit. 1. Disconnect customer wiring and conduit entries from the existing WDG-IV UOP electronics enclosure. - Page 57 Figure 2-18. Retrofit Wiring diagram. Installation and Start-Up 2-35 PN 9000-280-VE, Rev B...
-
Page 58: Amevision Communication Troubleshooting Checks
(furthest analyzer in a daisy-chain configuration) is close to exceeding, or does exceed, the maximum required distance (1219.2 meters/4000 ft), the devices may need to be moved closer together. 2-36 | Thermox ® WDG-V UOP ATEX-IECEx Analyzer PN 9000-280-VE, Rev B... -
Page 59: Maintenance And Troubleshooting
Maintenance and Troubleshooting Remove AC power from the analyzer and allow it to cool for at least 90 minutes before performing any maintenance or troubleshooting activities. Always use gloves when working on the analyzer. This chapter describes analyzer System Status and Error (Alarm / Warning) messages. -
Page 60: Aftermarket Excellence And Long-Term Commitment To Safety And Quality
Aftermarket Excellence and Long-Term Commitment to Safety and Quality Safety is a core value at AMETEK Process Instruments and is our primary consideration in every decision. We believe all accidents, injuries, and occupa- tional illnesses are preventable. We adhere to the highest design and safety... -
Page 61: Requesting Technical Support
Requesting Technical Support To request service support, a call back, or product information we encour- age you to use our Web-to-Case online tool, so we are instantly aware of your request no matter the time zone or day of the week. To do this, follow the link below. -
Page 62: Spare Parts Lists
Spare Parts Lists WDG-V UOP Analyzer Spare Parts Description AMETEK Part No. Figure Assy, Furnace, WDG-V UOP, 120 VAC 7001-986-SE Assy, Furnace, WDG-V UOP, 240 VAC 7002-005-SE Kit, WDG-V Replacement Thermocouple for O Cell Furnace 7000-839-TE RTD Flow Switch, WDG-V UOP... -
Page 63: Remote Calibration Unit (Rcu) Parts
Remote Calibration Unit (RCU) Parts Description AMETEK Part No. Figure 0–60 PSI External Air Regulator 39004JE 2-5.2 0–60 Regulator Gauge 37018JE 2-5.1 Aspirator Air Solenoid Valve (normally open) 36090JE 2-5.2 Calibration Gas Solenoid Valve (normally closed) 36088JE 2-5.2 Flow Meter 37020JE 2-5.2... -
Page 64: Diagnostics Flowcharts
(see “Plugged Plumbing Check” later in this chapter, and check the Diagnostic Flowcharts below. AMETEK recommends monitoring the Thermocouple millivolts and Cell mil- livolts be displayed during troubleshooting as a troubleshooting aid. This infor- mation will be helpful should you need to contact the factory for assistance. -
Page 65: Calibration/Aspirator Air Setup Checks
Calibration/Aspirator Air Setup Checks If performing a manual calibration, wait for the reading to stabilize on the display before switching to the next calibration gas. Possible Cause Corrective Action To check calibration gas values: Calibration Gas Check From the Calibration Gas Values screen (AMEVision User Inter- ... -
Page 66: Ac Power Checks
Sensor board. If voltage is present and the system is not heating, remove power and check the furnace resistance. If no voltage is present at terminals FURN on the Sensor board, replace the Sensor board. 3-8 | Thermox ® WDG-V UOP ATEX-IECEx Analyzer PN 9000-280-VE, Rev B... -
Page 67: Process Pressure Checks (Only If Above 2 Psig)
Process Pressure Checks (only if above 2 PSIG) Possible Cause Corrective Action Process Pressure set To check that you entered the process pressure correctly, select Process Pressure from the Configuration menu. Also ensure incorrectly that the calibration process pressure equals normal operating process pressure. -
Page 68: Maintenance
(the upper hex nut is pre-tightened at the factory). The Cell o-ring provides a seal for the system. Ensure the o-ring is properly aligned in its o-ring groove and apply even pressure when tightening the Cell. 3-10 | Thermox ® WDG-V UOP ATEX-IECEx Analyzer PN 9000-280-VE, Rev B... - Page 69 Cell Clips Washer Hex Nut Cell Housing Cell O-Ring Figure 3-1. Cell disassembly. PN 9000-280-VE, Rev B Maintenance and Troubleshooting 3-11...
-
Page 70: Replacing The Thermocouple
7. Attach one new speed nut to each post. 8. Attach the thermocouple wires to the +TC- terminals on the Sensor board (yellow wire is positive (+)). 9. Perform an oxygen calibration. 3-12 | Thermox ® WDG-V UOP ATEX-IECEx Analyzer PN 9000-280-VE, Rev B... - Page 71 Thermocoouple Speed Clips Thermocouple Figure 3-2. Thermocouple replacement. PN 9000-280-VE, Rev B Maintenance and Troubleshooting 3-13...
-
Page 72: Replacing The Flow Sensor
6. Route the wires through the top conduit back to the electronics enclosure. 7. Connect the new wires to the Cact terminals. 8. Reopen the process valves and close the enclosure doors. 3-14 | Thermox ® WDG-V UOP ATEX-IECEx Analyzer PN 9000-280-VE, Rev B... -
Page 73: Replacing The Furnace
Replacing the Furnace To replace the Furnace (Figure 3-4): 1. Open the analyzer and expose the analyzer components. 2. Close the isolation valves on the inlet and outlet of the process. Shutoff levers should be in the vertical position. 3. Disconnect Cell furnace wires. 4. -
Page 74: Replacing The Box Heater
Heater locations. 6. Remove the box heater by sliding it out. 7. Replace the box heater. AMETEK recommends that you coat the heater with “WATLUBE” before installing. 8. Reinstall the snap rings. 9. Reconnect the wires on the Sensor board. - Page 75 Box Heater Block Furnace Wires Heater Figure 3-5.2. Box Heater Replacement PN 9000-280-VE, Rev B Maintenance and Troubleshooting 3-17...
- Page 76 #2 into the other terminal on HTR2. Connect the remaining two wires together into the terminal marked T. Figure 3-5.3. Sensor board wiring. 3-18 | Thermox ® WDG-V UOP ATEX-IECEx Analyzer PN 9000-280-VE, Rev B...
-
Page 77: Replacing The Sensor Board
Replacing the Sensor Board To replace the Sensor board (Figure 3-6): 1. Disconnect all wires. 2. Loosen but DO NOT REMOVE the eight (8) kep nuts located on the elec- tronics plate. 3. Slide the board down to release. 4. Replace the Sensor board. 5. -
Page 78: Recommended Maintenance
Personnel should be thoroughly familiar with the operation of the WDG-V UOP Analyzer before performing the maintenance and troubleshooting procedures described in this section. Preventing leaks in the sample system is critical to proper analyzer op- eration. -
Page 79: Troubleshooting
Troubleshooting Never service the analyzer unless power has been removed from the analyzer, and it has been allowed to cool for at least 90 minutes. Also, always use gloves when working on the analyzer. General Troubleshooting Your system may pass calibrations, yet still seem to be reading incorrect oxy- gen levels. -
Page 80: Pressurizing For Leaks
2. If this doesn’t solve the problem, disassemble the analyzer to locate the plug. Clean the plumbing using hot water and a bottle brush. 3. When assembly is complete, check for leaks using a leak detecting liquid. 3-22 | Thermox ® WDG-V UOP ATEX-IECEx Analyzer PN 9000-280-VE, Rev B... -
Page 81: Alarm And Warning Messages
• Check the Thermocouple wiring for proper connections and inspect it for damage (cuts, nicks, burn marks, etc.). • Check the Thermocouple for a short or open circuit. Replace the Thermocouple if necessary. Contact AMETEK to verify operation before removing the Thermocouple. - Page 82 • Check the Cell Thermocouple for a short or open circuit. Replace the Thermocouple if necessary. Contact AMETEK to verify operation before removing the Thermocouple. • Check the Heater for a short or open circuit. Replace the Heater if necessary. Contact AMETEK to verify opera- tion before removing the Heater.
- Page 83 • Check the Box Temperature RTD wiring for proper connection and inspect it for damage (cuts, nicks, burn marks, etc.). • Check the Box Temperature RTD for a short or open circuit. Replace the RTD if necessary. Contact AMETEK to verify operation before removing the RTD.
- Page 84 • Check the Box Heater and Box Temperature RTD wiring for proper connections and inspect them for damage (cuts, nicks, burn marks, etc.). • Check the Box Temperature RTD for a short or open circuit. Replace the RTD if necessary. Contact AMETEK to verify operation before removing the RTD.
- Page 85 • Check the Box Heater and Box Temperature RTD wiring for proper connections and inspect them for damage (cuts, nicks, burn marks, etc.). • Check the Box Temperature RTD for a faulty circuit. Replace the RTD if necessary. Contact AMETEK to verify operation before removing the RTD.
- Page 86 Take appropriate safety precautions, open the Analyzer door, and: • Check the Cell for an open cell. • Check the Cell for proper operation. Replace the Cell if necessary. Contact AMETEK to verify operation be- fore removing the Cell. Cell Mv Mismatch The Cell mv measurement does not match the real-time Cell measurement.
- Page 87 • Check the Thermocouple wiring for proper connections and inspect it for damage (cuts, nicks, burn marks, etc.). • Check the Thermocouple for proper operation. • Check the Thermocouple circuit. Replace the Thermocouple if necessary. Contact AMETEK to verify opera- tion before removing the Thermocouple. PN 9000-280-VE, Rev B...
-
Page 88: Warnings
• Low Cell output. Corrective Action: Take appropriate safety precautions, open the Analyzer door, and: Cell. Contact AMETEK to verify operation and to order a new Cell. • Replace the ZrO High Cell Mv The combustible measurement is no longer valid (set to full-scale) - Page 89 Alarm Condition / Description / Corrective Action Analog Output 3 Out Of Range The analog output value is saturated (high or low). Trigger Conditions: • Incorrect range setting. Corrective Action: From the AMEVision User Interface or PC Configurator Software: • Check the range configured for Analog Output 3. Change it to the required range if necessary. Last O Span Calibration Failed The last oxygen Span calibration failed.
- Page 90 Trigger Conditions: • Last Calibration failed. • Unit has never been calibrated. Corrective Action: • Restart the Calibration and allow sufficient time for it to complete its cycle. 3-32 | Thermox ® WDG-V UOP ATEX-IECEx Analyzer PN 9000-280-VE, Rev B...
-
Page 91: Specifications
Specifications Specifications included in this chapter are typical for the ranges listed. For custom ranges/applications refer to accompanying Manual Supplements shipped with the analyzer, or consult with your AMETEK representative. PN 9000-280-VE, Rev B Specifications... -
Page 92: Wdg-V Uop Analyzer Specifications
0.5 A, 30 V, 10 VA max. non-inductive load, AC or DC Digital Communication 2-wire Modbus RTU, 57.6 KBaud Configuration Modbus RTU, AMETEK configuration software, or AMEVision User Interface. HART® option available. Diagnostics Low sample flow, Cell and Detector age tracking, Cell resistance, calibration required, analog current verification. -
Page 93: Remote Calibration Unit (Rcu) Specifications
Remote Calibration Unit (RCU) Specifications Specification Description Display 4.2" color 1/4W VGA with graphical user interface, password-protected. Keypad 18-key membrane Input Two-wire Modbus RTU (19200 Baud Rate, Even Parity, 1 Stop Bit) from analyzer. Host capable of up to eight analyzers. Digital Outputs Two- or four-wire Modbus RTU, TCP/IP Ethernet with embedded web server (RJ-45 connection), USB port for data collection or... -
Page 94: Approvals And Certifications
Approvals and Certifications WDG-V UOP Analyzer Directives and Standards IECEx Certificate Number: IECEx ETL 19.0039X Using the following standards: IEC 60079-0:2017 Edition 7.0 IEC 60079-2:2014-07 Edition 6.0 ATEX Certificate Number: ITS19ATEX14526X Directive 2014/34/EU using the following standards: EN 60079-0: 2018... -
Page 95: Remote Calibration Unit (Rcu) Directives And Standards
Remote Calibration Unit (RCU) Directives and Standards Directive 2004/108/EC Low Voltage Directive Directive 73/23/EEC. IEC Installation Category II IEC Pollution Degree 2 PN 9000-280-VE, Rev B Specifications... -
Page 96: Wdg-V Uop Series Analyzer Rating Labels
WDG-V UOP Series Analyzer Rating Labels 4-6 | Thermox ® WDG-V UOP ATEX-IECEx Analyzer PN 9000-280-VE, Rev B... - Page 97 AMETEK Process Instruments delivers worldwide sales and service support through a network of direct and factory-trained global distribution channels. AMETEK Service Assistance Program plans offer coverage up to 24 hours a day, 365 days of the year. As worldwide experts in the manufacture of process analyzers and instrumentation, we have supplied solutions to industry since 1962, providing the widest range of analysis technology available.
Need help?
Do you have a question about the WDG-V UOP and is the answer not in the manual?
Questions and answers