Table of Contents
Advertisement
Quick Links
Advertisement
Table of Contents

Related Manuals for ibidi Heating System


Summary of Contents for ibidi Heating System
- Page 1 Heating System Instructions Version 25.04.2017...
- Page 2 Instructions Heating System Version (26th April 2017)
-
Page 3: Table Of Contents
1 Principle – Physiological Conditions in Live Cell Imaging 2 Equipment 2.1 Components of the Heating System ...... - Page 4 Instructions Safety Considerations To ensure operation safety, the Heating System must be operated correctly and maintained accord- ing to a regular schedule. Carefully read all safety precautions in this manual before operating the instrument. Note that the signal words WARNING, CAUTION and NOTE have specific meanings in this manual.
- Page 5 • Do only use the delivered cables and plugs. If not doing so you risk electric shock and fire. • Do not operate the Heating System with substances or under conditions, that can cause a risk of explosion, implosion or the release of gases.
- Page 6 • IEC 61326-1:2006 EMC, Electrical equipment for measure- ment, control and laboratory use. EMC requirements. General requirements • IEC/CISPR 11:2009, modified + A1:2010, Industrial, sci- entific and medical equipment - Radio-frequency distur- bance characteristics - Limits and methods of measure- ment Heating System Version (26th April 2017)
- Page 7 Heated Lid (Channel 1): Ambient temperature (min. 18°C) to +46°C Heated Plate (Channel 2): Ambient temperature (min. 18°C) to +45°C Recommended Temperatures before Adjustment (see Section3.5) Heated Lid (Channel 1): 42°C Heated Plate (Channel 2): 37°C Version (26th April 2017) Heating System...
- Page 8 Instructions Compatibility The parts of the Heating System must only be used according to the instructions. The compatibility of all parts is shown in detail in section 2.2. Notices 1. ibidi shall not be held liable, either directly or indirectly, for any consequential damage incurred as a result of product use.
- Page 9 Instructions Limited Warranty Products sold by ibidi, unless otherwise specified, are warranted for a period of one year from the date of shipment to be free of defects in materials and workmanship. If any defects in the product are found during this warranty period, ibidi will repair or replace the defective part(s) or product free of charge.
- Page 10 9. Avoid vibrations from vacuum pumps, centrifuges, electric motors, processing equipment, and machine tools. 10. Avoid dust and corrosive gas. Do not install the Heating System where it could be exposed to high levels of dust or to outside air or ventilation outlets.
- Page 11 Connect the Heating Devices to the connectors at the rear of the Temperature Controller. Connect each device to the connector labeled with the corresponding device name. WARNING! To avoid risk electric shock and fire, operate the Heating System with the supplied external power supply and the supplied cables and plugs.
- Page 12 CAUTION The manual disassembling of the Heating System is not allowed. Manual disassembling poses a risk of personal injury or damage to the devices. Contact ibidi service personnel if there is need to disassemble the devices.
- Page 13 Waste treatment lies in the responsibility of the user. Contact your institution’s waste management department or a company specializing in waste recovery. Do not dispose the Heating System in a trash bin or at a public waste disposable site. For detailed information please contact the ibidi service department.
- Page 14 Preface This manual is your guide to using the Heating System for cell culture experiments on an optical microscope. It instructs first-time users how to use the instrument, and serves as a reference for experienced users. Before using the Heating System, please read this instruction manual carefully, and make sure that the contents are fully understood.
- Page 15 –reduced air can be flushed in, which makes the incubation chamber a fully controlled incubator – right on the microscope stage. Figure 1: Schematic view of the Heating System. Figure 2: The Heated Lid prevents condensation effects on the lid of the cell culture vessel.
-
Page 16: Equipment
Instructions 2 Equipment The Heating System is a stage top incubator to keep samples on the microscope stage at the right temperature. It consists of the Temperature Controller, Heated Lid, Heated Plate, and Inserts to hold the samples. The Heated Plate fits into a universal mounting frame for multiwell plates (outer dimensions 127.5 mm ×... -
Page 17: Combination Options
Controller with a computer 2.2 Combination Options The parts of the Heating System are combined as shown in Figure 3. The Heated Lid and Heated Plate fit on a microscope stage equipped with a universal mounting frame for multiwell plates. They are connected to the Temperature Controller. -
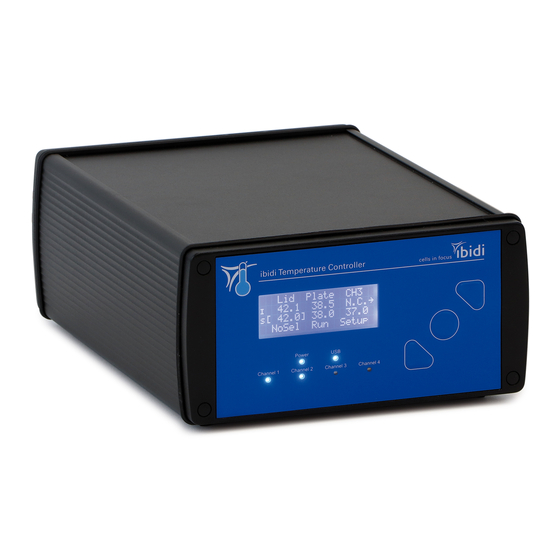
Page 18: Temperature Controller
Instructions Figure 3: Overview of the parts of the Heating System with options to combine 2.3 Temperature Controller The Temperature Controller is designed to precisely operate the different heating devices. To achieve this, the controller has four control channels that control the Heated Lid, Heated Stage (Insert), and two optional channels. - Page 19 The available connections are: • Power supply • USB to connect to the computer • 4 control channels • External thermosensor (Type KTY-81) • On/Off switch Figure 5: Rear view of the Temperature Controller. Version (26th April 2017) Heating System...
-
Page 20: Heated Lid
Figure 6: Heated Lid 2.5 Heated Plate The Heated Plate provides the base for the Heating System. The lower part of the Heated Plate fits into any microscope stage with a universal mounting frame for multiwell plates. The electrical cable (1.5 m) is connected to the Temperature Controller. -
Page 21: Heating Inserts
The Heated Plate passively heats the inserts. 2.6.1 Heating Insert for µ–Slides The Heating Insert for µ–Slides fits 75 mm × 25 mm µ–Slides (e.g. all ibidi µ–Slides). Figure 8: Heating Insert for µ–Slides... -
Page 22: Heating Insert For Μ-Dishes
Instructions 2.6.2 Heating Insert for µ–Dishes 35mm, high The Heating Insert for µ–Dishes fits dishes with a diameter of 35 mm (e.g. ibidi µ–Dish Center the dish in the insert, before you put the holder on. 35mm, high Figure 9: Heating Insert for µ–Dish To make sure that µ–Dishes are properly placed, the holder of the insert must apply a diagonal force... -
Page 23: Operating The Heating System
Prepare the cells according to your protocol and place the culture vessel in the Heating Insert. The Heating Insert can be removed from the Heating System even with the holder in place. Then put the whole assembly in the opening of the Heated Plate and close the Heated Lid. -
Page 24: Start The Heating System
Instructions 3.3 Start the Heating System The Temperature Controller is switched on by the dip–switch on the back. The system immediately starts heating up the heated components. Warning! Be aware that when the system is switched on, 10V AC voltage is applied to the underside of the glass plate. -
Page 25: Temperature Adjustment In The Sample
Figure 12: Temperature Controller with Control Panel. 3.5 Temperature Adjustment in the Sample The Heating System controls the temperature of the actively heated components. The temperature in the sample will result from the interaction of all heated parts. Therefore, the temperature at the position of the cells must be adjusted. - Page 26 4. Place the µ–Dish/µ–Slide in the Insert and put the holder on. 5. Place the Insert in the Heating System, close the Heated Lid. 6. Set all parameters to create your experimental conditions, such as room temperature, air con- ditioning, airflow, illumination, microscope settings, etc.
-
Page 27: Maintenance
(e.g. Barrycidal 36 or Pharmacidal). All parts of the Heating System can be cleaned from the outside. We recommend using ultrapure water for cleaning. Fingerprints on the Heated Lid can be removed using isopropanol (70%) or lens/eyeglass cleaning wipes. -
Page 28: Troubleshooting
5.2 Evaporation is Too High Depending on the incubating conditions, small volumes might evaporate quickly, especially during long–term experiments. We suggest using silicone oil (e.g. Anti-Evaporation Oil, ibidi, 50051) to decrease evaporation. If you have an actively controlled humidifying device, increase the set value for relative humidity.
Need help?
Do you have a question about the Heating System and is the answer not in the manual?
Questions and answers