
Related Manuals for IDTECH VP6800


Summary of Contents for IDTECH VP6800
- Page 1 VP6800® User Manual 80159500-001 Rev V 7 May 2021 ID TECH® 10721 Walker Street Cypress, CA 90630 (714) 761-6368 www.idtechproducts.com support@idtechproducts.com...
- Page 2 ID TECH VP6800 User Manual Copyright © 2021 ID TECH. All rights reserved. This document, as well as the software and hardware described in it, is furnished under license and may be used or copied online in accordance with the terms of such license. The content of this document is furnished for information use only, is subject to change without notice, and should not be construed as a commitment by ID TECH®.
- Page 3 ID TECH VP6800 User Manual FCC warning statement This device complies with Part 15 of the FCC Rules. Operation is subject to the following two conditions: (1) this device may not cause harmful interference, and (2) this device must accept any interference received, including interference that may cause undesired operation.
- Page 4 ID TECH VP6800 User Manual Revision History Date Changes Author 03/30/2021 Reimplemented Revision History Added Tamper and Failed Self-Check Indicators section Multiple updates for readability—specifically, condensed section and Basic Operations sections Added Durability section to Specifications Added LED indicator specs...
-
Page 5: Table Of Contents
6.4.1. Other Status Messages ....................................15 7. INSTALLATION ................................16 7.1. Parts List for Development ............................. 16 7.2. VP6800 Mounting Guidelines and Installation ......................17 7.3. Connecting Cable and Power ............................18 7.4. Bluetooth Connection ............................... 20 8. VP6800 CONFIGURATION SETTINGS ......................... 21 8.1. -
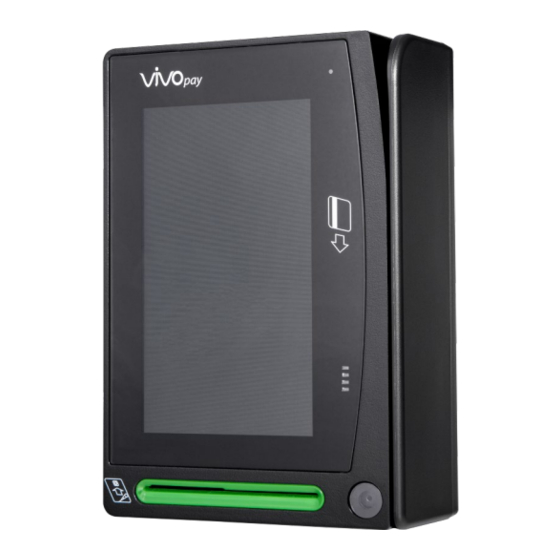
Page 6: Overview
VP6800. The Universal SDK is available for the C# language on Windows and comes with sample code for demo apps. To obtain the SDK and other useful utilities, demos, and downloads for the VP6800, be sure to check the Downloads link on the TECH Knowledge Base (no registration required). -
Page 7: Features
Environmental certifications (RoHS, REACH, RED) • Encryption support (TDES, AES, DUKPT) • Remote Key Injection Support (PCI validated) • Firmware upgradeable in the field • Note: the VP6800 must be power-cycled to switch between 10M and 100M. Page | 7... -
Page 8: Agency Approvals And Compliances
ID TECH VP6800 User Manual 2.1. Agency Approvals and Compliances • EMV Contact L1 & L2 • EMV Contactless L1 • EMV Contactless L2s: • o Amex o Discover o Interac o JCB o MasterCard o UPI o Visa FCC (Part 15, Class-B) •... -
Page 9: Specifications
ICC Connector Reliability 500,000 times Note: Boot-up time can vary for VP6800 readers depending on configuration; boot-up is usually complete within 15 seconds. “Power On” is defined as the length of time from pressing the power button to the screen displaying the ID TECH logo; “Wake Up” is defined as the length of time from tapping the screen to the screen displaying the ID TECH logo. -
Page 10: Communications
The diagram below illustrates the layout of various ports. 4.1. Audio Support While the VP6800 does not have an internal speaker, it can host 16mb .WAV files and connect to an external speaker via the 3.5mm audio jack. Page | 10... -
Page 11: Cable
ID TECH VP6800 User Manual 5. Cable The VP6800 uses a serial port to USB +RS-232+RS-232 cable. The cable connectors follow the schematic illustrated below. Note: For development purposes, ID TECH can supply a serial port interface cable that supports RS- 232 or USB. -
Page 12: Basic Operation
VP6800, and supply 5VDC 2A power (via cannon connector at the powered DB9 connection) using an ID TECH P/N AC0005R-26 or equivalent power supply. Optionally also connect a standard Ethernet cable between the RJ45 ports on the back of the VP6800 and the network port of the host system. -
Page 13: Leds And Lcd Status Indicators
ID TECH VP6800 User Manual 6.2. LEDs and LCD Status Indicators The VP6800 uses LEDs and the main LCD display to denote its status during transactions and in case of errors. The small LED lights beside the main digital display used during a contactless transaction. -
Page 14: Tamper And Failed Self-Check Indicators
6.4. Tamper and Failed Self-Check Indicators The VP6800 displays the following indicators when it has been tampered or has any of the other following internal issues, such as an expired certificate, missing key, or similar fault discovered during a self-check. -
Page 15: Other Status Messages
ID TECH VP6800 User Manual 6.4.1. Other Status Messages The VP6800’s LCD can display the following messages for both regular status and in the event of a failed self-check: State Buzzer Indicating Tamper Beeps "Tampered” Device was tampered by physical, temperature, or voltage... -
Page 16: Installation
ID TECH VP6800 User Manual 7. Installation The sections below describe VP6800 installation. 7.1. Parts List for Development Verify that you have the following hardware for the installation of the VP6800: • Cable 80159217-001 Power supply AC0005R-26 Page | 16... -
Page 17: Vp6800 Mounting Guidelines And Installation
Mount the unit according to the drawings shown, with #8-32 studs spaced 65mm apart horizontally and 67mm vertically. Use a torque wrench to tighten the screws to 8kgf. For safety reasons, make sure to mount the VP6800 at a height no greater than two meters from the floor. -
Page 18: Connecting Cable And Power
ID TECH VP6800 User Manual 7.3. VP6800 Grounding Requirements The VP6800 is designed such that it is isolated from the signal noise of other devices and does not require additional grounding. However, to add your own grounding cable, follow the diagrams... - Page 19 ID TECH VP6800 User Manual Page | 19...
-
Page 20: Bluetooth Connection
ID TECH VP6800 User Manual 7.5. Bluetooth Connection When using Bluetooth communication with the host, follow these steps: 1. Search for Bluetooth name of VP6800 on the mobile host. 2. Select Pairing. 3. The VP6800 will display a window with a random passkey:... -
Page 21: Vp6800 Configuration Settings
ID TECH VP6800 User Manual 8. VP6800 Configuration Settings Setting up the VP6800 requires users to enter the main menu each time they enter a sub-menu, even if they do not save any setting changes. Note that users can change many of the settings below via firmware commands. To use firmware commands to configure a VP6800 unit, refer to the NEO 2 Interface Developer's Guide, available from your ID TECH representative. -
Page 22: Configuring Ethernet Settings
ID TECH VP6800 User Manual 8.1. Configuring Ethernet Settings Follow the steps below to configure ethernet settings. 1. Enter the main menu and select Ethernet Settings. 2. Select Device IP or Remote IP as needed. Page | 22... -
Page 23: Setting The Device Ip
To clear a field, select Cancel. d. To exit the menu without making changes, select Cancel again. 2. The VP6800’s screen displays an IP is Set dialog on success. 8.1.2. Setting the Remote IP 1. To set the Remote IP, enter IP address information in the field highlighted in blue. - Page 24 To clear a field, select Cancel. d. To exit the menu without making changes, select Cancel again. 2. The VP6800’s screen displays an IP is Set dialog on success. 3. Next, on a Windows computer, open Network & Internet Settings by right-clicking the internet connection icon in the taskbar.
-
Page 25: Configuring Wi-Fi Settings
ID TECH VP6800 User Manual 8.2. Configuring Wi-Fi Settings Follow the steps below to configure Wi-Fi settings. 1. Enter the main menu and select Wi-Fi Settings. 2. Select Device IP, Remote IP, or SSID & Password as needed. Page | 25... -
Page 26: Setting The Device Ip
To clear a field, select Cancel. d. To exit the menu without making changes, select Cancel again. 2. The VP6800’s screen displays an IP is Set dialog on success. 8.2.2. Setting the Remote IP 1. To set the Remote IP, enter IP address information in the field highlighted in blue. -
Page 27: Setting The Ssid And Password
To clear a field, select Cancel. d. To exit the menu without making changes, select Cancel again. 2. The VP6800’s screen displays an IP is Set dialog on success. 8.2.3. Setting the SSID and Password 1. To set the SSID and Password, enter the required information in the field highlighted in blue. -
Page 28: Configuring Ble Settings
Select Enter after completing the configuration to save. b. To clear a field, select Cancel. c. To exit the menu without making changes, select Cancel again. 3. The VP6800’s screen displays a Name is Set dialog on success. Page | 28... -
Page 29: Selecting Wi-Fi Or Bluetooth
ID TECH VP6800 User Manual 8.3.1. Selecting Wi-Fi or Bluetooth Note: VP6800 units can only transmit wirelessly over one communication format at a time: Wi-Fi or Bluetooth. In addition to the steps below, see the following commands in the NEO 2 Interface Developer’s Guide:... -
Page 30: Security Guide
ID TECH VP6800 User Manual 9. Security Guide The VP6800 is an unattended device. Contact your ID TECH representative or send an e-mail to support@idtechproducts.com if you have any questions involving the product's daily use. We recommend you conduct daily checks of the device as follows: Check the tamper evidence physical seals, to make sure they are intact. -
Page 31: Decommissioning Pci-Certified Devices
13. Firmware Reference The VP6800 uses ID TECH's NEO 2 firmware. For a comprehensive guide to the device's firmware- level commands, ask your ID TECH representative for the NEO 2 Interface Developer's Guide (or IDG). It is available at no charge to customers on request. -
Page 32: Updating Vp6800 Firmware
ID TECH VP6800 User Manual 15. Updating VP6800 Firmware The steps below describe the process for updating VP6800’s firmware (for both its K81 and RT1050 processors) via the Universal SDK Demo. Note: Before you begin, contact your ID TECH representative to receive the most recent VP6800 firmware. - Page 33 6. In the File Explorer window, navigate to the directory where you saved the K81 firmware update, select the FW file that starts with NEO_II_vp6800_... and click Open. 7. The VP6800 reboots and enters the bootloader, at which point the USDK Demo app begins updating the device’s K81 firmware.
- Page 34 RT1050 FW file that starts with VP6800FW_RT1050_... and click Open. 12. The VP6800 reboots and enters the bootloader again to update the device’s RT1050 firmware. 13. When the RT1050 firmware update completes, the VP6800 reboots again and the USDK Demo app prints Firmware Update Successful in the Results panel.
-
Page 35: Appendix A: Power Over Ethernet Splitter
Contact ±8KV, Air ±10KV Isolation 1.0KV Power/Data cables 23cm Length 17. Appendix B: Supported Micro SD Cards The VP6800 supports a limited number of Micro SD cards; the following cards have been tested and verified for the device: Kingston/SDC4/8GB • Kingston/SDCS/16GB •...
Need help?
Do you have a question about the VP6800 and is the answer not in the manual?
Questions and answers