Table of Contents
Advertisement
Quick Links
Advertisement
Table of Contents

Related Manuals for IDTECH ViVOpay Vendi


Summary of Contents for IDTECH ViVOpay Vendi
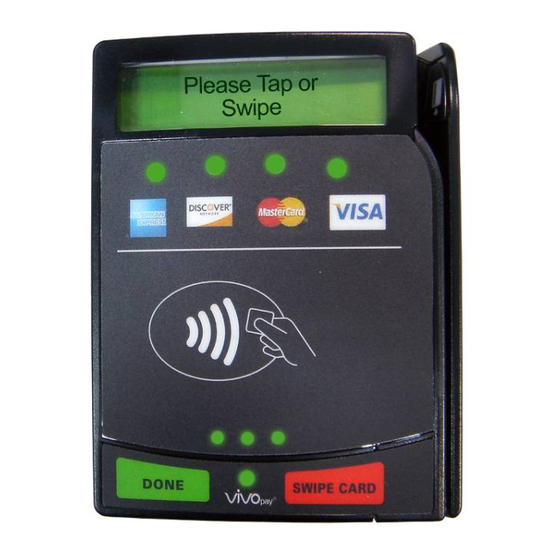
- Page 1 ViVOpay Vendi™ User Manual 80139500-001 Rev. A...
- Page 2 Copyright Copyright 2015, International Technologies and Systems Corporation. All rights reserved. ID TECH 10721 Walker Street Cypress, CA 90630 This document, as well as the hardware and software it describes, is furnished under license and may only be used in accordance with the terms of such license. The content of this paper is furnished for informational use, subject to change without notice, and not to be construed as a commitment by ID TECH.
- Page 3 Consult the dealer or an experienced radio/TV technician for help. Changes or modifications to the ViVOpay Vendi not expressly approved by ID TECH could void the user's authority to operate the ViVOpay Vendi. This device complies with Part 15 of the FCC Rules. Operation is subject to the following two conditions: 1.
-
Page 4: Table Of Contents
Table of Contents Overview ....................5 Features....................5 Specifications..................6 Installation ....................7 Firmware Upgrade via RS232 or USB............13 Preparation ...................13 Download Procedure ................13 Default Configuration ................15 Installation Points ..................16 Troubleshooting..................17 Glossary ....................19 Customer Support ....................20... -
Page 5: Overview
The ViVOpay Vendi supports USB and serial RS-232 host communication using the protocol defined in the NEO v1.0.0 Interface Developers Guide. The ViVOpay Vendi is designed to support a wide input power range. Both data and power can be supplied via a single cable to reduce the effort and complexity of installation. -
Page 6: Specifications
Specifications Hardware MTBF 200,000 hrs. Transmitter Frequency 13.56 MHz +/- 0.01% Transmitter Modulation ISO 14443-2 Type A Rise/Fall Time: 2-3 µsec. Rise, < 1 µsec fall ISO 14443-2 Type B Rise/Fall Time: < 2 µsec. each; 8% - 14% ASK ISO 18092 Receiver Subcarrier 847.5 KHz... -
Page 7: Installation
2. Installation This Section describes how to install the ViVOpay Vendi either inside a vending machine or on the front surface of the vending machine. Make sure that you have the following major components required for installing the ViVOpay Vendi unit inside a vending machine. - Page 8 Open the vending machine to gain access to the backside of the front panel. See the individual vending machine instructions on how to gain access to the interior. Remove any existing hardware to make room for the installation of the ViVOpay Vendi hardware.
- Page 9 Insert the ViVOpay Vendi into the opening making sure that it is positioned right side up. Attach the nuts to lock the ViVOpay Vendi into position.
- Page 10 Attach the Pigtail Cable to the back of the ViVOpay Vendi. Attach the other end of the Pigtail Cable to the supplied Interior Cable, which then attaches inside the vending machine. Tidy all cables and fasten with nylon cable-ties. Ensure that no loose cables could...
- Page 11 Close up the vending machine. Connect the power cable into the electrical outlet. The ViVOpay Vendi unit LEDs should come on and the unit should beep.
- Page 12 Test the ViVOpay Vendi using the supplied contactless card or a magstripe card. The Green LEDs at the top of the ViVOpay Vendi unit should all flash and you should hear an audible beep to confirm that the ViVOpay Vendi has read the card.
-
Page 13: Firmware Upgrade Via Rs232 Or Usb
3. Firmware Upgrade via RS232 or USB Preparation To update the new firmware you will need: PC with available serial or USB port • Cables: • Test cable: Part # 80139201-001 • For Serial, any cable Part # 220-2463-XX (DB-9 serial to RJ45 or RJ50) •... - Page 14 6. Click “Load”, and select the appropriate firmware file (Ex:“NEO_v1.00-XXX .txt” or ”Vendi v1.00.XXX.bin”) 7. Download process will start...
-
Page 15: Default Configuration
8. Once Download is complete, it will display “100% Done and Rebooting” Default Configuration 1. Continue from last step in Sec. 3.2 Click “Reset Default” and when it is complete, “End of Load Default Setting (04-F0)” is displayed. 2. Application could be closed at this time. -
Page 16: Installation Points
4. Installation Points Unit is susceptible to RF and electromagnetic interference. This means that it is important not to mount the unit next to or near (within 3 or 4 feet) large electric motors, computer UPS systems, microwave transmitters, radio transmitters, communications equipment etc. ... -
Page 17: Troubleshooting
5. Troubleshooting Symptom Possible Cause Remedy General Issues ViVOpay Vendi does • ViVOpay Vendi is not • Check cable connections not appear to be properly powered on or • Ensure power is on and correct powered on (no LEDs incorrect voltage... - Page 18 Symptom Possible Cause Remedy Communication to host No data is received, or • Faulty or incorrect cable • Check that the cable connection is data is garbled secure and in the correct port on connections. host end • Contactless application is not installed on terminal •...
-
Page 19: Glossary
6. Glossary Electronic Cash Register (ECR) The combination of a traditional cash register and a POS terminal, often PC- based. Expresspay from American Express® American Express contactless payment product that utilizes contactless technology. Firmware Software that is embedded in a hardware device that allows reading and executing the software, but does not allow modification, e.g., writing or deleting data by an end user. -
Page 20: Customer Support
RF Reader The Point of Sale device that receives the RF transmission from a card, fob or NFC phone. Visa Contactless Visa's contactless payment product that utilizes contactless technology. Symbol Explanations: EMV Contactless Symbol The symbol of the crossed out wheeled bin indicates that the product (electrical and electronic equipment) should not be placed in municipal waste.
Need help?
Do you have a question about the ViVOpay Vendi and is the answer not in the manual?
Questions and answers