Advertisement
Quick Links
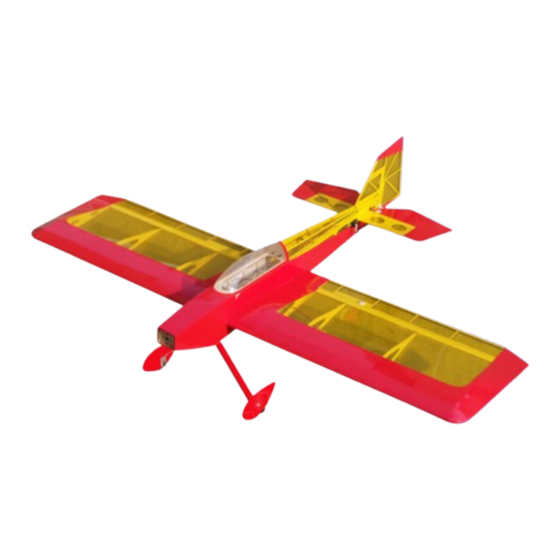
Specs:
Wing Span: 1016mm
Wing Area: 27.3 Sq dm
Length: 923.5mm
Weight: 650g RTF
Required:
Motor: BL2214 - 1000kv
Radio: 4 channels,
Servos: 4 x 9g servo
Battery: 3S 1300~1500mAh
ESC: 20~25A
Warning!
This item is not a toy. It has the potential to cause serious harm if mistreated. The user accepts all
responsibility in the assembly of this model. Always check the model to ensure it is free of damage and all
screws and control hardware is tight before each flight.
Advertisement

Subscribe to Our Youtube Channel
Related Manuals for HobbyKing Li13der-EP


Summary of Contents for HobbyKing Li13der-EP
- Page 1 Specs: Wing Span: 1016mm Wing Area: 27.3 Sq dm Length: 923.5mm Weight: 650g RTF Required: Motor: BL2214 - 1000kv Radio: 4 channels, Servos: 4 x 9g servo Battery: 3S 1300~1500mAh ESC: 20~25A Warning! This item is not a toy. It has the potential to cause serious harm if mistreated. The user accepts all responsibility in the assembly of this model.
-
Page 2: Wing Assembly
Wing Assembly 1) Aileron control hardware – control horns, clevis, pushrod connector, pushrod, control horn screws. 2) Cut covering to expose servo mounting holes. Servos are mounted on the bottom of the wing. 3) Cut covering away at rudder servo location on top of wing. Servo is mounted in the fuselage, but needs clearance from the wing. - Page 3 4) Cut covering to insert main wing. Use a covering iron to seal edges of covering. 5) Glue wing with CA glue or epoxy, use a hobby knife to puncture covering for better glue penetration. 6) Glue hinges with thin CA glue.
- Page 4 7) Install aileron servo, secure with screws. 8) Install aileron control horn, secure with screws. Control horn includes square backplate for top of aileron. 9) Thread clevis to control rod. Pushrod connector should be installed on outermost hole in servo arm for best control throw.
-
Page 5: Tail Assembly
Tail Assembly 1) Tail hardware – Pull Pull cables, clevis, aluminum crimps, control horns, elevator joiner, tail wheel 2) Cut covering to install stabilizer. Seal edges with covering iron. 3) Cut covering for elevator servo mount on right side only. - Page 6 4) Insert elevator into fuselage before installing stabilizer fin 5) Insert stabilizer into slot, center it, puncture covering at location it contacts fuselage, then glue in place with CA or Epoxy. 6) Glue hinge with thin CA.
- Page 7 7) Install elevator servo, secure with screws. You may need a small servo extension lead for the elevator servo to reach your receiver. 8) Install elevator horn, secure with screws and included backplate. 9) Glue vertical fin with CA glue or epoxy...
- Page 8 10) Glue plywood tail wheel mount with CA glue or epoxy. 11) Cut a small channel in balsa wood for tail wheel wire. 12) Drill a diameter 1.5mm hole to install the tail wheel wire.
- Page 9 13) Glue hinge with CA glue. 14) Glue tail wheel steel wire with CA glue or epoxy. A small piece of clear tape wrapped around works for double security. 15) Install rudder servo, secure with screws.
- Page 10 16) Insert rudder pull pull cables down the length of the fuselage to the rudder servo arm. Insert cables through threaded fittings, loop cable through, use aluminum crimps to secure cable. 17) Install rudder horn, secure with screws and nut M2 nuts. 18) Center servo arm, and rudder.
-
Page 11: Landing Gear Assembly
Landing Gear Assembly 1) Main Landing Gear parts. 2) Glue plywood with CA or a Rubberized CA glue. 3) Cut slot in wheel pant to conform with plywood insert... - Page 12 4) Secure wheels to landing gear with wheel collars set screws. 5) Insert wheel into wheel cowling. Hold in place with wheel collars and setscrew. 6) Install main landing wheel...
- Page 13 7) Install wheel pants, secure with screws Canopy/ Final Assembly 1) Canopy Parts 2) Glue short fiberglass canopy pins with CA glue.
- Page 14 3) Cut covering away to install motor...
Need help?
Do you have a question about the Li13der-EP and is the answer not in the manual?
Questions and answers