Advertisement
Specs
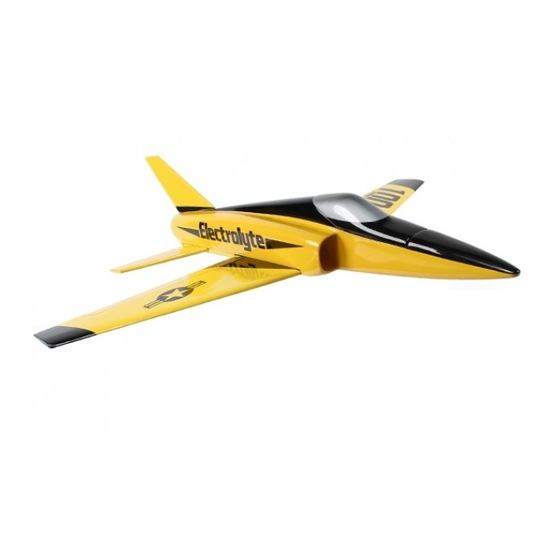
Wingspan: 508mm
Length: 533mm
Weight: 280~330g
Motor: 2040 Inrunner 8000Kv
Features
Pre-painted molded fiberglass fuselage
Balsa wing and tail from the factory
Bifurcated inlet ducting pre-installed
High visibility color scheme
Full Flying Horizontal Stabilizer
Required
4 Channel Transmitter and Receiver
3S 11.1V 850~1300mAh Lipoly Battery
3 x Dymond D4.7g Servos
30A Brushless ESC
Choice of two different vertical fins included
Dr. MadThrust alloy fan shroud with 8000kV
motor included
Easy access battery hatch
Advertisement
Table of Contents

Related Manuals for HobbyKing Electrolyte


Summary of Contents for HobbyKing Electrolyte
- Page 1 Specs Required Wingspan: 508mm 4 Channel Transmitter and Receiver Length: 533mm 3S 11.1V 850~1300mAh Lipoly Battery Weight: 280~330g 3 x Dymond D4.7g Servos Motor: 2040 Inrunner 8000Kv 30A Brushless ESC Features Pre-painted molded fiberglass fuselage Choice of two different vertical fins included Balsa wing and tail from the factory Dr.
-
Page 2: Required Items
It is your responsibility to complete final assembly, setup, and routine pre-flight checks. Always make sure to check for any loose screws or parts, and that the airframe is free from damage that may cause failure in flight. HobbyKing is not responsible for Hobby Knife Phillips Screwdriver any injury or property damage inflicted due to negligence in assembly or maintenance. - Page 3 Airframe Assembly Stabilizer Assembly 1) Locate the servo cutouts in wing and cut 2) Mount the wing to the fuselage, lining up the 2) Remove covering material where control 1) Identfiy left stab with recess for control horn. away covering from the top and bottom. wing mounting holes to the fuselage.
-
Page 4: Wing Assembly
Wing Assembly 5) Install micro pushrods. Suggest placing the 8) Install landing skids on bottom of wing. These U-bend towards the wing surface to prevent are a wear item and will need to be replaced catching upon landing. periodically. 1) Use two hinges per aileron. Check that there are slots for hinges. Cut slots as necessary with a sharp hobby knife. -
Page 5: Fan Installation
3) Using clear tape, tape together the ducting pieces. 6) Using clear tape, carefully attach ducting to fan to make complete unit. Check your motor will not be used for the Electrolyte. For tightest fit of rear ducting, roll it tightly around fan for proper rotation direction prior to installation. -
Page 6: Final Assembly
Final Assembly 1) Attach elevator pushrod to servo and stabilizer 2) Attach wing to fuselage using four screws. as shown. Secure clevis with set screw. See note Feed aileron, elevator, and ESC leads under on page 11 for elevator setup. bifurcated inlet ducting into forward fuselage. -
Page 7: First Flight
Setup **Setup Note** Set elevator neutral with small amount of First Flight up elevator. Center leading edge of stabilizer with bottom of the fuselage. This is approximately 3mm. 1) Before flying this model, check that the model is assembled per this manual and is free from any damage that may have occured during transport.
Need help?
Do you have a question about the Electrolyte and is the answer not in the manual?
Questions and answers