Advertisement
Quick Links
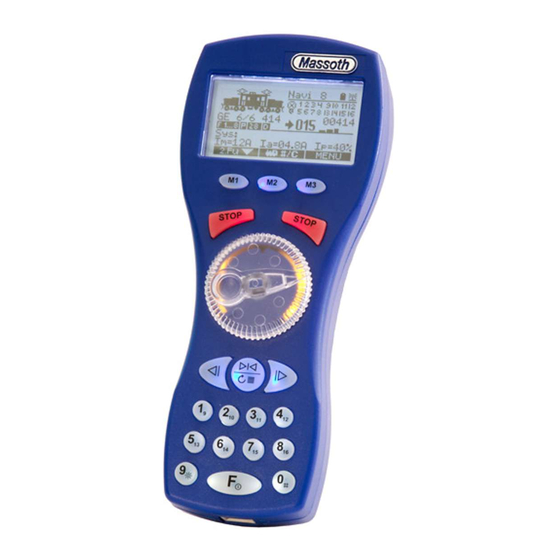
DiMAX Navigator Operation
Menu Keys
CANCEL Emergency Stop
Dial Knob
Secondary Function Keys
Function Keys
"F" -Key
Cable Operation:
Connect the Navigator with the bus
cable to the Central Station. The
Navigator will start automatically.
Display
Wireless Operation:
Three (3) type AA batteries are required.
Start the Navigator by pressing the F key.
Holding the F key (>1sec) will turn it off again.
Page 1 of 6
EMERGENCY
STOP
Advertisement

Related Manuals for Massoth DiMAX


Summary of Contents for Massoth DiMAX
- Page 1 DiMAX Navigator Operation Page 1 of 6 Display Menu Keys CANCEL Emergency Stop Dial Knob EMERGENCY STOP Secondary Function Keys Function Keys "F" -Key Cable Operation: Wireless Operation: Connect the Navigator with the bus Three (3) type AA batteries are required.
-
Page 2: Battery Condition
Display Page 2 of 6 Status bar Main function array Auxiliary function array Menu assignment Navigator ID Wired-/ RC mode Battery Condition Illustration #2: Status bar shows Navigator ID, Battery state & operation mode. ---------------------------------------------------------------------------------------- Light Loco symbol Function display Loco name Loco address Function level... -
Page 3: Emergency Stop
Page 3 of 6 Selection 2. Function Main Menu Change Loco and/or Configuration Illustration #5: The menu bar shows the function assigned to the keys M1, M2 & M3. ----------------------------------------------------------------------------------------- The keyboard numers are used for main and auxiliary functions. Switching between the main function display and the auxiliary function display: - F: Assigns functions from F1-F8 to F9-F16, etc.) - M1: Keyboard is assigned to auxiliary functions. - Page 4 Page 4 of 6 Changing the Loco Selected by Using Its Address: Pressing and briefly holding M2 enters the "Loco Selection Mode". Enter the loco address using the keyboard, for example press "25", and press M3 to select the locomotive with the address of "25". (The locomotive is assigned to the Navigator by an address previously set in the decoder.) The Navigator will automatically start running loco "25".
- Page 5 Page 5 of 6 Switches: To Individually Alter The Direction of Dead End Siding Switches #3 and #4: Press the M1 button until "Switch Command" (Switch Comm.) shows in the Secondary Function area. Enter the Number of the individual switch, and press the Left or Right Secondary Function arrow keys to trigger the switch.
- Page 6 Page 6 of 6 Navigator Configuration (for Reference Only) Backlight: This menu sets the intensity of the backlight with M2. The following settings are available: • 0 = no backlight • 1 = Display + dial knob illuminated • 2 = Keyboard also illuminated • 3 = everything with 50% dimming The backlight of the centered zero point is always lighted and cannot be turned off. EMERGENCY STOP: This configuration has been preset! - RIGHT STOP Key triggers Emergency-Stop and cuts current to the track immediately, both STOP keys will flash &...
Need help?
Do you have a question about the DiMAX and is the answer not in the manual?
Questions and answers