Advertisement
Available languages
Available languages
Quick Links
Advertisement

Subscribe to Our Youtube Channel
Related Manuals for Adaptec PM3754U2


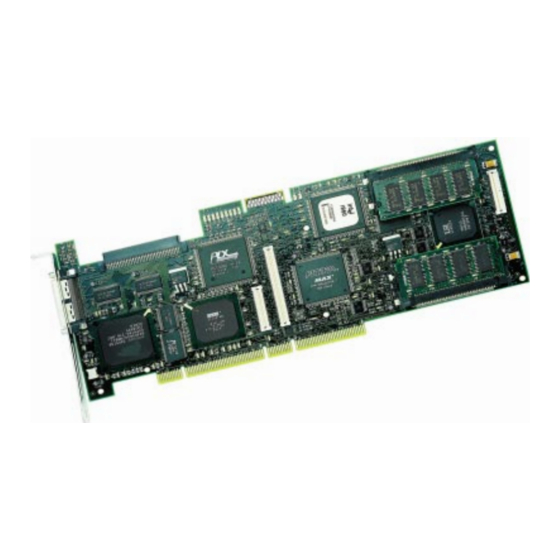
Summary of Contents for Adaptec PM3754U2
- Page 1 Millennium...
- Page 6 Warning: Changes or modifications to this unit not expressly approved by the party responsible for compliance could void the user’s authority to operate the equipment. This equipment has been tested and found to comply with the limits for a Class B digital device, pursuant to Part 15 of the FCC Rules.
- Page 8 You may (i) use the software on a single machine; (ii) make only one copy of the software into any machine-readable or printed form for backup purposes; (iii) merge the software into other software for your use on the single machine (provided that any portion of the software merged into other software will continue to be subject to the terms and conditions of this license);...
- Page 9 Our technical support staff is available Monday – Friday between 6 am and 6 pm Eastern time. Between 6 pm and 8 pm, you can leave a callback message. You can contact us by fax or e-mail 24 hours a day. Telephone: +1 407-830-5522 (Press 6 and follow the prompts.) Fax:...
- Page 10 This guide will help you to configure and install your DPT Millennium controller into a new system. If you are replacing an existing controller, the controller is being installed in a system that does not use an Intel CPU, or it will not be the only peripheral controller in the system, refer to the SmartRAID V User’s Manual for more complete information.
- Page 11 n To add channels to a Millennium SCSI controller, install an SX4055U2 Bus Expansion Module (Figure 1A). To add a second Fibre Channel to a PM3755F controller, install an SX4055F Bus Expansion module. n Replace the mounting bracket on the controller with the one shipped with the SX4055U2 (Figure 1B).
- Page 12 PM3754U2 and PM3755F controllers support up to 256MB of cache, using 16MB or 64MB low-profile, single-sided 60ns EDO SIMMs. Fill the sockets with SIMMs of identical type and capacity starting with socket 1 (Figure All memory modules must be of the same type. Do not mix DPT SIMMs and non-DPT SIMMs.
- Page 13 Terminate the SCSI devices as shown in the examples, ensuring that only the devices at the ends of the cables are terminated. SmartRAID V controller termination is set to Auto by default and can be changed using Storage Manager on ROM (SMOR). If you are using Ultra2 SCSI devices, refer to the “Ultra2 SCSI”...
- Page 14 The following apply to the Ultra2 SCSI controllers and SX405xU2 modules: n SmartRAID V Ultra2 (LVD) SCSI buses support both LVD and single- ended devices, which may be mixed on the SCSI bus. Connecting a single- ended device to an Ultra2 bus will result in the entire bus running at a maximum 20MHz Ultra speed.
- Page 15 n Attach the computer’s disk activity LED cable to connector P6 on the controller. n Attach an internal SCSI cable to the controller and internal SCSI devices. Optionally, attach an internal SCSI cable to the SX405xU2 (if installed) and to additional internal SCSI devices. One internal Ultra2 SCSI cable is supplied with the SmartRAID V controller.
- Page 16 n Turn on the host computer. Run Storage Manager on ROM (SMOR) by pressing Ctrl+D when prompted during the system boot process. n If necessary, change the default settings for the controller SCSI ID and termination on the Configuration tab of the controller Information view. n Save the new settings.
- Page 18 Diese Anleitung wird Ihnen dabei behilflich sein, den DPT Millennium Controller in einem neuen System zu konfigurieren und installieren. Falls Sie einen bereits vorhandenen Controller ersetzen, den Controller in einem System installieren, das keinen Intel-Prozessor verwendet oder dieser Controller nicht der einzige Peripherie-Controller im System sein wird, schlagen Sie bitte im SmartRAID V User’s Manual (SmartRAID V- Benutzerhandbuch) nach, um weitere Informationen zu erhalten.
- Page 19 n Um zu einem PM3755U2B Controller Kanäle hinzuzufügen, installieren Sie ein SX405x Bus-Erweiterungsmodul (Abbildung 1A). Um einen zweiten Fibre Channel zu einem PM3755F Controller hinzuzufügen, installieren Sie ein SX405xF Bus-Erweiterungsmodul. n Ersetzen Sie die Halterung des Controllers mit der mit dem SX405xU2 (Abbildung 1B) gelieferten.
- Page 20 n Der PM3755F nimmt bis zu 256 MB Cache auf. Er verwendet 16 MB oder 64 MB Low-profile, einseitige 60ns-EDO SIMMs. Setzen Sie SIMMs des gleichen Typs und gleicher Kapazität in die Sockets ein. Fangen Sie bei Socket 1 an (Abbildung 2). Sämtliche Speichermodule müssen vom gleichen Typ sein.
- Page 21 Schließen Sie die SCSI-Geräte wie in den Beispielen gezeigt ab. Stellen Sie sicher, daß die Geräte am Ende der Kabel abgeschlossen sind. Der SmartRAID V Controller-Abschluß ist standardmäßig auf Auto eingestellt und kann durch Verwendung des “Storage Manager on ROM” (SMOR) geändert werden.
- Page 22 Folgende Angaben treffen auf den PM3755U2 und SX405xU2 zu (falls installiert: n SmartRAID V Ultra2 (LVD) SCSI-Busse unterstützen LVD und einseitig abgeschlossene Geräte, die auf dem SCSI-Bus gemischt werden können. Der Anschluß eines einseitig abgeschlossenen Geräts an einen Ultra2-Bus führt dazu, daß der gesamte Bus mit maximal 20 MHz Ultra- Geschwindigkeit läuft.
- Page 23 n Verbinden Sie das Kabel der Festplatten-Aktivitätsanzeige (LED) des Computers mit dem Anschluß P6 auf dem Controller. n Verbinden Sie den Controller und interne SCSI-Geräte über ein internes SCSI-Kabel. Optional verbinden Sie den SX405xU2 (falls installiert) und zusätzliche interne SCSI-Geräte über ein internes SCSI-Kabel. Ein internes Ultra2 SCSI-Kabel wird mit dem SmartRAID V Controller geliefert.
- Page 24 n Schalten Sie den Computer ein. Führen Sie “Storage Manager on ROM” (SMOR) aus, indem Sie während des Starts bei der Aufforderung Strg+D drücken. n Stellen Sie sicher, daß alle angeschlossenen Geräte in der Baumansicht des SMOR sichtbar sind. n Falls erwünscht, erstellen Sie Disk-Arrays. Für weitere Informationen, schlagen Sie im Kapitel “Storage Manager on ROM”...
- Page 26 Esta guía le servirá para configurar e instalar el controlador Millennium de DPT en un sistema nuevo. Si va a reemplazar un controlador existente, el controlador va a ser instalado en un sistema que no dispone de una CPU Intel o el controlador no va a ser el único controlador de periféricos del sistema, consulte el Manual del usuario del SmartRAID V (SmartRAID V User’s Manual) donde encontrará...
- Page 27 n Para añadir canales a un controlador SCSI Millennium, instale un módulo de expansión de bus SX4055U2 (Figura 1A). Para añadir un Fibre Channel a un controlador PM3755F, instale un módulo de expansión de bus SX4055F. n Reemplace la consola de montaje que viene con el controlador con la que se incluye con el módulo SX4055U2 (Figura 1B).
- Page 28 Los controladores PM3754U2 y PM3755F aceptan hasta 256MB de memoria caché, con SIMM 60ns EDO delgados de una sola cara de 16MB o 64MB. Llene los conectores con SIMM del mismo tipo y capacidad empezando por el conector 1 (Figura 2).
- Page 29 Termine los dispositivos SCSI como se demuestra en los ejemplos y asegúrese de que sólo estén terminados los dispositivos que se encuentran al final de los cables. El controlador SmartRAID V viene configurado de fábrica en Auto, aunque se puede cambiar con el Storage Manager en la ROM (SMOR). Si está...
- Page 30 Las siguientes características son aplicables a los controladores SCSI Ultra2 y a los módulos SX405xU2: n Los buses SCSI SmartRAID V Ultra2 (LVD) permiten la conexión tanto de dispositivos LVD como de dispositivos uniterminación, que pueden mezclarse en el bus SCSI. Si se conecta un dispositivo uniterminación a un bus Ultra2, este último funcionará...
- Page 31 n A los dispositivos Wide SCSI se les asigna las identificaciones de la 0 a la 15. Los dispositivos Narrow SCSI (SCSI estrecha) sólo pueden recibir las identificaciones de la 0 a la 7. n Si tiene instalado un módulo de expansión de bus SX405xU2, configure las identificaciones de SCSI para dispositivos de cada canal de forma independiente.
- Page 32 n Encienda la computadora central. Ejecute Storage Manager en ROM (SMOR). Para hacerlo oprima Ctrl+D cuando el sistema se lo pida durante el proceso de inicio. n Cambie la configuración por omisión de identificación SCSI y terminación del controlador si lo considera necesario en la ficha Configuration de la pantalla Information.
- Page 34 Vous trouverez dans ce guide abrégé toutes indications utiles pour une installation rapide des contrôleurs DPT Millennium dans un nouveau système. Si vous remplacez un contrôleur déjà en place et si vous installez le nouveau contrôleur dans un système non équipé d’un processeur Intel, ou si ce contrôleur n’est pas le seul et unique contrôleur de périphériques de ce système, consultez le manuel d’utilisation SmartRAID V (SmartRAID V User’s Manual) pour informations plus détaillées.
- Page 35 n Pour ajouter des canaux supplémentaires à un contrôleur Millennium, il suffit d’installer un module d’extension du bus SX4055U2 (figure 1A). Pour ajouter un deuxième canal Fibre Channel au contrôleur PM3755F, installez un module d’expansion SX4055F. n Si vous installez cette option, vous devez remplacer la plaque de fixation de la carte contrôleur par celle qui est livrée avec le module SX4055U2 (figure 1B).
- Page 36 Les contrôleurs PM3754U2 et PM3755F supporte un maximum de 256 Mo de mémoire cache sous forme de modules SIMM EDO simple face de 16 ou 64 Mo fonctionnant à 60ns. Les modules SIMM doivent être de même type et de même capacité et être installés en commençant par le support de SIMM 1 (figure 2).
- Page 37 Veillez à ce que la chaîne des périphériques SCSI soit pourvue d’une terminaison, comme représenté dans les exemples ci-après ; notez que seuls les périphériques installés en fin de câble doivent être équipés d’un terminateur. Par défaut, l’option SmartRAID V controller termination (terminaison du contrôleur SmartRAID V) est en mode Auto mais ce paramètre peut être modifié...
- Page 38 Les informations qui suivent s’appliquent au contrôleur et au module SX405xU2, s’il est installé : n Les bus Ultra2 SCSI (procédé LVD) du contrôleur SmartRAID V prennent en charge les périphériques LVD et single-ended qui peuvent être installés sur un même bus SCSI. Notez toutefois que si vous connectez un périphérique single-ended à...
- Page 39 n Les adresses 0 à 15 peuvent être affectées aux périphériques Wide SCSI tandis que les périphériques Narrow SCSI (8 bits) peuvent recevoir les adresses 0 à 7. n Si vous avez installé le module d’extension du bus SX405xU2, configurez séparément les adresses SCSI de chacun des canaux.
- Page 40 n Si vous utilisez d’autres câbles que ceux qui sont livrés avec le contrôleur, consultez le manuel d’utilisation du contrôleur SmartRAID V pour des informations supplémentaires sur les spécifications requises pour les câbles. n Allumez l’ordinateur hôte. Pendant le processus d’amorçage du système, lancez l’exécution du Gestionnaire de stockage en ROM (SMOR, Storage Manager on ROM) en appuyant simultanément sur les touches Ctrl+D lorsque le message vous y invite.
- Page 42 Questa guida vi aiuterà ad installare e configurare il vostro controller DPT Millennium in un nuovo sistema. Se sostituite un controller già esistente, se il controller viene installato in un sistema che non utilizza una CPU Intel, o se non sarà l’unico controller periferico installato nel sistema, consultate il Manuale Utente per lo SmartRAID V (SmartRAID V User’s Manual) per informazioni più...
- Page 43 n Per aggiungere canali ad un controller Millennium SCSI, installate un modulo di espansione SX4055U2 (Figura 1A). Per aggiungere un secondo canale in fibra ad un controller PM3755F, installate un modulo di espansione SX4055F. n Sostituite la staffa di montaggio presente sul controller con quella fornita assieme al modulo SX4055U2 (Figura 1B).
- Page 44 I controller PM3754U2 e PM3755F supportano fino a 256MB di cache, usando moduli di memoria SIMM 60ns EDO da 16MB o 64MB, low-profile, a faccia singola. Inserite nelle prese solamente moduli SIMM dello stesso tipo e aventi la stessa capacità, partendo dalla presa 1 (Figura 2).
- Page 45 Terminate i dispositivi SCSI come illustrato negli esempi, assicurandovi che la terminazione sia fatta solamente ai dispositivi alle estremità dei cavi. La terminazione del controller SmartRAID V viene impostata su Auto per default, e può essere modificata mediante lo Storage Manager su ROM (SMOR).
- Page 46 Quanto segue vale per i controller Ultra2 SCSI e per i moduli SX405xU2: n I bus SmartRAID V Ultra2 (LVD) SCSI supportano sia dispositivi LVD, sia dispositivi single-ended, che possono essere messi assieme sul bus SCSI. Se si collega un dispositivo single-ended ad un bus Ultra2, l’intero bus funzionerà...
- Page 47 n Collegate il cavo del LED di attività del disco al connettore P6 del controller. n Collegate il controller ai dispositivi SCSI interni per mezzo di un cavo SCSI interno. Potete anche collegare un cavo SCSI interno al modulo SX405xU2 (se installato) ed agli ulteriori dispositivi SCSI interni. Assieme al controller viene fornito anche un cavo SCSI Ultra2 interno.
- Page 48 n Accendete il computer host. Avviate lo Storage Manager su ROM (SMOR) premendo Ctrl+D quando richiesto durante l’avviamento del sistema. n Se necessario cambiate le impostazioni di default del Numero di Identificazione SCSI e della terminazione del controller nella tabella di Configurazione della finestra di Informazioni del controller.
- Page 50 Millennium SmartRAID V (SmartRAID V User’s Manual) w celu do pracy w systemach zawiera mostek PCI, który musi Informacje o SmartRAID V: Najnowsze w katalogu instalacyjnym DPT. Sterowniki emu operacyjnego. W celu uzyskania dodatkowych informacji o sterownikach...
- Page 51 W celu dodania drugiego Fibre Channel n W celu wykorzystania funkcji podtrzymywania bateryjnego na kontrolerze ysunek 1C).
- Page 52 Kontrolery PM3754U2 i PM3755F...
- Page 53 kablem 8-bitowym, Wewnetrzny Wide SCSI Zewnetrzny Wide SCSI SmartRAID V Ograniczenie = Auto Wewnetrzny Wide SCSI Zewnetrzny Wide SCSI SmartRAID V Ograniczenie = Auto T = Ograniczony terminowane. Auto Zewnetrzny Narrow SCSI SmartRAID V Ograniczenie = High Only Disabled (Wylaczony) Zewnetrzny Wide SCSI Zewnetrzny...
- Page 54 n Kontrolery single-ended standardem Ultra2 do magistrali Ultra2 Low Voltage Differential (LVD) i kontrolery Fibre Channel zas uruchamiania systemu. n DPT korzysta ze single-ended Differential SCSI niezgodnych ze Fibre Channel High Speed Serial Data Connector (HSSDC). Ultra2. obudowy Fibre Channel.
- Page 55 n PM3755F & SX4055F: posiadania podwójnym portem i Fibre Channel Fibre Channel Fibre Channel. W przypadku Fibre Channel z zainstalowanym systemów z Fibre Channel i Fibre Channel. CSI, kabel musi ntrolerze. offset...
- Page 56 w czasie procesu startu systemu. Configuration n W SMOR Devi SmartRAID V. n Instalacja Systemu Operacyjnego n Instalacja Storage Manager SmartRAID V.
Need help?
Do you have a question about the PM3754U2 and is the answer not in the manual?
Questions and answers