Advertisement
Quick Links
Advertisement

Related Manuals for Paramount Fitness FP-350


Summary of Contents for Paramount Fitness FP-350
- Page 1 FP-350 FS1010-T-171...
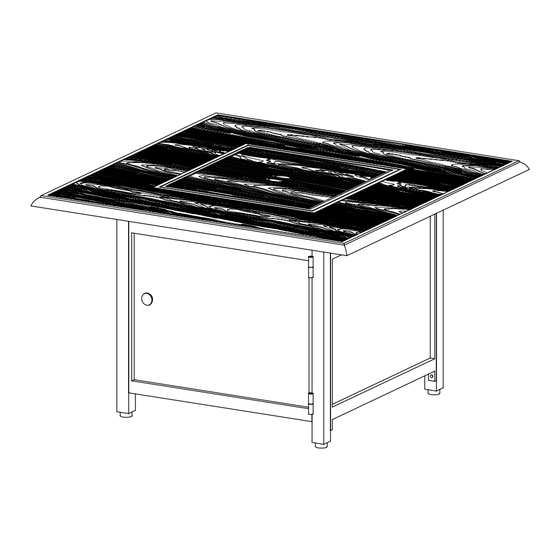
- Page 3 Burner Cover Burner Table Top Side Panel 1 Side Panel 2 Door Frame Bolt 8x40mm Bolt 6x25mm Allen Wrench Nut 8mm Washer 6mm Qty: 1 Washer 8mm Spring Washer 8mm Qty: 8 Qty: 4 Qty: 1 Qty: 1...
- Page 5 Panels Place a Washer on each of 8 Bolts and insert through holes of Side Panels into the holes of Leg Panels Bolts with Allen Wrench Bolt (6x25mm) Hardware Used: Washer (6mm)
- Page 6 through the corners of the holes at the onto each Hardware Used: Stud (8x60mm) Washer (8mm) Spring Washer (8mm) WARNING:...
- Page 7 Put the Burner on the base. Make sure the Burner control face the door. our the Fire Glass around the Burner. obstruct the pilot light housing. Put the Removable Burner Cover on the Burner. Protective Cover . DO NOT PUT THE PROTECTIVE FIRE PIT COVER ON A HOT FIRE PIT.
- Page 11 OPERATING INSTRUCTIONS OPERATING INSTRUCTIONS CAUTION WARNING DANGER! Do not attempt to operate until you FOR OUTDOOR USE ONLY have read and understand all General Very hot while in operation! Safety Information in this manual and CARBON MONOXIDE HAZARD Do not touch Table Top or Burner all assembly is complete and leak Never use this inside a house, or other test has been performed.
- Page 17 Turn the table over.
-
Page 18: Gas Conversion From Lp To Ng
GAS CONVERSION FROM LP TO NG 5. Reconnect the brass coupler on the stainless steel flex connector to the air shutter. Tighten using 2 wrenches. 6. Turn all knobs to OFF. Remove propane regulator and hose with brass adapter from the burner control (manifold) with a wrench. - Page 20 , ,...
- Page 22 8x40mm...
- Page 24 Durée approximative du montage : 60 minutes...
- Page 30 ALLUMER: Note: Lors purger l’air des conduites de gaz avant d’allumer l’appareil.
- Page 32 Remarque : Dans une atmosphère saline, comme à proximité d’un océan, la corrosion se produit plus rapidement qu’à la normale. Vérifiez fréquemment la présence de traces de rouille et effectuez rapidement les réparations nécessaires. Entreposage Remarque : Laissez le temps au foyer d’extérieur de refroidir avant de le recouvrir. Pour les périodes d’inutilisation prolongées ou le transport : Remarque : Attendez que le foyer d’extérieur ait refroidi avant de le recouvrir.
- Page 33 PROBLÈME CAUSE POSSIBLE SOLUTION Faites Part de Votre Évaluation et Prolongez Votre Garantie Nous désirons connaître votre opinion sur nos produits … et nous vous invitons à la partager! Laissez simplement votre opinion concernant le produit sur le site internet du détaillant où vous avez fait votre achat ou au au www.paramontathome.com/warranty une prolongation d’un an de la garantie de protection.
-
Page 34: Warranty
IMPORTANT For questions, concerns or problems with our product please Si vous éprouvez des dicultés, ou si vous avez des questions ou des email our customer service department: préoccupations, prière de faire parvenir un courriel à notre Service à la clientèle customercare@jrhome.com customercare@jrhome.com DATED PROOF OF PURCHASE REQUIRED FOR WARRANTY SERVICE... - Page 35 AVERTISSEMENT: AVERTISSEMENT:...
- Page 37 PART# NL-NGHOSE www.paramountathome.com Un test d’étanchéité doit être fait en suivant les instructions inscrites dans le manuel.
Need help?
Do you have a question about the FP-350 and is the answer not in the manual?
Questions and answers