Table of Contents
Advertisement
Quick Links
Advertisement
Chapters
Table of Contents

Related Manuals for LNS Tryton 112


Summary of Contents for LNS Tryton 112
-
Page 2: Table Of Contents
Layout of elements CHAPTER 3 SETTING INTO OPERATION Transportation Mounting Anchoring to the floor Connecting CHAPTER 4 ELECTRICS Electrical equipment Electrical control cabinet Diagrams 4-13 Interface 4-19 CHAPTER 5 PNEUMATICS Pneumatic equipment Air filtering device Pneumatic valves TRYTON 112 CNC... - Page 3 Settings 8-14 CHAPTER 9 MALFUNCTIONS Factors affecting performance Maintenance APPENDICES Appendix A Ordering form Appendix B LNS agencies Appendix C Programming example Appendix D Conversion table metric measurements / inches Appendix E Conversion table for shaped material TRYTON 112 CNC...
-
Page 4: Introduction
INTRODUCTION The TRYTON 112 bar loader is a worthy successor to the Tryton SST, which became a reference in its category and from which it has inherited the main qualities. While integrating the latest technological innovations, it offers users a range of surprising functions, while at the same time remaining simple to use and remarkably reliable. - Page 5 TRYTON 112 CNC...
- Page 6 CHAPTER 1 : BASIC NOTIONS 1 - 1 CHAPTER 1 : BASIC NOTIONS STRUCTURE Cross references Captions Symbols and terminology RIGHTS DECLARATION OF COMPLIANCE SAFETY INSTRUCTIONS SAFETY DEVICES Description Layout of the elements TRYTON 112 CNC...
-
Page 7: Structure
Whenever possible, the reference numbers contained in the instruction manual are shown with the LNS ordering number of the indicated element. To make it easier to place an order of supplies, a form has been included in the annex at the... -
Page 8: Symbols And Terminology
Indicates what conditions must be met to conduct the desired operation. Used in sequential diagrams, this sign indicates that the required function has been accomplished. Used in sequential diagrams, this sign indicates that the required function has not been accomplished. TRYTON 112 CNC... -
Page 9: Rights
LNS SA and its subsidiaries cannot be held responsible for damage and problems arising from the use of options and products other than LNS products, or products approved by LNS The names of the products indicated in this manual are registered trademarks. -
Page 10: Declaration Of Compliance
CH-2534 Orvin Declares that : The TRYTON 112 automatic bar feed system Is designed to be incorporated into a machine, or to be assembled with other machines, to create a machine covered by Directive 89/392/EEC amended, and that the following (parts/paragraphs) of the harmonized standards have been applied: EN 292, EN 60 204 1, EN 1088, EN 418, EN 60947, 89/336/EEC, 73/23/EEC. -
Page 11: Safety Instructions
The work area surrounding the bar feed system should always be clear of objects and well lit. The presence of oil on the ground could cause falls; it is important to maintain the floor clean on a regular basis. TRYTON 112 CNC... - Page 12 If it is necessary to move the bar feeder once it has been originally installed, do not reinstall it before first contacting LNS or its local representative. LNS disclaim all responsibility for possible accidents or property damage caused when safety instructions are not followed.
-
Page 13: Safety Devices
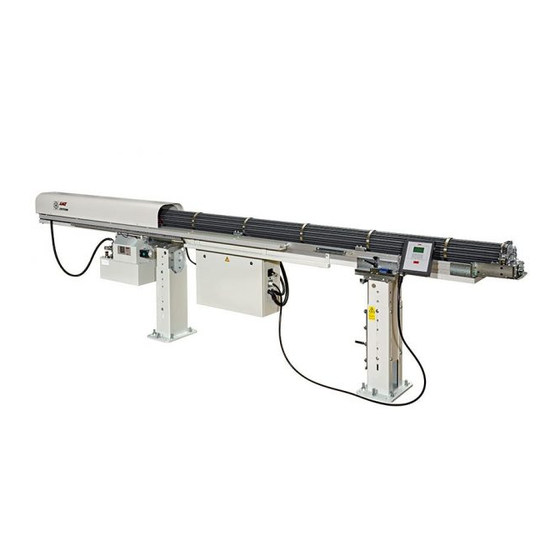
SAFETY DEVICES Description The Tryton 112 bar feed system has been designed with a focus on maximum safety during its handling and complies with all CE requirements. Safety covers and devices make access to the moving parts of the bar feed system impossible. - Page 14 CHAPITRE 2 : CHAPTER 2: TECHNICAL DATA 2 - 1 CHAPTER 2: TECHNICAL DATA CHARACTERISTICS FLOOR PLANS Tryton 112 CNC LAYOUT OF THE ELEMENTS TRYTON 112 CNC...
- Page 15 Some features of the devices vary according to the model. Please refer to the data sheet of your Tryton 112 to see which model it is. 12 ' Tryton 112 CNC...
-
Page 16: Floor Plans
Details on the dimensions of other parts or elements of the bar feed system will be furnished upon request. The plan shows a feeder with right-hand loading (B). The measurements of feeders with left-hand loading (A) are the same. The views are merely reversed. All measurements are in millimetres. TRYTON 112 CNC... - Page 17 2 - 4 CHAPTER 2: TECHNICAL DATA 2.1 Tryton 112 CNC TRYTON 112...
-
Page 18: Layout Of Elements
Rear foot Loading arm (option) Hydraulic tank Indexing motor Air filtering unit Pneumatic / electrical cabinet Connector feed motor Cable feed motor Pulse generator Material support Accessory support (pushers, reduction tubes) Stationary command Back stop Front stop TRYTON 112 CNC... - Page 19 2 - 6 CHAPTER 2: TECHNICAL DATA TRYTON 112...
-
Page 20: Setting Into Operation
CHAPTER 3: SETTING INTO OPERATION 3 - 1 CHAPTER 3: SETTING INTO OPERATION TRANSPORTATION Description Unpacking Preparation for mounting MOUNTING Alignment ANCHORING TO THE FLOOR CONNECTING TRYTON 112 CNC... - Page 21 Description Depending on its destination, the Tryton 112 bar feed system may be delivered either on a pallet, or packed in a wooden crate. When sea or air transports it, the second solution is recommended.
- Page 22 Preparation for mounting For mounting and installing the bar feed system, it is advisable to contact LNS or one of its agents. The latter cannot be held responsible for any malfunction resulting from an incorrect installation in which they did not take part.
- Page 23 C When placing the bar feed system insert leveling plates under the feet. The distance between the lathe and the bar feed system should not exceed 20 mm. Should an obstacle impose a greater distance, contact LNS or their local representative.
- Page 24 3 - 5 MOUNTING The Tryton 112 bar feed system is delivered completely assembled. Because of this, it is possible to proceed directly to its alignment when in place behind the lathe. If the bar-feeder is equipped with a lateral pivoting device then, for safety reasons, the 4 safety screws (S) must not be removed until after the bar-feeder has been anchored to the ground.
-
Page 25: Connecting
• For the electrical connection, please see Chapter 4, Electrics. • For the pneumatic connection, please see Chapter 5, Pneumatics. • For filling the tank, please refer to Chapter 6 / Hydraulics. TRYTON 112 CNC... -
Page 26: Electrical Equipment
Main power supply 4-21 4.3.2 Signals from the lathe to the bar feed system 4-22 4.3.3 Signals from the bar feed system to the lathe 4-24 4.3.4 Options 4-25 4.3.5 Recapitulation of safety instructions related to the interface 4-25 TRYTON 112 CNC... -
Page 27: Description
Particular attention should be given to the handling of electrical elements because of risks of electrocution. In case of possible electrical malfunctions, it is advisable to contact LNS or their local representative. Description The electrical parts of the bar feed system, as well as the diagrams representing them, conform to the ISO/IEC 204-1, 617 international electrical codes. - Page 28 Pneumatic outboard support detector (optional) SQ10 4.484 Loading arm security switch (option) SQ11 4.291 Main access cover safety switch Pneumatic pressure switch Hydraulic pressure switch Pulse generator: Counting direction 4.619 Pulse generator: Counting (*) See following page TRYTON 112 CNC...
-
Page 29: Description Of The Electrical Elements Of The Bar Feed System
Particular attention should be given to the handling of electrical elements because of risks of electrocution. In case of possible electrical malfunctions, it is advisable to contact LNS or their local representative. It is strictly prohibited to make adjustments as long as the bar feed system is under electrical power. -
Page 30: Stationary Control
CHAPTER 4: ELECTRICS 4 - 5 1.3.2 Stationary control The Tryton 112 bar-feeder is equipped with a stationary control which is very useful when conducting mechanical adjustments to the feeder. This control is active only in manual mode. As soon as the feeder is in automatic mode, the stationary control becomes inactive. - Page 31 Rear connector motor relay 4.606 Pusher retract motor relay KM1A 4.507 Main contactor KM1R 4.507 Main contactor 4.503 Main circuit breaker 4.138 Circuit breaker 2A 4.242 Main disconnect switch R1-R5 4.606 Interface relay 4.191 Transformer with 24 Vdc power supply TRYTON 112 CNC...
- Page 32 The main switch can be locked with a padlock. This way, it is impossible to turn the bar feed system on. Push (2) the locking mechanism and insert (3) the padlock into the opening. Lock the padlock. TRYTON 112 CNC...
-
Page 33: Circuit Breakers
The power supply to the transformer is immediately interrupted to avoid material damages. After having located and repaired the problem causing this interruption, reset the lever (B) of the circuit breaker. Designation Description Power in connecting terminal Lever off/on Power out connecting terminal TRYTON 112 CNC... - Page 34 Measure the power provided by the lathe, and, if necessary, adapt the cable on the power terminal block (A). Designation Description Primary terminal block, 220V-380V / 50hz or 60 Hz ± 15% Output , 24 Vdc, terminal block Fuse 5 Amps for 24 Vdc TRYTON 112 CNC...
- Page 35 The battery must be replaced as soon as possible by a battery of the same type (see Chapter 9 / Maintenance). Designation Description Input Output Reset/restart switch Remote-control output PC connector SR 2 Pulse-generator connector TRYTON 112 CNC...
- Page 36 SB 20 Load push-button SB 21 Selector / Advance SB 22 Selector / Retract SR 2 Pulse generator: Counting Interface Clamping device of the lathe Open Lathe in Automatic cycle Load command (according to application) Cams engaged TRYTON 112 CNC...
- Page 37 Relay : Bar feeder alarm Relay : Loading cycle End of bar or block relay Headstock release relay Options : end of auxiliary bar / pneumatic outboard support / canon / part separator / profiled material pulse relay. TRYTON 112 CNC...
-
Page 38: Transformer
CHAPTER 4: ELECTRICS 4 - 13 DIAGRAMS Symbols The electrical diagrams of the Tryton 112 bar feed system were made in accordance with the ISO/IEC 204-1, 617 international electricity The following table shows the symbols used, as well as their descriptions. Symbol... -
Page 39: Electrical Diagram
The electrical diagram consists of four parts and is contained in the electrical control cabinet. Should it differ from the one shown on the following pages, the one contained in the electrical cabinet should be referred to. TRYTON 112 CNC... - Page 40 CHAPTER 4: ELECTRICS 4 - 15 TRYTON 112 CNC...
- Page 41 4 - 16 CHAPTER 4: ELECTRICS TRYTON 112 CNC...
- Page 42 CHAPTER 4: ELECTRICS 4 - 17 TRYTON 112 CNC...
- Page 43 4 - 18 CHAPTER 4: ELECTRICS TRYTON 112 CNC...
-
Page 44: Description
(A). Description The interface cable(s), between the bar feed system and the lathe is (are) provided by LNS. Although an example of an interface diagram is provided, the diagram for the interface corresponding to your device, essential when making the electrical connection, is located inside the electrical cabinet. -
Page 45: Diagrams
The inputs and outputs designation of the interface on the PLC are indicated in the section 2.2.5. The interface diagram below is provided as example. The diagram corresponding to your bar feed system is located in the electric cabinet, with the electric diagram. TRYTON 112 CNC... -
Page 46: Connections
Transformer T1 Hydraulic pump motor The LNS bar feed systems are equipped with their own thermal protection systems (breakers, thermal relays and fuses, etc.). The power supply for the bar feed system should be connected to the output of a breaker mounted in the electrical control box of the lathe (10 A max.). -
Page 47: Signals From The Lathe To The Bar Feed System
All signals from the bar feed system to the lathe shall be powered by the +24 Vdc of the lathe. For the other types of connections, please contact LNS S.A., or their local representative. "EMERGENCY STOP" signal of lathe XT8-XT9 This signal is part of a safety link (Emergency Stop circuit) of the bar feed system. - Page 48 As long as this signal is present, the signal of the foot switch to open and close the clamping device of the lathe, must be locked. The lathe should not start up in automatic cycle as long as the clamping device does not grip the bar. TRYTON 112 CNC...
-
Page 49: Signals From The Bar Feed System To The Lathe
When the Emergency Stop button is pressed, the contact opens. The lathe must be in Emergency Stop mode, and the feeding pusher signal from the lathe must turn off. Two normally closed contacts of the Emergency Stop button, are available for connection in the Emergency Stop circuit of the lathe TRYTON 112 CNC... -
Page 50: Options
CHAPTER 4: ELECTRICS 4 - 25 4.3.4 Options The options described below are an integral part of the standard equipment of the LNS bar feed systems. These signals, however, are not required for the proper operation of the devices, or the safety locking for protecting persons and materials. - Page 51 4 - 26 CHAPTER 4: ELECTRICS TRYTON 112 CNC...
-
Page 52: Pneumatic Equipment
CHAPTER 5: PNEUMATICS PNEUMATIC EQUIPMENT Description Layout of the pneumatic elements AIR FILTERING SYSTEM Description Layout of the elements Connections Settings PNEUMATIC VALVES Description Layout of the elements Description of the elements 3.3.1 Electro-valves 3.3.2 Pressure switch TRYTON 112 CNC... -
Page 53: Description
Please read the safety precautions described at the beginning of this manual before handling the following devices. 1.1 Description The following movements of the Tryton 112 bar-feeder are effected by pneumatic elements: Locking the barrel Front positioning end-stop Engaging the cable-feed device... -
Page 54: Layout Of The Pneumatic Elements
CHAPTER 5 : PNEUMATICS 5 - 3 1.2 Layout of the pneumatic elements (*) Designation Article No Description 3.471 Air filtering unit 3.451 Valve assembly 3.434 Pneumatic positioning stop screw 3.432 Pneumatic barrel-lock screw 3.419 Pneumatic cable-feed clutch screw TRYTON 112 CNC... -
Page 55: Air Filtering Device
The air must be furnished at a maximum pressure of 5 bar, and whenever possible, clean and Layout of the elements Designation Description Pressure regulator Pressure gauge Inlet Regulated pressure Decanter Automatic purging Insert fitting TRYTON 112 CNC... -
Page 56: Connections
To increase the pressure, turn it clockwise. To decrease it, turn it in the opposite direction. The operational pressure should be set at 5 bar 2. When the settings are done, lock the adjuster by pushing it downward. TRYTON 112 CNC... -
Page 57: Description
3.338 / 4mm 3.334 Muffler 3.464 Pressure switch YV10 3.327 Electro-valve : pusher retract cable coupler YV11 3.327 Electro-valve : position end-stop YV12 3.327 Electro-valve : barrel unlocking * Coordination of LED on the PLC in Chapter 4/ Electrics. TRYTON 112 CNC... -
Page 58: Description Of The Elements
Sortie d’air Electrical connection Control LED 3.3.2 Pressure switch For the Tryton 112 bar feed system, the service pressure must be at least 5 bar (75 Psi). The pressure switch serves to confirm that this pressure is present and adequate. - Page 59 5 - 8 CHAPTER 5 : PNEUMATICS TRYTON 112 CNC...
- Page 60 CHAPTER 6 : HYDRAULICS 6 - 1 CHAPTER 6 : HYDRAULICS HYDRAULIC EQUIPMENT Description Layout of the elements Hydraulic bloc Filling and emptying HYDRAULIC DIAGRAM Symbols Diagram TRYTON 112 CNC...
-
Page 61: Hydraulic Equipment
1.1 Description The guidance principle of the Tryton 112 bar-feeder consist in creating an oil film around the rotating bar that will help maintain it in the centre of the guidance tube thus avoiding all vibration and friction. -
Page 62: Hydraulic Bloc
Consult your supplier who will recommend the correct oil for you. To drain the hydraulic tank, place a container with sufficient capacity (minimum: 25 liters) underneath the tank, and unscrew the drain plug. Please refer to Chapter 9, Item 3 / Maintenance for cleaning the filter. TRYTON 112 CNC... -
Page 63: Hydraulic Diagram
6 - 4 CHAPTER 6 : HYDRAULICS Hydraulic diagram Symbols Symbol Description Designation Pump motor Hydraulic pressure switch Pressure gauge Filter Pressure adjusting valve Flow adjusting valve Hydraulic tank Diagram TRYTON 112 CNC... - Page 64 BARREL Description Layout of the elements Loading Hybrid barrel (option) CONNECTOR Description Layout of the elements Hybrid barrel (option) PUSHER Description Layout of the elements MOVABLE VISE Description Layout of the elements LOADING ARM (OPTION) Description Operation TRYTON 112 CNC...
-
Page 65: Barrel
Layout of the elements Designation Article No Description Barrel Rotation ring 112.002.044 Bearing supports 112.02.103 Safety hoop 112.02.113 Front stop Indexing device Varies according to the configuration of the bar-feeder Not available as spare part See below TRYTON 112 CNC... -
Page 66: Loading
(see Item 5). Hybrid barrel (option) The Hybrid barrels comprise two different diameters of guidance tubes. The procedure for passing from one working diameter to another is given in the Start-up Manual. TRYTON 112 CNC... -
Page 67: Connector
When extracting the remnant, the pusher is locked inside the connector block. Layout of the elements Designation Description Connector Connector block Nozzle Locking screw Hydraulic fluid feed Proximity detector : positioning Hybrid barrel (option) Please consult the Start-up Manual for instructions on replacing the connector reduction tube. TRYTON 112 CNC... -
Page 68: Pusher
Layout of the elements Designation Description Piston Rear rotating sleeve Body of pusher Front rotating sleeve Collet Please consult the Start-up Manual on how to replace the collet. TRYTON 112 CNC... -
Page 69: Movable Vise
Upper jaw adjusting screw Lower arm Lower jaw adjusting screw Lower jaw Upper jaw Roller-bearings Positioner Material presence verification plate Material presence verification probe The mobile vice jaws must be adjusted at each change of diameter (see Start-up Manual). TRYTON 112 CNC... -
Page 70: Loading Arm (Option)
To facilitate these tasks, the Tryton 112 can be equipped with a loading arm, which allows the operator to move the bar feeder. The rigidity of the system guarantees a perfect alignment when the bar feed system is in working position. -
Page 71: Operation
Loosen the lever (B) and unscrew until the screw is free. Pivot the feeder. When maintenance operations are finished, bring the bar-feeder back to the working position. Resecure with the lever (B) then bring the support arm (A) down again. TRYTON 112 CNC... - Page 72 Description Flow chart 8-10 Cycling 8-11 SETTINGS 8-14 Description 8-14 Access to the functions 8-15 5.2.1 Parameters related to start-up 8-16 5.2.2 Settings for the positioning 8-17 5.2.3 Various functions and parameters 8-18 5.2.4 Service parameters 8-18 TRYTON 112 CNC...
-
Page 73: Remote Control Station
The most recent error signals are saved in a register and can be recalled to establish the diagnostics. The remote control has five distinct segments, namely: display (A), function keys (B), numerical keys (C), command keys (E), and the emergency button (D). TRYTON 112 CNC... -
Page 74: Display
Pusher reverse (Bar feed located on the left hand side of the lathe) Pusher forward (Bar feed located on the left hand side of the lathe) Pusher reverse (Bar feed located on the right hand side of the lathe) Automatic Top-Cut positioning in manual mode Bar stock extraction TRYTON 112 CNC... - Page 75 (about 3 seconds). Start the sequence. Exit from the function in process, return to the beginning. Return to the previous menu Go to the following menu Index the barrel TRYTON 112 CNC...
-
Page 76: Function Keys F1 - F4
When a dangerous situation arises, pressing the emergency stop switch interrupts immediately all bar feed system and lathe functions (if interface is wired accordingly). To cancel the alarm, release the switch by rotating its red knob counter-clockwise. TRYTON 112 CNC... -
Page 77: Command Keys (Stop, Clear, Help, Menu)
The MENU key allows at all times, to reach the setting functions of the bar feed system. The functions are shown in section 5. By pressing down on the MENU key, it is possible to remove the setting mode, regardless of the level one has reached, and to return to the work screen. TRYTON 112 CNC... -
Page 78: Powering Up
This chapter shows the various functions of the bar feed system and indicates how to access them. Given that the handling may vary depending on the status and configuration of the bar feed system, a standard procedure cannot always be described. TRYTON 112 CNC... -
Page 79: Manual Sequence
Pos. Index the barrel Bring the bar to the sectioning position Manual / Automatic Advance / retract the pusher Pos. Sequence A Protection cover closed Indexing the barrel Material in the barrel Positioning the bar for sectioning TRYTON 112 CNC... -
Page 80: Automatic Sequence
The outboard support (option) must be correctly adjusted (opening and closing) and its elements must be adapted to the shape of the material. On the lathe, the clamping device must correspond to the material to be loaded. TRYTON 112 CNC... -
Page 81: Flow Chart
The movable vise extracts the remnant Monitoring of material presence Monitoring of material presence Fill the bar magazine Remnant not extracted M Feeding pusher positions bar to Top-Cut The movable vise moves back Closing the lathe chuck jaw TRYTON 112 CNC... -
Page 82: Cycling
The mobile vice continues on its way and will move up against the barrel. The hydraulic pump starts up and pushes the pusher into the barrel. On leaving the barrel, the bar pushes the positioning stop and the measuring path begins. TRYTON 112 CNC... - Page 83 Drawn by the retraction cable, the pusher moves back and recovers the remainder of the material. When the pusher is locked into the connector, the hydraulic motor stops turning and the connector retracts, taking the mobile vice with it. TRYTON 112 CNC...
- Page 84 The connector withdraws to the end-stop and extracts the remnant from the barfeed collet. The barrel is then indexed and it positions the next bar in the axis of the pusher and the spindle. The loading cycle restarts. TRYTON 112 CNC...
-
Page 85: Settings
Description The Tryton 112 bar feed system has different parameters and functions allowing the operator to configure it in the manner best adapted to the lathe on which it is installed, and to the mode of production in progress. -
Page 86: Access To The Functions
To exit the setting functions and return to the work display, press MENU or STOP key. For data collection values as well as to navigate in the various menus, please see point 1.1, Display (meaning of the icons). TRYTON 112 CNC... -
Page 87: Parameters Related To Start-Up
The interface signal is reversed depending on whether the clamping device functions by pushing or by pulling. It is therefore essential to know the operation of the clamping device, without this, the feeding process cannot be done correctly. TRYTON 112 CNC... -
Page 88: Settings For The Positioning
Start-up clamping device Manual With this system, the setting is the same for any bar length.. To adjust the sectioning position, please consult the Start-up Manual. TRYTON 112 CNC... -
Page 89: Various Functions And Parameters
The service parameters allow to configure the bar feed system in its environment and to adapt the interface connected to the lathe. These parameters are protected with a password, because only LNS (or certified) technician is authorized to modify them. - Page 90 Clearance between the guiding tube and the bar Clearance between the spindle and the bar Material 1.4.1 Bar stock 1.4.2 Tubing 1.4.3 Profiled material 1.4.4 Straightness of bars 1.4.5 Composition of the material Clamping Method 1.5.1 Collet system MAINTENANCE Hydraulics Pneumatics Batteries Mechanics Cleaning TRYTON 112 CNC...
-
Page 91: Factors Affecting Performance
It is, therefore, highly recommended to install reduction liner inside the spindle as indicated in the Start Up manual. TRYTON 112 CNC... -
Page 92: Material
1.4.3 Profiled material Loading shaped bars requires the installation of adapted components which are available on demand. Please ask your local LNS representative for advice. 1.4.4 Straightness of the bars Performances may vary, depending on the material machined, the length of the bar, etc. -
Page 93: Clamping Method
Double cone collet The double cone clamp has the great advantage of holding the bar at two points separated by about 1.5 the diameter, with a clamping 2 times 350 degrees over about 0.5 times the diameter. Effectiveness: excellent TRYTON 112 CNC... -
Page 94: Maintenance
The water recuperated comes from the pneumatic circuit of the building. It is advisable to make certain that the air received by the bar feed system is as dry as possible (see Chapter 5 / Pneumatics). TRYTON 112 CNC... - Page 95 Particular attention must be paid when manipulating electric components because there is a risk of electrocution. • Bar-feeder on • Open electric cabinet • Open lid of the module by pulling it forward. • Replace battery • Close module again • Close cabinet again TRYTON 112 CNC...
-
Page 96: Mechanics
At no time should solvents, such as acetone, or diluents be used for cleaning the bar feed system. At no time should cleaning products come into contact with electrical components. TRYTON 112 CNC... - Page 97 9 - 8 CHAPTER 9 : MALFUNCTIONS TRYTON 112 CNC...
- Page 98 APPENDICES A - 1 APPENDICES APPENDIX A : ORDERING FORM APPENDIX B : LNS AGENCIES APPENDIX C : PROGRAMMING SAMPLE APPENDIX D : CONVERSION TABLE METRIC MEASUREMENTS / INCHES APPENDIX E : CONVERSION TABLE FOR SHAPED MATERIALS TRYTON 112 CNC...
- Page 99 This form should be photocopied, duly filled out, and returned to your retailer or nearest LNS agent. Name of the company: Person in charge: Address: ZIP: City: Country: Telephone: Fax: Type of device: Serial number: Ordering Nr Description Expected delivery: Location and date: Signature and stamp of the company : TRYTON 112 CNC...
- Page 100 2 Carmont Place Siber Hegner Building Mt. Wellington 89-1 Yamashita-cho-, Naka-ku P.O. Box 5046 YOKOHAMA 231 AUCKLAND 6 JAPAN NEW ZEALAND TEL. 0081 45 664 8000 TEL. 00649 276 2720 0081 45 664 2824 00649 276 1155 TRYTON 112 CNC...
- Page 101 0042 33 52 17 02 001 513 528 57 33 0042 33 52 17 02 E-Mail lnsamerica@aol.com VENEZUELA MAQUINARIA DIECKMANN S.A. Avda Nueva Granada Apartado 40112 1040 CARACAS VENEZUELA TEL. 0058 2 617 422 0058 2 615 423 TRYTON 112 CNC...
- Page 102 (RETURN TO MAIN PROGRAM) N... N... X, Z, G, F, T, S, M, ... N... N... PROGRAMM END (LOOP) Important: The above is an example only. Programming may change according to the interface between the lathe and the bar feed. TRYTON 112 CNC...
- Page 103 Diameters across flats x 1.414 Hexagonal = Diameter across flats x 1.155 Hexagonal : D Square : D Across flats 1,41 2,31 2,83 3,47 4,24 4,62 5,66 5,78 7,07 6,93 8,48 8,09 9,90 9,24 11,31 10,40 11,55 TRYTON 112 CNC...
Need help?
Do you have a question about the Tryton 112 and is the answer not in the manual?
Questions and answers