Table of Contents
Advertisement
Quick Links
Advertisement
Table of Contents

Related Manuals for Ancar Sd-175


Summary of Contents for Ancar Sd-175
- Page 1 Sd-175 USER MANUAL July 2014, QS4 591 v.2...
- Page 3 Name of device Type or Model: Dental Unit Code GMDNS: 34991 Sd-175 Device Class According to the intended use and the criteria of Annex IX of the Directive: Class IIa (rule 11). Scope of Application: All (including pieces and accessories)
-
Page 5: Table Of Contents
USER MANUAL DENTAL UNIT - QS4-591-02 / SD 175 TABLE OF CONTENTS PAGE 1.- GENERALITIES 2.- GUARANTEE 3.- IDENTIFICATION 4.- PRECAUTIONS 5.- CLAUSES 6.- TECHNICAL FEATURES 6.1.- Chair 6.2.- Dental Unit 7.- DIMENSIONS AND TRANSPORTATION 8.- DENTAL UNIT DESCRIPTION 8.1.- Circuit box 8.2.- Pneumatic pedal 8.3.- Instrument tray 8.4.- Main keypad... -
Page 6: Generalities
DENTAL UNIT - QS4-591-02 / SD 175 USER MANUAL 1.- GENERALITIES Thank you for purchasing the SD-175 dental unit. This instruction manual contains information on the dental unit, including its configuration and maintenance. 0434 This symbol means the unit is certified under Directive 93/42/EEC by... -
Page 7: Identification
USER MANUAL DENTAL UNIT - QS4-591-02 / SD 175 3.- IDENTIFICATION The identification tag, containing technical information required for connection, is duplicated. One can be seen on the back of the seat, and the other can be found on the electronic card protection cover. -
Page 8: Clauses
Directive, and (ii) for all other countries, in accordance with local provisions and recycling laws. The Sd-175 dental unit conforms to the basic requirements of Directive 93/42/EEC concerning medical devices, and complies with the design and construction requirements contained in... -
Page 9: Technical Features
USER MANUAL DENTAL UNIT - QS4-591-02 / SD 175 6.- TECHNICAL FEATURES 6.1.- Chair Ergonomic design for the patient. Dental chair with silent, automatic and highly reliable movement. Microprocessor-controlled movements: - automatic chair return-to-zero movement (configurable height). - automatic chair-to-spittoon movement (configurable height). - 3 programmable chair settings (configurable seat height and backrest). -
Page 10: Dimensions And Transportation
DENTAL UNIT - QS4-591-02 / SD 175 USER MANUAL 7.- DIMENSIONS AND TRANSPORTATION The dental unit is suitably packaged and protected. The package includes the dental unit secured to a pallet, with a further two cases containing the water unit and colibri forceps system (Fig. 2). It is essential that none of the boxes collide when in transit, and under no circumstances must they fall to the floor. -
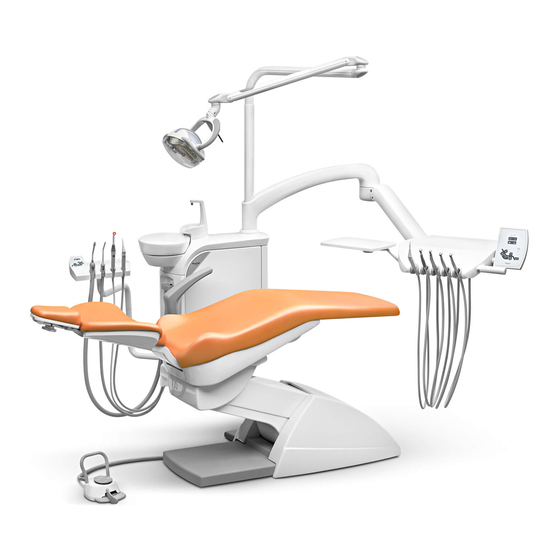
Page 11: Dental Unit Description
USER MANUAL DENTAL UNIT - QS4-591-02 / SD 175 8.- DENTAL UNIT DESCRIPTION (A) Fig. 4 Circuit box Page 8 (B) Fig. 5 Pneumatic pedal Page 9 (F) Fig. 6-7 Instrument tray + Main control panel Pages 11, 12 (E) Fig. 8-13 Water Cabinet Pages 13, 14 (D) Fig. -
Page 12: Circuit Box
DENTAL UNIT - QS4-591-02 / SD 175 USER MANUAL 8.1.- Circuit box The circuit box contains all points for connecting the dental unit to the clinic’s power supply, as well as controls for adjusting the air and water supply. The directional movement regulator conforms to Standard UNE 20128. -
Page 13: Pneumatic Pedal
USER MANUAL DENTAL UNIT - QS4-591-02 / SD 175 8.2.- Pneumatic pedal: INSTALLATION AND USE Pedal for adjusting each of the optional instruments on the instrument tray: Micromotor, turbine. Ultrasound on/off switch (fig 5). Control the electric micromotor rotation speed, turbine power and pneumatic micromotor by activating the trigger (B);... -
Page 14: Instrument Tray
DENTAL UNIT - QS4-591-02 / SD 175 USER MANUAL 8.3.- Instrument tray The instrument tray (Fig. 6), ergonomically designed to facilitate the work by the user, is also fitted with an auxiliary instrument tray (A), a slight inclination of the main keypad (B) to provide easy viewing, and a comfortable positioning handle (C). - Page 15 USER MANUAL DENTAL UNIT - QS4-591-02 / SD 175 The tray is attached to the unit by means of a pantographic arm, with a pneumatic brake for comfortable, effortless front positioning (handle side). Fig. 6...
-
Page 16: Main Keypad
DENTAL UNIT - QS4-591-02 / SD 175 USER MANUAL 8.4.- Main keypad A. Dental light switch (ON/OFF) B. Water cup and spittoon taps. Timed, 2-12 seconds. If spittoon and cup tap have been set-up to work simultaneously, both are operated. It may be set up independently (then only cup). C Press continuously: Raises backrest via manual movement. -
Page 17: Water Cabinet
USER MANUAL DENTAL UNIT - QS4-591-02 / SD 175 8.5.- Water Cabinet The water unit has a rotation of approx. 70° towards the arm support, facilitating the ergonomics of daily use. The upper part holds the cup holder (A) and spittoon (B), made of porcelain to offer high standards of hygiene (fig. - Page 18 DENTAL UNIT - QS4-591-02 / SD 175 USER MANUAL You can easily dismount porcelain pieces of spittoon following the steps depicted in fig. 11 and those of the tap in fig. 12. Turn the spittoon (B) 180° (“1”), and lift it (“2”). For the tap, first hold the glass faucet (G) upwards (“1”), then remove (“2”) the glass support (H), so you can get access to the spittoon faucet (J), and detach it (“3”).
-
Page 19: Cannula Support
USER MANUAL DENTAL UNIT - QS4-591-02 / SD 175 8.6.- Cannula support (surgical suction, instruments, auxiliary keypad) The surgical suction motor is activated by lifting any of the cannulas. The tube support is mounted on an arm with a large capacity for movement to find the desired position. The cannula support has an auxiliary keypad (A), medium and large capacity surgical suction (B and C) and, as optional instruments, a 3F syringe (always placed at E), and Polymerized Lamp or Intraoral Camera (position D). -
Page 20: Auxiliary Keypad
DENTAL UNIT - QS4-591-02 / SD 175 USER MANUAL 8.7.- Auxiliary keypad. The auxiliary keypad (or assistant’s keypad) is located at the cannula support (Fig. 14). Fig. 17 A. Cup tap and spittoon tap. Timed, 2s-12s. It is possible to set up the spittoon and cup tap to work together or separately. B. -
Page 21: Headrest
USER MANUAL DENTAL UNIT - QS4-591-02 / SD 175 8.8.- Headrest Thanks to its articulated movement, this head support allows the patient’s head to be positioned easily and ideally, according to the treatment required. It can be easily adjusted lengthways, as shown in Fig. -
Page 22: Safety Movements
Before being shipped, all ANCAR equipment is thoroughly cleaned using ECO-JET1 Cattani Magolia disinfectant spray. For cleaning and disinfecting the different parts of the system, please check: - Section 8.6 “Cannula Support”. -
Page 23: Technical Data
USER MANUAL DENTAL UNIT - QS4-591-02 / SD 175 11.- TECHNICAL DATA Voltage 220-240 V~ Frequency 50 Hz Air pressure 5.5 Bar Water pressure 3 Bar Power 900 W Electrical protection type Operation type Intermittent Maximum load (patient) 160 Kg. Maximum load (instrument tray) 2 Kg. -
Page 24: Annex 1. Cleaning & Disinfecting Of Cattani Glass, Cannulas And Basin
DENTAL UNIT - QS4-591-02 / SD 175 USER MANUAL Upon request, the water unit can be supplied with gravity-drained or continuous suction systems, and with an amalgam separator option for wet- or dry-ring systems. See appendices to this manual for specific instructions for each manufacturer. As diagram 10 shows, when you open the door pressing the upper corner there is access to all elements of the vacuum area. -
Page 25: Annex 2. Spittoon Basin Cut-Off Valve And Aspiration Unit (Cattani)
USER MANUAL DENTAL UNIT - QS4-591-02 / SD 175 ANNEX 2. SPITTOON BASIN CUT-OFF VALVE AND ASPIRATION UNIT (CATTANI) Before opening the water cabinet door or removing the container, disconnect the unit from the electrical mains using the main switch. The spittoon suction unit (B) requires a maintenance operation on the filter (C). -
Page 26: Annex 3. Vsa300 Suction System (Dürr Dental)
DENTAL UNIT - QS4-591-02 / SD 175 USER MANUAL ANNEX 3. VSA300 SUCTION SYSTEM (DÜRR DENTAL). MAINTENANCE OF THE SUCTION SYSTEM TOGETHER WITH THE SPITTOON VALVE Before opening the water cabinet door or removing the container, disconnect the unit from the electrical mains using the main switch. Use suitable protective gloves. -
Page 27: Annex 4. Aspiration System Typ1 (Metasys)
USER MANUAL DENTAL UNIT - QS4-591-02 / SD 175 ANNEX 4. ASPIRATION SYSTEM TYP1 (METASYS) Before opening the water cabinet door or removing the container, disconnect the unit from the electrical mains using the main switch. The filter (A) requires maintenance: turn the part (“2.1”) and then remove it (“2.2”). To access the separation and sedimentation element (C) you need to turn (“1.1”) the sealing flange (B) upwards and remove it, pulling it forwards (“1.2”). -
Page 28: Annex 5. Eco Aspiration System (Metasys)
DENTAL UNIT - QS4-591-02 / SD 175 USER MANUAL ANNEX 5. ECO ASPIRATION SYSTEM (METASYS) Before opening the water cabinet door or removing the container, disconnect the unit from the electrical mains using the main switch. This is a single-chamber automatic air/water separator with integrated heavy particle collector. To access the separation and sedimentation element (B) you need to turn (“1”) the sealing flange (A) up and pull it forwards and out (“2”). -
Page 29: Annex 6. Ign - Calbenium Decontamination System (Airel)
USER MANUAL DENTAL UNIT - QS4-591-02 / SD 175 ANNEX 6. IGN - CALBENIUM DECONTAMINATION SYSTEM (AIREL) The elements are inside the water cabinet. First you need to remove (“1.1”) the tank (F). The buzzer battery (D) forms part of the tank block. Then unscrew (“1.2”) to pour out the CALBENIUM solution. -
Page 30: Annex 7. Self Water System Kit
DENTAL UNIT - QS4-591-02 / SD 175 USER MANUAL Important recommendations. Never work if the BACSET II handle is up. Never leave the COCCIBROM solution in contact with the unit for more than an hour. Never dilute the concentrated COCCIBROM or CALBENIUM before use. Never work until you have made sure there is no COCCIBROM in the sprays. -
Page 31: Annex 8. Combi-Separator Cas 1 (Dürr Dental)
USER MANUAL DENTAL UNIT - QS4-591-02 / SD 175 ANNEX 8. COMBI-SEPARATOR CAS 1 (DÜRR DENTAL) The control panel is placed internally (A). You are recommended to clean the tank (B). To remove it, unscrew the piece (“1”), but before taking it out (“2”);... -
Page 32: Annex 10. Water Decontamination System: Wek (Metasys)
DENTAL UNIT - QS4-591-02 / SD 175 USER MANUAL ANNEX 10. WATER DECONTAMINATION: WEK (METASYS) Within the mixing system you will find the product bag (B); here, the arrival of the water is designed in accordance with a free-fall flow distance, thanks to which the separation between the WEK system and the water supply network established by the DVGW is guaranteed. -
Page 33: Annex 11. Hygiene System H1 (Metasys)
USER MANUAL DENTAL UNIT - QS4-591-02 / SD 175 ANNEX 11. HYGIENE SYSTEM H1 (METASYS) Do not use additional cleaning or disinfection products for the aspiration installation in treatment areas where an H1 hygiene system has been set up as there is a risk of negative chemical interactions resulting from the combination of different chemical products. -
Page 34: Annex 12. Selective Cannula System S1 (Metasys)
DENTAL UNIT - QS4-591-02 / SD 175 USER MANUAL AUTOMATIC CLEANING PROGRAM First Wash Duration: approximately 2 minutes. The pilot light F flashes slowly. Switching on: every time you press the treatment unit’s main switch. Function: Preparation for subsequent treatments based on higher disinfectant dosage. Permanent Wash Cycle The pilot light F is permanently on. -
Page 35: Annex 13. Minilight Syringe (Luzzani)
USER MANUAL DENTAL UNIT - QS4-591-02 / SD 175 ANNEX 13. MINILIGHT SYRINGE (LUZZANI) GENERAL The Minilight syringe is an instrument designed exclusively for dental use, its function being to introduce air and water (individually or simultaneously, at either room or body temperature) into the area of operation to keep it continuously clean and dry. - Page 36 DENTAL UNIT - QS4-591-02 / SD 175 USER MANUAL INSTALLATION The unit may only be connected by an Antoni Carles-authorised technician. NORMAL USE - To introduce cold water into the area of operation, press the left button on the handle. - To introduce cold air into the area of operation, press the right button on the handle.
-
Page 37: Annex 14. Optional Items
USER MANUAL DENTAL UNIT - QS4-591-02 / SD 175 ANNEX 14. OPTIONAL ITEMS AUXILIARY AIR & WATER OUTLETS / USB CONNECTOR It is defined as optional in water unit to have available quick water (C) and air (D) outlet connectors, as well as a direct point-to-point USB connector (A), the other end will be passed through interior of dental unit. -
Page 38: Annex 15. Cleaning And Disinfecting Other Parts Of The Unit
Cleaning and disinfecting: clean after each treatment using antimicrobial, fungicidal, virucidal and sporicidal disinfectant. ANCAR recommends the use of the BODE X-WIPES reloadable wet wipe dispenser for professional washing and disinfection. Suitable for all BODE surface disinfectants at concentrations that take effect within 1 hour. -
Page 39: Annex 16. Safety Notes
USER MANUAL DENTAL UNIT - QS4-591-02 / SD 175 ANNEX 16. SAFETY NOTES GENERAL PRECAUTIONS Read all necessary manuals. Keep all manuals – dental unit, chair, instruments, light and additional kits – in a safe place for future reference. Before turning the unit on, read all appendices in this manual. Upon first start-up: carry out a thorough clean of the water channels by passing a solution of water and disinfectant through all water pipes connected to the instruments and water unit. - Page 40 DENTAL UNIT - QS4-591-02 / SD 175 USER MANUAL ELECTRICAL SAFETY MEASURES The use of mobile phones is not advisable in proximity of the dental unit. Observe regular hospital standards. In the event of a light overload, the built-in thermal protection in the 17VCA line may have suspended operation of the unit.
- Page 41 USER MANUAL DENTAL UNIT - QS4-591-02 / SD 175 Maximum oupput Separation distance depending on transmitter frequency in nominal value of meters transmitter in watts 150kHz – 80 Mhz 80 Mhz – 800 MHz 800 Mhz – 2.5 GHz 0.01 0.12 0.12 0.23...
- Page 42 DENTAL UNIT - QS4-591-02 / SD 175 USER MANUAL...
- Page 44 Volta dels Garrofers, 41-42 Polígono Industrial “Els Garrofers” July 2014 08340 Vilassar de Mar (Barcelona-SPAIN) Tel. (34) 93 754 07 97 Fax (34) 93 759 26 04 Subject to design and/or specification changes www.ancar-online.com / e-mail: ancar@ancar-online.com without prior warning. Made in Europe.
Need help?
Do you have a question about the Sd-175 and is the answer not in the manual?
Questions and answers