
Related Manuals for SJCAM SJ9STRIKE


Summary of Contents for SJCAM SJ9STRIKE
- Page 1 USER MANUAL FW v1.2.4 All graphics, words, and design by Troy Ferrer 2019 troy@sjcamhd.com...
- Page 2 -SJCAM CEO All graphics, words, and design by Troy Ferrer 2019 troy@sjcamhd.com...
- Page 3 It is important to keep your camera’s firmware up to date. You may connect your camera via WiFi to the SJCAM ZONE app to automatically download and install the latest firmware, or visit www.sjcam.com/firmware.
-
Page 4: Specifications
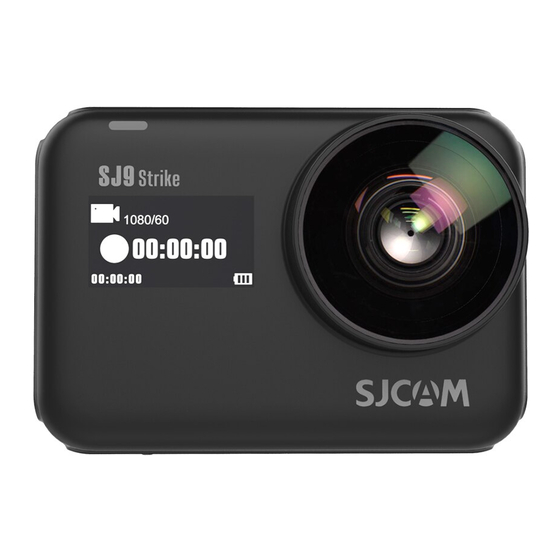
SJ STRIKE SJ STRIKE SPECIFICATIONS CHIPSET: Ambarella H22 S85 SENSOR: SONY IMX377 SENSOR RESOLUTION: 12 MegaPixels FRONT SCREEN: 0.96 OLED MAIN SCREEN: 2.33” IPS Touch Screen 4K/60 Ultra LENS: 7G ( 2 Aspheric Lens included) 00:00:00 ANGLE: 170° APERTURE: F 2.8 17:20:43 FOCAL LENGTH: 2.8 MM VIDEO RESOLUTION: 4K:(3840×2160)25/30/50/60fps,... -
Page 5: Parts Of Your Camera
SJ STRIKE SJ STRIKE PARTS OF YOUR CAMERA Speaker 2.33” Touchscreen Power/Shutter Button LED Indicator Microphone Lens Wireless Charging Front LCD Display Receiver Battery/Memory Card Battery/Memory Card 1/4-inch Tripod USB-C Port Compartment Compartment Mounting Hole All graphics, words, and design by Troy Ferrer 2019 troy@sjcamhd.com... - Page 6 SJ SMART REMOTE (Optional) Once your Remote is paired, you will never need to pair it WIFI On/Off Switch again. Camera-Off Button When the SJ9 STRIKE is powered on, SJ Remote can begin sending commands to your camera. The Remote is tested to work at Burst Shot Button a maximum distance of 10 meters (30 feet) away from your...
-
Page 7: Powering The Camera On
POWERING THE CAMERA ON 2 2 2 On the top right side of your camera The SJCAM splash-screen will briefly is the Power/Shu er Bu on. show while the camera ini alizes, Press and hold it down to start your and will immediately proceed to the camera. - Page 8 SJ STRIKE SJ STRIKE INSERTING A MICRO SD CARD INTO THE CAMERA 1 1 1 Open the ba ery cover by sliding the Locate the card slot, and insert the Gently push the card in un l it clicks lock with your fingernail towards the microSD with the label side facing into place.
-
Page 9: Replacing The Battery
SJ STRIKE SJ STRIKE REPLACING THE BATTERY 3 3 3 1 1 1 PULL TAB Open the ba ery cover by sliding the While pressing on the lock, swing the Pull the ba ery out. lock with a fingernail. ba ery door open. Insert a freshly-charged ba ery in. - Page 10 SJ STRIKE SJ STRIKE INSERTING A USB-C CABLE 1 1 1 SWING DOOR OUT Firmly insert the USB-C cable Locate the covered USB-C port on the included in the package all the way in. le side of the camera. Use a fingernail A LED charging indicator is next to the to slide the lock open.
-
Page 11: The Main Screen
The Main Screen Elapsed Time | Time left on Card WiFi Active | Frequency Current Mode Icon Microphone Active Icon shows what mode you are currently in. Battery Level Indicator 00:00:00 | 02:06:16 Displays approximate power left on the Current Date & Time battery. -
Page 12: Playback Options
Toggles Screen Playback Options General Settings Lock Screen WiFi Remote Control Format Language WIFI English Video Picture 00:00:00 | 02:06:16 Auto Power Off LCD Off Time Front Display 3 Minutes 3 Minutes > 4K (3840x2160) 60 fps 2018-06-06 04:20:43 ISO:Auto Shutter Time1/2 Video 60FPS... - Page 13 Toggles Screen Lock Screen Turns off the display and disables the touchscreen to avoid accidental taps. Swipe the key icon to the lock to enable the touchscreen again. Lock Screen WiFi Toggle Lock Screen WiFi Remote Control Enable or disable the WiFi by tapping this and setting it. WiFi Enable or disable FPV (First-Person View) via a special cable.
-
Page 14: Playback Screen
Playback Screen Battery Status Indicator Elapsed Time 00:00:00 Shows how much power is left. Shows how much of the file is being played Go to previous file Go to Next File Tap or swipe right to get to the previous file. Tap or swipe left to get to the next file. -
Page 15: Mode Selection
Mode Selection Swipe UP to access Video+Photo, and Car Modes. Mode for recording videos. Video Video VideoLapse Slow Motion Timelapse photography stitched on-cam to produce a video. VideoLapse For recording video in slow motion. Photo PhotoLapse Burst Mode Slow Motion Still photograph mode. -
Page 16: Mode Settings Screen
User Interface > White Balance Auto You can switch to text-only menu by going Classic to General Settings and choose “Classic” in User Interface options. > Color Profile Flat SJCAM All graphics, words, and design by Troy Ferrer 2019 troy@sjcamhd.com... - Page 17 The Front Screen Current Mode Icon Current Resolu on / Frame Rate Icon will show what mode you are currently in. Will display the set resolu on size and the The op ons will vary depending on the mode. accompanying frames per second. 4K/60 Ultra Camera Ac vity Ball Elapsed Time / Shots Taken...
-
Page 18: Resolution Selection
RESOLUTION SELECTION > 4K (3840x2160) 60 fps 12MP 4000x3000 4:3 > 4K Ultra (3840x2160) 30 fps 10MP 3468x2736 4:3 > 2.7K (2720x1520) 30 fps 8MP 3840 Video Modes Photo Modes IMPORTANT! To ensure you get the full potential of your SJ9 STRIKE, it is very strongly 4K •... -
Page 19: Mode Settings
-5/3 -5/3 -2.0 -2.0 COLOR PROFILE • You are given 2 preset choices: SJCAM - Vivid, and Flat. Choose Flat to preserve color dynamics; SJCAM - Vivid to enhance colors. Color Profile Flat METERING • Tells the camera which portion of the scene takes priority when setting the... - Page 20 MODE SETTINGS - Page 2 A visual explanation of how Distortion Correction works. ENCODING • H.264 is a standard for writing video files, high compatibility with video players. H.265 is a newer standard that compresses video much better for smaller file sizes and faster streaming, may require you to update your video player’s codec.
- Page 21 MODE SETTINGS - Page 3 VIDEO QUALITY • Gives you the option of recording video in high bitrate for more image detail per frame, but will result in much bigger file sizes. METERING OPTIONS Encoding H264 PHOTO QUALITY • Presets for making adjustments on how much detail is written in photos. Options: Fine, Standard, and Economy.
- Page 22 MODE SETTINGS - Page 4 RAW • Enables or disables saving pictures as image sensor data onto a file (.RAW), preserving image details for editing later. Requires a converter for use with image manipulation software. NOTE: RAW is not readily viewable until converted or output to JPEG. H.265 H.265 H.265...
-
Page 23: General Settings
WIFI • Switches WiFi communication to app on or off. When active: scan networks, select your to get the most out of your battery’s camera’s SSID and then connect on your phone before opening the SJCAM app. charge. If no activity is detected within this period, your camera will power off. - Page 24 GENERAL SETTINGS - Page 2 FRONT DISPLAY • Enables or disables the small front LCD when not needed. Front Display INDICATOR LIGHTS • Turns on or off all status indicator lights on the camera. Indicator Lights W I R E L E S S - C H A R G I N G Your SJ9 can be alternatively charged KEYPAD TONE •...
- Page 25 GENERAL SETTINGS - Page 3 EXTERNAL MICROPHONE • Enables or disables external microphone. External microphone must be inserted first into the USB slot (sold separately). External Microphone CAUTION: • Make sure the black rubber seals DATE / TIME • Sets camera system date and time. Files will be labeled according to the behind the access doors are present, setting here.
- Page 26 Version Updating your firmware. ZOOM IN SJCAM Zone Mobile App You can access the Frequently Asked Ques ons Supported MicroSD Cards and answers by going to General Se ngs screen and tap this Q&A icon on the bo om right.
-
Page 27: Troubleshooting
DOES NOT TURN ON WHEN USING BATTERY Check that the terminal contacts at the end of the battery compartment are not bent or dislodged. If this is the case, contact SJCAM support. All graphics, words, and design by Troy Ferrer 2019 troy@sjcamhd.com... -
Page 28: File Management
Connect the USB-C cable, choose “Mass Storage Device” on your camera. b› Your device will show as a drive on your File Manager (Explorer on Windows; Finder in OSX) 2. Via WIFI through the SJCAM Zone App: a› Connect your camera to your phone: Device Settings>Wifi>Choose your camera b›... - Page 29 Get the app. Follow us Visit us at www.sjcam.com For technical assistance, go to support.sjcam.com All graphics, words, and layout by Troy Ferrer 2018 troy@sjcamhd.com...