Table of Contents
Advertisement
Quick Links
Download this manual
See also:
Reference Manual
Advertisement
Table of Contents

Related Manuals for 3Com 3108


Summary of Contents for 3Com 3108
- Page 1 3Com 3108 Wireless Telephone Guide 3C10408A WL-108 Networked Telephony Solutions ® System Release 6.0 Part Number 900-0338-01 Rev AC Published August 2006 http://www.3com.com/...
- Page 2 3Com Corporation. 3Com Corporation reserves the right to revise this documentation and to make changes in content from time to time without obligation on the part of 3Com Corporation to provide notification of such revision or change.
-
Page 3: Table Of Contents
Powering the Phone On and Off About Power-Saving Mode Care and Maintenance 3108 W IRELESS WLAN Operation – Placing a Call via a SIP Proxy Server 3108 Wireless Telephone Physical Description Built-in Features Expanded Feature Support Product Specifications EARNING TO Checking Connection Status... - Page 4 Storing Names and Numbers in Your Phonebook Configuration Overview Entering the Network Profile Settings Entering the SIP Account Settings Activating a Network Profile Setting the Time and Date Setting the Ring Mode and Ring Tone Setting a Wallpaper Image Adjusting the Backlight Viewing Recent Calls Returning an Unanswered Call Transferring a Call...
- Page 5 Checking Wireless Network Status Editing Names and Numbers in Your Phone Book Wireless Network Settings SIP Settings Phone Settings E-mail Settings Upgrade Software Upgrade Bootcode Debug Statistics Reboot Phone Password Logout ROUBLESHOOTING Unable to Connect to the Network Unable To Register With The SIP Server EGULATORY NFORMATION Caution: Exposure to Radio Frequency Radiation...
-
Page 7: About This Guide
BOUT This guide is intended for anyone using the 3Com 3108 Wireless Telephone. It describes how to unpack, set up and operate the Wireless Telephone. It also includes information for the Wireless Telephone installer or network administrator on how to configure the initial handset parameters required for connection to the network and wireless, Session Initiation Protocol (SIP), VoIP operation. -
Page 8: Conventions
Table 1 Common Terms Table 2 Table 2 Icons Documentation When using the 3Com 3108 Wireless Telephone with the 3Com NBX Network Telephony System, the following additional documents are helpful: For the most up-to-date versions of this guide and other NBX documentation, visit Downloads &... -
Page 9: Comments On The Documentation
Comments on the Your suggestions are important to us. They help us to make the 3Com Documentation documentation more useful to you. Please send your e-mail comments about this guide or any of the 3Com NBX documentation and Help systems to: Voice_TechComm_Comments@3com.com... - Page 10 BOUT UIDE...
-
Page 11: Getting Started
As soon as you receive your 3Com 3108 Wireless Telephone package, you can unpack the contents, install the battery, and plug in the AC power adapter to begin charging the battery. This chapter describes these steps and the basic care and operation of your phone. It covers these topics: The initial handset parameters and network service must be configured before you can use your Wireless Phone to make or receive any calls. -
Page 12: Powering The Phone On And Off
1: G HAPTER ETTING TARTED To install and charge the battery: 1 Remove the rear cover on the handset (See 2 Insert the battery in the compartment so that the metal contacts on the battery and handset are aligned. 3 Replace the rear cover of the handset. 4 Plug the AC power adapter into the USB Data Cable slot on the bottom of the handset. - Page 13 Care and Maintenance Do not put your phone or accessories in extremely hot or cold areas. Do not use harsh chemicals, cleaning solvents, or strong detergents to clean your phone or accessories.
- Page 14 1: G HAPTER ETTING TARTED...
-
Page 15: Om Wireless Elephone
This chapter describes the basic operating principles, controls, features, and specifications of the 3Com 3108 Wireless Telephone. It covers these topics: WLAN Operation – The 3Com 3108 Wireless Telephone is a Session Initiation Protocol Placing a Call via a (SIP)-based wireless Voice over Internet Protocol (VoIP) telephone. SIP is... -
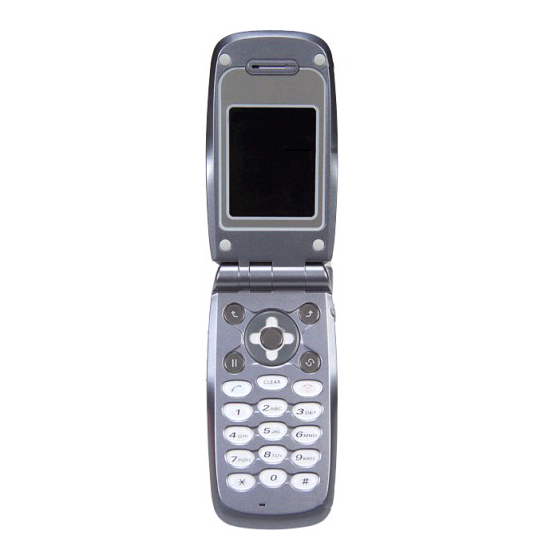
Page 16: 3108 Wireless Telephone Physical Description
Telephone Physical key components of the 3108 Wireless Telephone. Description Figure 1 IRELESS ELEPHONE Figure 2 show the location of buttons, controls, and other 3108 Wireless Telephone — Open, Front, and Back Views Speaker Keypads Display Microphone Antenna Battery Compartment... -
Page 17: Built-In Features
Figure 2 3108 Wireless Telephone — Side, Top, and Bottom Views Volume adjustment keys Earphone jack Built-in Features The 3Com 3108 Wireless Telephone has the following built-in features: Pixel-based display - Intuitive access to calling features Nine configurable speed dials... -
Page 18: Expanded Feature Support
2: 3C 3108 W HAPTER Expanded Feature Because it is based on standard SIP VoIP protocols, your 3108 Wireless Support Telephone can support additional features offered through the wireless Internet Telephony Service Provider (ITSP) or corporate VoIP PBX system to which it subscribes. - Page 19 WLAN Operation – Placing a Call via a SIP Proxy Server Table 3 3Com 3108 Wireless Telephone Specifications (continued) Item Description Channel Support Japan: 802.11b 14 (1~13 or 14 Modulation Technology DSSS OFDM 1.8î Color LCD, 128x160 pixel, 65k colors...
- Page 20 2: 3C 3108 W HAPTER IRELESS ELEPHONE...
-
Page 21: Learning To Use Your Phone
This chapter describes how to use the basic features of your 3Com 3108 Wireless Telephone. It covers these topics: The initial handset parameters and network service must be configured before you can use your Wireless Phone to make or receive any calls. For... -
Page 22: Making A Call
3: L HAPTER EARNING TO For SIP Status you see the following information: Making a Call There are two ways to make a call when your phone is in standby: Press Answering a Call When you receive a call, your phone rings and/or vibrates and displays an incoming call message. -
Page 23: Using The Keypad Lock Feature
In Standby, press and hold Or, select Menu and go to Settings > Keypad > Key Lock. Select OK to activate Key Lock. 3108 Wireless Telephone Display Icons Icon Description Signal Strength — Indicates the received wireless signal strength. The greater the number of bars, the stronger the signal Message —... -
Page 24: Using The Keypad
3: L HAPTER EARNING TO Using the Keypad The Wireless phone’s keypad allows you to dial phone extensions and enter characters for messages and Phonebook names. You can use the keypad to enter any combination of numbers and text (letters and special symbols, including punctuation marks). - Page 25 Table 6 Available Characters in Text Mode Characters in the Order Displayed space " ' [ ] < >( ) { } ABCabc DEFdef GHIghi JKLjkl MNOmno PQRSpqrs TUVtuv WXYZwxyz * . + - / , : ; = ? ! # @ $ % &...
-
Page 26: Using Led Status Indicators
Using LED Status You can view phone status by determining the color and pattern of the Indicators LED indicators located on the front of the 3108 handset. These LED indicators and their status are described in Table 7 Storing Names and... -
Page 27: Initial Handset Configuration
Additionally, the network administrator will need to configure the device settings that are required by the wireless Internet Telephony Service Provider (ITSP) or a corporate VoIP PBX system, such as the 3Com NBX® System. Approved Channels: Use of this product is only authorized for the channels approved by each country. -
Page 28: Entering The Network Profile Settings
4: I HAPTER NITIAL ANDSET Before you can use your phone, you will need to enter the profile menu and create a network profile. You can create up to six different network profiles, although you can activate only one profile at a time. First Step: You are required to set a password for the profile menu. - Page 29 Table 8 Wireless Settings Setting Description ESSID Stands for Extended Service Set Identifier. Specifying the ESSID is how you make sure that you connect to your wireless network instead of your neighbor’s network by mistake. You can either manually input the New ESSID or select Site Survey to check all available networks.
- Page 30 4: I HAPTER NITIAL ANDSET Table 9 7 Edit your Account Choice as necessary. Press SIP Account. If you have not yet set up your SIP account, before you can activate this network profile, you will need to return to the Account Choice menu option and specify the particular SIP account you want to associate with this profile.
-
Page 31: Entering The Sip Account Settings
Entering the SIP The SIP account parameters enable your Wireless phone to register with Account Settings the designated SIP proxy server for VoIP operation. To enter your SIP account parameters: 1 Press 2 Press If you are setting up a new SIP account, select an unused account from the list (for example, <SIP Account>). -
Page 32: Activating A Network Profile
4: I HAPTER NITIAL ANDSET Table 11 5 Press After defining the SIP Account settings, you must associate the SIP account with a particular network profile in order for the Wireless phone to use these settings. To do this, you name the specific SIP account in the Account Choice menu option of the active Network Profile. -
Page 33: Personalizing Your Phone
This chapter covers the following topics: For complete descriptions of all telephone configuration settings, see Appendix Setting the Time You must set the time and date to fully use your phone features. and Date Set the time: 1 Select Menu and go to Settings > Clock > Time. 2 Set the time as described in Table 12 ERSONALIZING... -
Page 34: Set The Time Format
5: P HAPTER ERSONALIZING Set the Time Format 1 Select Menu and go to Settings > Clock > Time Format. 2 Set the time format as described in Table 13 Setting the Time Format Set the Date 1 Select Menu and go to Settings > Clock > Date. 2 Set the date as described in Table 14 Setting the Date Set the Date Format... -
Page 35: Setting The Ring Mode And Ring Tone
Table 15 Setting the Ring Your phone rings or vibrates to alert you of an incoming call or other Mode and Ring event. The Ring Mode and Ring Tone settings allow you to personalize Tone this alert. Set the Ring Mode 1 Select Menu and go to Settings >... -
Page 36: Setting A Wallpaper Image
5: P HAPTER ERSONALIZING Table 16 Setting a Wallpaper You can set a picture as a background image or wallpaper in your phone’s Image standby display. There are five built-in pictures for you to select from for the background image. 1 Select Menu and go to Settings >... -
Page 37: Adjusting The Backlight
Adjusting the You can adjust the brightness of the display for different lighting Backlight conditions. 1 Select Menu and go to Settings > Display Settings > LCD Brightness. 2 Set the brightness as described in Table 18 Setting the LCD Brightness Press Increase or decrease the LCD lighting level Set your display lighting level... - Page 38 5: P HAPTER ERSONALIZING HONE...
-
Page 39: Calling Features
This chapter covers the following topics: Viewing Recent Your phone keeps track of the calls you recently received and dialed, even Calls if the calls did not connect. View recent calls: 1 Select Menu and go to Call Log > Missed Calls/Dialed Calls/Received Calls. -
Page 40: Transferring A Call
6: C HAPTER ALLING EATURES To return a missed call: 1 Select 2 Press to view the name and the numbers, if available, with the time and date when the call was received. You can also redial the number by pressing the Transferring a Call When you are on a call, you can transfer this call (either announced or... -
Page 41: Using Call Waiting
Using Call Waiting Call Waiting provides an alert tone when you are on an active call and you receive a second incoming call. To activate Call Waiting: 1 Select Menu and go to Settings > Call Settings > Call Waiting. 2 Press Table 21 Table 21... - Page 42 6: C HAPTER ALLING EATURES To activate any of the call forwarding functions: 1 Select Menu and go to Settings > Call Settings > Call Forward. 2 Press To deactivate Call Forward, press 3 Press To deactivate the set of Call Forward functions, go to Settings > Call Setting >...
-
Page 43: Menus
This chapter describes each of the functions you can access through the Wireless phone’s built-in menu interface. It covers the following topics: Phonebook This section describes how to manage the information stored in your Phonebook. After storing entries in your Phonebook (see Phonebook”... -
Page 44: Call Log
7: M HAPTER ENUS Table 22 Using Your Phonebook Call Log Call Log allows you to view and manage the entries for missed, dialed, and received calls. Table 23 entries. Feature Description Search Phonebook > Search Press to Search and press You are asked to enter the name. -
Page 45: E-Mail
Table 23 Using the Call Log E-mail Using the E-Mail feature, you can receive or send text messages through an established e-mail account. Receiving or sending e-mail is based on POP3 and SMTP system design. To use this feature, you must have an e-mail account (a specific username and password) from your e-mail service provider. - Page 46 7: M HAPTER ENUS Table 24 Setting Up and Using E-mail Feature Description Account From Account Settings, the following options are available: Settings Account Name: enter a name for the activated account. Your Name: enter the name to be displayed as the sender name.
- Page 47 Table 24 Setting Up and Using E-mail Feature Description Inbox Allows you to access your e-mail Inbox and read the e-mail messages you’ve received. Press to select the mail you want to read and then press View. Details (From, Date, Recipients, Subject and Content) are indicated. You can also press with the original content), Forward, Preview the detail, read the Subject, set the Recipients, write the Content, Save To Draft,...
-
Page 48: Speed Dial
7: M HAPTER ENUS Speed Dial You can assign up to nine Speed Dials for single-key dialing of commonly used numbers. You can assign an entry you saved in your Phonebook a unique speed dial number (1-9) in phone memory. two ways to assign a Speed Dial, either through the Phonebook or by directly assigning a key to a Speed Dial. -
Page 49: Settings
Table 26 Profile Settings Settings Table 27 Settings menu. Table 27 Profile Password Profile > Profile Password You can change your profile password. First enter the “Old Password” and then enter the “New Password.” Press Hotspot Profile > Hotspot Press Set to enter the hotspot name and password. - Page 50 7: M HAPTER ENUS Table 27 (continued) Phone Settings Clock Settings > Clock There are six options included in Clock menu: Settings > Clock > Time This option enables you to adjust the current time. Press and enter the appropriate time with numeric keys. Press OK to confirm your setting or press menu.
- Page 51 Table 27 (continued) Phone Settings Alarm Clock Settings > Alarm Clock This option enables you to set the alarm to ring at a specific time. Alarm Time: Press and enter the appropriate time with numeric keys. Press OK to confirm your setting. Mode: Press and to activate the alarm Once, Daily or Weekly...
- Page 52 7: M HAPTER ENUS Table 27 (continued) Phone Settings Call Settings Settings > Call Settings Three options are included in Call Settings: Settings > Call Settings > Call Waiting For details, refer to Using Call Waiting on page 36. Settings > Call Settings > Call Forward For details, refer to Using Call Forwarding on page 37.
- Page 53 Table 27 (continued) Phone Settings Speed Dial Settings > Speed Dial There are three options for you to choose: Disable: Deactivate the speed dial function. Ask: Press and hold the numeric key (for example, 1) the screen will display the numbers and then press Dial: Press and hold the numeric key (for example, 1) to make the call directly.
- Page 54 7: M HAPTER ENUS Table 27 (continued) Phone Settings Display Settings > Display Settings Settings Settings > Display Settings > Wallpaper For details, refer Settings > Display Settings > Greeting This option enables you to set welcome words as greeting and to be displayed when the phone is powered on.
-
Page 55: Tools
Tools Table 28 Table 28 describes each of the options you have through the Tools menu. Tools Options Feature Description Signal Tools > Signal Quality Quality Displays the status of current wireless connection, including ESSID, BSSID, Channel, Rate, RSSI, Noise and Security. Site Survey Tools >... - Page 56 7: M HAPTER ENUS...
-
Page 57: Web Configuration
The 3108 Wireless Telephone includes a built-in Web Configuration utility that allows you to easily view and edit your telephone settings from your This chapter covers the following topics: Accessing the Web Configuration Utility Checking Wireless Network Status Editing Names and Numbers in Your Phone Book... -
Page 58: Accessing The Web Configuration Utility
8: W HAPTER ONFIGURATION Accessing the Web To access the Web Configuration utility, your Wireless phone must have Configuration an IP address and WLAN connection. The PC used to view the Web Utility Configuration utility must be connected to this same network. 1 In Standby, press connected IP address is indicated (for example,172.16.140.174). -
Page 59: Wireless Network Settings
To edit an existing entry: 1 In the Name column, double-click the entry you want to edit. 2 Make any changes you need. 3 After editing an entry, you can Save, Delete, Cancel or Reset the entry. You can delete all the recorded entries by pressing Clear All. A confirmation message appears on the screen. -
Page 60: Sip Settings
8: W HAPTER ONFIGURATION Table 29 2 Select Save to confirm your settings. Alternatively, you can select Cancel to leave the settings unchanged, or Reset to remove the settings. 3 Edit the Certification settings (CA Cert./ User Cert./ Private Key) as needed. -
Page 61: Phone Settings
To configure a SIP Account: 1 Select the account entry and click Configure to enter the sub-menu. 2 Edit the following SIP Account settings as needed: SIP Account Name, Phone Number, Authentication ID, Authentication Password, SIP Domain, Proxy Address, Outbound Address, Local Port, Register Timer(sec), Codec (Auto/G.711u/G.711a/ G129A), Pkt Time(ms)(Default, 20,30,40,50,60,70,80), OutofBand DTMF (Off/On). -
Page 62: E-Mail Settings
Signature. 3 You can also Remove or Activate one of up to five e-mail accounts. Upgrade Software This option enables you to upgrade your phone’s software. The 3108 Wireless Telephone is shipped with firmware already installed. To upgrade your firmware: 1 Click Browse and find the new firmware image on your network or on a 2 Click Upgrade. -
Page 63: Upgrade Bootcode
Upgrade Bootcode This option enables you to upgrade your phone’s bootcode (starting system). CAUTION: Do not interrupt a boot code upgrade operation. Debug Statistics Detailed information about Debug Statistics is listed. Information includes: Wireless Network Status (ESSID, BSSID, IP address, MAC address), WL Info (rssi is, noise is, No scan in progress, current mac channel, target channel, Receive, Transmit), RTP Stats (igrRtpPkt, igrRtpByte, egrRtpByte, egrRtpCumLostPkt, egrRtpNoProfDiscPkt, igrRtpPkt, egrRptJitter, igrRtpLatency), PVE Stats... -
Page 64: Reboot Phone
8: W HAPTER ONFIGURATION Reboot Phone After upgrading software, you need to reboot the phone (power off and on) to activate all new settings. Password You can change the current password for the Web Configuration utility by using this feature. Logout To exit the web configuration, select Logout. -
Page 65: Troubleshooting
This appendix contains troubleshooting suggestions for identifying and solving common network connection and SIP registration problems. For additional assistance, see your network administrator. Unable to Connect If upon power up, your phone displays the message “No Network,” to the Network check the following: Unable To Register If upon power up, your Wireless phone shows a network connection, but... - Page 66 9: T HAPTER ROUBLESHOOTING network profile. See “Entering the Network Profile Settings” on page...
-
Page 67: Regulatory Information
EGULATORY NFORMATION The 3Com 3108 Wireless Telephone, (3C10408A, WL-108) must be installed and used in strict accordance with the manufacturer’s instructions as described in the user documentation that comes with the product. This device complies with the following radio frequency and safety standards. -
Page 68: Usa-Federal Communications Commission (Fcc)
This booklet is available from the U.S. Government Printing Office, Washington, D.C. 20402. Stock No. 004-000-0034504. 3Com is not responsible for any radio or television interference caused by unauthorized modification of the devices included with this 3Com 3108 Wireless Telephone, (3C10408A, WL-108), or the substitution or attachment of connecting cables and equipment other than specified by 3Com. -
Page 69: Manufacturer's Declaration Of Conformity
Date: Aug. 15, 2006 Declares that the Product: Brand Name: 3Com Corporation Model Number: WL-108 Equipment Type: 3Com 3108 Wireless Phone Canada – Industry This device complies with RSS 210 of Industry Canada. Canada (IC) Operation is subject to the following two conditions: (1) this device may... -
Page 70: Industry Canada (Ic) Emissions Compliance Statement
Declaration of Conformity Intended use: IEEE 802.11b/g radio device To ensure product operation is in compliance with local regulations, select the country in which the product is installed. Refer to 3Com 3108 Wireless Telephone Guide (3C10408A, WL-108). NFORMATION UL Standard 60950-1 CAN/CSA C22.2 No. -
Page 71: Europe - Declaration Of Conformity In Languages Of The European Conformity
3Com Corporation declara que este RLAN device está conforme com os requisitos essenciais e outras disposições da Directiva 1999/5/CE. 3Com Corporation izjavlja, da je ta RLAN device v skladu z bistvenimi zahtevami in ostalimi relevantnimi določili direktive 1999/5/ES. 3Com Corporation týmto vyhlasuje, že RLAN device spĺňa základné požiadavky a... -
Page 72: Europe - Restrictions For Use Of 2.4 Ghz Frequencies In European Community Countries
This device may cause radio interference during its operation. Therefore service in relation to human life security is not available. NFORMATION 3Com Corporation vakuuttaa täten että RLAN device tyyppinen laite on direktiivin 1999/5/EY oleellisten vaatimusten ja sitä koskevien direktiivin muiden ehtojen mukainen. - Page 73 24 Extended Service Set Identifier (ESSID) 29 FCC channel restrictions 27 Hotspot Choice 30 icons 3108 Wireless Telephone display 23 Internet Telephony Service Provider (ITSP) 27 IP settings 29 keypad lock 23 LCD brightness setting 37...
- Page 74 NDEX configuring 28 renaming 28 Network Profile menu 28 no network message, See unable to connect to the network 65 no service message, See unable to register with the SIP server 65 numeric mode, See entering digits, *, and # characters 24 password for Profile menu 28...
Need help?
Do you have a question about the 3108 and is the answer not in the manual?
Questions and answers