3Com 3101 Manual
Hide thumbs
Also See for 3101:
- User manual (134 pages) ,
- Quick reference manual (2 pages) ,
- Telephone manual (154 pages)

Related Manuals for 3Com 3101


Summary of Contents for 3Com 3101
- Page 1 3101 Basic Telephone Guide for 3Com Asterisk ® ® Part Number 900-0470-01 Rev AA Published November 2007 http://www.3com.com/...
- Page 2 TRADEMARKS Unless otherwise indicated, 3Com registered trademarks are registered in the United States and may or may not be registered in other countries. 3Com, and the 3Com logo are registered trademarks of 3Com Corporation. Asterisk and Digium are registered trademarks and Asterisk Business Edition, AsteriskNOW, AsteriskGUI, and Asterisk Appliance are trademarks of Digium, Inc.
-
Page 3: Table Of Contents
BOUT UIDE Conventions Comments ETTING TARTED Configuration Overview Telephone Overview Configuration Options ASIC ELEPHONES 3101 3101SP ODELS Buttons and Controls Access Buttons Status Lights for System Appearance Buttons Access Button Label ASIC ELEPHONE PERATION Logging In to Your Telephone Changing Your Password... - Page 4 Using the Hands Free Feature Putting a Call on Hold Music on Hold Dialing a New Call While on a Call Answering a New Call While on a Call Transferring a Call Unattended Transfer Attended Transfer Muting Calls Mute Ringer Activating Do Not Disturb Accessing Voice Mail EATURE...
- Page 5 ELEPHONE NSTALLATION AND AINTENANCE Connecting the Telephone Connecting the Telephone to the 3Com Asterisk Appliance Manually Configuring Telephone Connectivity Attaching and Adjusting the Support Bracket Moving Your Telephone Swapping Telephones Cleaning Your Telephone Troubleshooting Problems NDEX...
-
Page 7: About This Guide
BOUT UIDE This guide describes how to set up and use a 3Com® 3103 Basic Telephone with a 3Com Asterisk Appliance. CAUTION: The 3Com telephone system operates over the Ethernet local area network (LAN), not through a traditional telephone connection. -
Page 8: Conventions
Include the following information with your comments: Document title ■ Document part number (found on the front page) ■ Page number ■ Your name and organization (optional) ■ Please address all questions regarding the 3Com software to your authorized 3Com coordinator. -
Page 9: Getting Started
This chapter describes the steps you must complete to use your telephone and provides a general description of your telephone. For information about installing your telephone and connecting to the LAN and to the 3Com Asterisk Appliance, see Telephone Installation and Maintenance. -
Page 10: Configuration Overview
One of the benefits of network-based telephony is portability. Depending on how your administrator has configured the 3Com Asterisk Appliance, you may be allowed to configure another telephone in the system to duplicate your primary telephone simply by logging in to the other... -
Page 11: Configuration Options
Configuration Options Configuration Simple telephone operations (for example, making a call, transferring a Options call, and putting a call on hold) require no configuration. These operations are described in Chapter Many features, however, do require configuration (for example, call forwarding). In general, you can configure these features using the Telephone User Interface (TUI). - Page 12 1: G HAPTER ETTING TARTED...
-
Page 13: Basic Telephones Models 3101 And 3101Sp
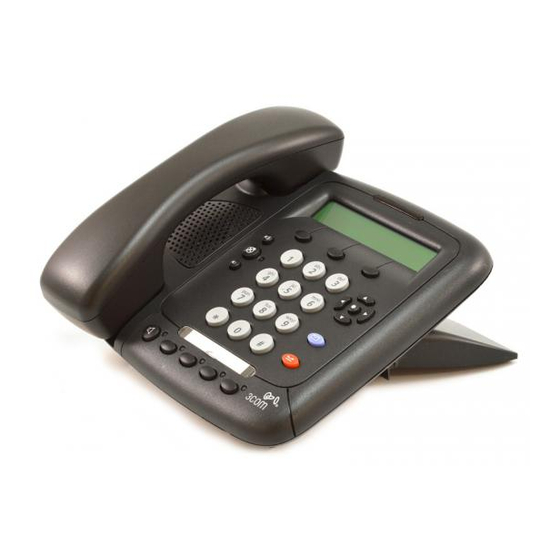
ASIC ELEPHONES 3101 3101SP ODELS This chapter describes the buttons, controls, and features on the 3Com® Model 3101 and Model 3101SP Basic Telephones. The chapter includes the following topics: Buttons and Controls ■ Access Buttons ■ Status Lights for System Appearance Buttons ■... -
Page 14: Buttons And Controls
Model 3101SP Basic Controls Telephone. The Model 3101 Basic Telephone does not include a microphone, 8, or a speaker button and its indicator light, 10. All other controls are identical on the two telephones. - Page 15 Buttons and Controls 2 Message Waiting Indicator (MWI) — When lit, indicates that you have at least one unreviewed message in your mailbox. Also, this indicator flashes when your telephone rings. 3 Display Panel — Displays the current date and time, telephone status messages, Caller ID information (if enabled), and the number of new messages that you have in your mailbox (see Using the Telephone Display...
-
Page 16: Access Buttons
ELEPHONES ODELS The Model 3101SP Basic Telephone includes a microphone and supports speaker phone operation. The Model 3101 Basic Telephone does not support speaker phone operation and it does not have a button. 12 Telephone key pad — Use these buttons to dial telephone numbers and to access additional features. - Page 17 Access Buttons 1 The first button controls a line for incoming and outgoing calls (System Appearance button; SA1). 2 The second button controls a line for incoming and outgoing calls (System Appearance button; SA2). 3 Feature button — Allows you to access features that are not directly assigned to an Access button on your telephone.
-
Page 18: Status Lights For System Appearance Buttons
Blinking slowly On hold Access Button Label Figure 3 shows the access button label for the 3101 Basic phone. Print this page and cut out the label and affix it to the telephone. Figure 3 Access Button Label Feature Transfer... -
Page 19: Basic Telephone Operation
ASIC ELEPHONE PERATION This chapter includes the following topics: Logging In to Your Telephone ■ Answering a Call ■ Answering a Second Call ■ Making Calls ■ Terminating Calls ■ Using the Telephone Display Panel ■ Controlling the Volume ■ Changing Ringing Tones ■... -
Page 20: Logging In To Your Telephone
3: B HAPTER ASIC ELEPHONE PERATION Logging In to Your Your administrator assigns an extension (telephone number) and initial Telephone password to your telephone. To log in to your telephone: 1 Press Program+ 5 + 6 or press Feature + 410 + 5 + 6. The Display Panel shows: Enter Password: 2 Enter your password and press #. -
Page 21: Changing Your Password
9 digits. Answering a Call To answer an incoming call, lift the handset. Alternatively, if you are using a 3Com 3101SP Basic Telephone, you can press the speaker button. If your telephone includes multiple access lines, press the Access button for the line on which the new call is arriving (the light next to the button will be flashing). -
Page 22: Making Internal Calls
2 Dial the number, then press the # key to send. Or use the display panel on a 3Com Telephone to scroll to Placed Calls, Received Calls, or Missed Calls. 3 When you finish speaking, hang up the handset. If you pressed the button, press it again to end the call. -
Page 23: Terminating Calls
Terminating Calls To activate the one-call-only Class of Service Override from any telephone: 1 Pick up the handset. 2 Press Feature + 433. The Display Panel prompts you for the required input. 3 Enter your telephone extension. 4 Enter your password and press #. 5 Enter the destination number as you would from your own telephone. -
Page 24: Controlling The Volume
3: B HAPTER ASIC ELEPHONE PERATION following (and MWI is lit): . The include the just 2 Msgs 1 New 2 Msgs received new, unreviewed message and the other message that is new but reviewed. The indicates the just received new, unreviewed 1 New message. -
Page 25: Changing Ringing Tones
Changing Ringing Tones Adjusting the volume control of one device DOES NOT affect the volume control of the other devices. For example, lowering the volume of the speaker has no effect on the handset volume. Changes you make to any device remain in effect if you reset the telephone to its default settings. -
Page 26: Using The Hands Free Feature
3: B HAPTER ASIC ELEPHONE PERATION To change the ringing tone: 1 Log out of the telephone; press Program + 5 + 6. 2 Press Program + 5 + 9. The Display Panel shows which ringing tone the telephone uses, for example: Alert Tone 1- 10: 3 Use the middle soft key under the Display Panel to delete the current... -
Page 27: Music On Hold
Transferring a Call Music on Hold If configured by the administrator, callers on hold hear music while they wait. Dialing a New Call You can put a call on hold, dial a new call, and toggle between the two While on a Call calls: 1 Press the Hold button. -
Page 28: Muting Calls
3: B HAPTER ASIC ELEPHONE PERATION To announce a transfer: 1 While on a call, press Transfer. The call is placed on hold, you hear a dial tone, and the system prompts you enter a destination number. 2 Dial the extension number to which you want to transfer the call The call processor dials the call. -
Page 29: Activating Do Not Disturb
Activating Do Not Disturb To mute the telephone ringer: 1 Press Feature + 489. The LCD displays: Ringer is now muted. 2 To clear the display, lift the handset. The next time you receive an incoming call, the ringer is muted. 3 To turn this feature off, press Feature + 489 again. -
Page 30: Accessing Voice Mail
3: B HAPTER ASIC ELEPHONE PERATION Accessing Voice Mail To access voice mail directly for a mailbox: 1 Press one of the following: Messages button ■ *600* + <extension> + # ■ Feature + 600 ■ 2 You are prompted to enter the password, which by default is the same as the mailbox number. -
Page 31: Feature
EATURE ODES This chapter describes how to use feature codes on a telephone to enhance the operation of your telephone. A feature code is a sequence of numbers you enter on the telephone keypad to enable a feature that is not mapped to a button. -
Page 32: Feature Code Overview
4: F HAPTER EATURE ODES Feature Code Some common telephone features are mapped to buttons (Transfer, for Overview example). However, the number of features exceeds the number of buttons available on any telephone. Feature codes allow the telephone feature set to be available to all telephones, regardless of the number of buttons on the telephone. -
Page 33: Feature Codes
Feature Codes want your calls forwarded. The feature code for call forward (Fwd Universal) is 465. To enable this feature: 1 Press Feature + 465. The Display Panel shows the prompt FWD Universal Number 2 Enter the extension to which you want your calls forwarded, in this case, 1001. - Page 34 4: F HAPTER EATURE ODES Table 3 Feature Codes Alphabetical by Feature or Task (continued) Feature Feature Code Entry Description Mute Feature + 101 Muting Calls. Mute Ringer Feature + 489 Mute Ringer. Feature + 120 Displays OK in the Display Panel. Used to make a call without waiting for the call completion time-out value to expire.
-
Page 35: Standard Features
TANDARD EATURES This chapter describes the standard telephone features that you can set up and access through the Telephone User Interface (TUI) on your telephone. This chapter contains the following topics: Viewing the Call Logs ■ Setting up a Conference Call ■... -
Page 36: Viewing The Call Logs
5: S HAPTER TANDARD EATURES Viewing the Call You can use the Call History feature to display your call logs. These are Logs the logs of the 10 most recent placed calls, received calls, missed calls and unreviewed calls to and from your telephone. From the call logs you can select calls and the telephone automatically dials them. -
Page 37: Setting Up A Conference Call
Setting up a Conference Call Setting up a The conference feature enables you to have up to six parties, including Conference Call the conference originator, on one conference with the capability to extend a conference through cascading. Conferences can be multi-site capable where any endpoint in a conference can be located anywhere within the system. -
Page 38: Adding A Recipient To An Existing Conference
5: S HAPTER TANDARD EATURES Adding a Recipient to While participating in a conference of three to five people, any recipient an Existing in the conference can add a new recipient. While a new recipient is being Conference added, the existing recipients in the conference, including the originator, are still able to communicate, but there is no ring back tone associated with the new recipient. -
Page 39: Transferring Your Telephone Settings To Another Telephone
■ If the originator drops the last party in a 3-party conference, the call then becomes a 2-party non-conference call. Transferring Your This feature enables you to use any 3Com telephone with all your Telephone Settings telephone’s settings. to Another To transfer your telephone’s settings to an alternate telephone:... -
Page 40: Forwarding Calls To Voice Mail
5 Log in to the alternate telephone and use your own telephone extension number and password: a If the telephone is a 3Com Basic or Business telephone, press Program + 5 + 6. b If the telephone is a 3Com Manager’s telephone, press the bottom right soft button (Advanced Settings) + 6. -
Page 41: Call Waiting
Call Waiting If you are a Ring Group member, personal (non-Ring Group) calls go to ■ your voice mailbox. However, Ring Group calls always ring on a member’s telephone, regardless of your personal telephone setting. To forward incoming calls to your voice mailbox for any telephone (including the Basic telephones, which do not have a FWD Mail button): Press Feature + 440. -
Page 42: Call Park
5: S HAPTER TANDARD EATURES To disable the Call Forward Universal feature so that you can answer calls at your telephone again: 1 Press Feature + 465 or press the Feature Access button, then scroll down to and select Fwd Universal The Display Panel shows: FWD Universal Number: 2 Use the Delete soft key to erase the call forward extension and leave the... -
Page 43: Ring Groups
Ring Groups b When the call is answered, tell the user the Call Park extension number, for example 6018. c Hang up. The user dials the Call Park number and the system connects the call automatically. 3 To retrieve a parked call yourself: a Pick up the handset of any telephone on the system. -
Page 44: Emergency Telephone Number Dialing Service
Each time a call is put back in a ring group queue, it is treated like a ■ new call. Emergency 3Com telephones provide the capability to dial an emergency telephone Telephone Number number even when the telephone is not logged in to a system. The Dialing Service telephone must be properly configured, connected to an operational system, and the region must support this service. -
Page 45: Nstallation And
ELEPHONE NSTALLATION AND AINTENANCE This chapter covers these topics: Connecting the Telephone ■ Connecting the Telephone to the 3Com Asterisk Appliance ■ Attaching and Adjusting the Support Bracket ■ Moving Your Telephone ■ Swapping Telephones ■ Cleaning Your Telephone ■... -
Page 46: Connecting The Telephone
A: T HAPTER ELEPHONE NSTALLATION AND AINTENANCE Connecting the Although the connector layout varies between telephones, all telephones Telephone use these symbols to identify the connectors: Power connection for an AC power adapter. Network connection. Connects the device to the network. A powered Ethernet cable that conforms to the Power over Ethernet (IEEE 802.3af) standard is acceptable. -
Page 47: Connecting The Telephone To The 3Com Asterisk Appliance
The subnet mask of your local network ■ A default gateway IP address ■ The IP address of the 3Com Asterisk Appliance and the IP address of ■ the download server If your network is configured to use DHCP, the telephone receives its IP configuration automatically. -
Page 48: Manually Configuring Telephone Connectivity
Configuration menu (menu option 6). If your telephone received its IP configuration automatically, follow steps 1 through 3 to set the IP address of the 3Com Asterisk Appliance and your user settings. If your telephone did not receive its IP configuration automatically from a DHCP server, follow all the steps. -
Page 49: Attaching And Adjusting The Support Bracket
Attaching and Adjusting the Support Bracket If your telephone received its IP configuration automatically, follow steps 1 through 5 to set the IP address of the 3Com Asterisk Appliance. If your telephone did not receive its IP configuration automatically from a DHCP server, follow all the steps. - Page 50 Figure 7 Wall Mounting a Telephone When you mount a 3Com telephone on a wall, attach the support bracket and adjust it so that the bottom of the support bracket rests against the bottom supports on the telephone, 1.
-
Page 51: Moving Your Telephone
Moving Your Telephone Moving Your Each telephone is uniquely identified by an IP address. You can move your Telephone telephone to another location within your calling domain, connect it to any Ethernet jack on the LAN, and still maintain all of your personalized features and extension number. - Page 52 A: T HAPTER ELEPHONE NSTALLATION AND AINTENANCE Table 4 Possible Problems Possible Problem Suggested Solutions My telephone has no dial Verify that the power cord is fully inserted in the ■ tone and the display panel correct connector on the underside of the is blank.
- Page 53 Class of Service see Program button overriding 22 making calls 21 cleaning telephones 51 message waiting indicator conference call 3101 and 3101SP Basic Telephones 15 announced 37 microphone cascaded conference 38 3101SP Basic Telephone 15 dropping recipients 38 missed calls 24...
- Page 54 39 problems solving 45 Program button 15 programmable access buttons 3101 Basic Telephones 16 relocating telephones 51 ringing tone, changing 25 RJ-11 jack caution, avoiding use with telephones 46 RJ-45 jack caution, using instead of RJ11 46...
Need help?
Do you have a question about the 3101 and is the answer not in the manual?
Questions and answers