Bernina Q Series User Manual
Hide thumbs
Also See for Q Series:
- Assembly instructions manual (26 pages) ,
- Service and maintenance manual (133 pages)
Table of Contents
Advertisement
Quick Links
Advertisement
Table of Contents

Related Manuals for Bernina Q Series


Summary of Contents for Bernina Q Series
- Page 1 BERNINA Q 24 User manual...
- Page 3 After all we sell our products to creative people like you, who do not only appreciate high quality but also form and design. Enjoy creative quilting with your new BERNINA Q 24 and find out about the variety of accessories at www.bernina.com. On our homepage, you can also find many inspiring sewing and quilting ideas.
-
Page 4: Table Of Contents
My BERNINA ............10 Settings ..............42 Introduction ............10 Overview Setup-Program ........42 Welcome to the world of BERNINA ......10 Selecting the language ..........42 Machine ..............12 Overview, front left ............. Setting up the screen ..........43 Overview, front right .......... - Page 5 Table of Contents Starting and stopping the machine ......58 Controlling the speed ..........58 Care and maintenance ........59 Firmware ..............59 Verifying the software version ........Updating firmware ............. Starting the Service Programm ........Machine ..............61 Cleaning the screen ............ Calibrating the screen ..........
-
Page 6: Important Safety Instructions
Do not use this machine if cables or plugs are damaged, or if the machine is not working properly, has been dropped or damaged or has fallen into a pool of water. Get in touch with the nearest BERNINA specialist and agree how you will proceed further. - Page 7 – set the power switch to «0». • Do not use bent needles. • Always use an original BERNINA stitch plate. The wrong stitch plate can cause needle breakage. • To disconnect, set the power switch to «0» and then remove the plug from the outlet.
-
Page 8: Important Information
• If you pass the machine to a third party, always include the instruction manual. Proper use Your BERNINA machine is conceived and designed for private household use. It is intended for quilting fabrics and other materials as described in this instruction manual. Any other use is not considered proper. - Page 9 Designates a low-risk hazard which can lead to minor or moderate injuries if not avoided. CAUTION Designates a hazard which can lead to material damage if not avoided. NOTICE Tips from BERNINA quilt experts can be found next to this symbol.
-
Page 10: My Bernina
You can find the latest version of your instruction manual as well as a lot more information about sewing and quilting on our website at www.bernina.com. Because of its size, your BERNINA Q 24 must be used on a quilt frame. Assembly instructions for the machine on the quilt can also be found on our website www.bernina.com. - Page 11 Follow us on the social networking to learn more about events, thrilling projects as well as tips and tricks all about sewing, quilting and embroidering. We will keep you informed and we are looking forward to presenting you the one or the other highlight from the world of BERNINA. http://www.bernina.com/social-media...
-
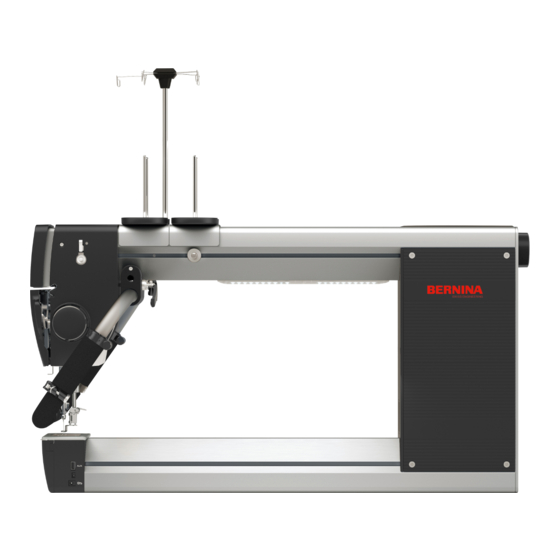
Page 12: Machine
My BERNINA 1.3 Machine Overview, front left Hook cover Sewing light Stitch plate Thread guide, top, left Air vents Thread guide rod, with eyelets Thread cutter Thread stand Thread guide, bottom Thread guide, top, right Thread guide slot... -
Page 13: Overview, Front Right
My BERNINA Overview, front right Presser foot Thread guide Needle threader Screen Thread guide Thread pre-tension Thread regulator Thread cutter Handwheel, front Bobbin winding unit Thread take-up lever... -
Page 14: Overview, Rear Right
My BERNINA Overview, rear right Handle Connection, automation Locking lever, handle Connection, control unit Handwheel, rear Connection, USB cable Air vents Connection, handle, rear Power switch Connection, laser pointer Connection, power cable Connection, screen, rear Connection, automation... -
Page 15: Provided Accessories
My BERNINA 1.4 Provided accessories Illustration Name Purpose Accessories box To store the supplied accessories as well as the optional accessories. Darning Foot #9 For free motion quilting and repairing holes. For free motion embroidery and contour quilting. Thread lubrication unit... - Page 16 My BERNINA Illustration Name Purpose Manual therader To thread the double needle. Screwdriver, red To adjust the thread tension of the bobbin. Screwdriver, hexagon To change the needle. Torx T25 screwdriver For installing the spool pin. Screwdriver set, Torx For fitting the machine to the quilt frame.
-
Page 17: Software
My BERNINA 1.5 Software Software operation The touch-sensitive screen can be operated with the finger or stylus. Tap: Short tap of an element. Draw: Tap the screen and slowly move in one direction, eg. for scrolling up and down. Navigation... - Page 18 My BERNINA Illustration Name Purpose Yellow frame Indication that the set value differs from the default value. Reset the value to the default value by tapping. Enter text and numbers To enter numerical values or text, a corresponding keyboard is shown.
-
Page 19: Home Screen
My BERNINA Home screen «Sewing screen» «Tutorial» «Setup Pogram» «Calculator» «eco-mode» «Stitch counter» Sewing screen «Upper thread tension» «Needle stop up/down» «Raising/lowering the presser foot» «Stitches» «User profile» «Idle speed» «Bobbin filling» «Programmable functions» «BSR» «Quilting modes» Calling up the Help The help contains information about a selected object on the screen. -
Page 20: Calling Up The Tutorial
My BERNINA Calling up the Tutorial The tutorial provides information and explanations about different areas of quilting, and the machine. > Tap «Home». > Tap «Tutorial». > Select the required topic. > Scroll longer texts upwards. Using the eco mode If work is interrupted for an extended period, the machine can be put into energy-saving mode. -
Page 21: Setting Up The Machine
Setting up the machine Setting up the machine 2.1 Connection and Switching on Connecting the machine > Insert the device connector of the power cable into the machine's power cable connection. > Insert the power plug of the power cable into the socket. For USA/Canada only The machine has a polarized power plug (one contact is wider than the other). -
Page 22: Programming The Handle Buttons
Setting up the machine > Place the spool holder on the machine such that both spool pins (1) are positioned in front of the thread guide (2). > Slide the spool pin forward until it lies against the machine housing. >... - Page 23 Setting up the machine > Tap one of the 4 programmable buttons on the sewing screen. Button I, left handle Button II, right handle Button II, left handle Button I, right handle > Select the desired function for the button. «No function»...
-
Page 24: Using The Single Stitch/Securing Function With The Handles
Setting up the machine Using the single stitch/securing function with the handles The «Single stitch/securing» funciton combines the following functions: • Pull the bobbin thread upward with a single stitch. • Sew a programmed number of securing stitches. Prerequisite: • A button of the handles is programmed with «Single stitch/securing». -
Page 25: Needle And Stitch Plate
Setting up the machine 2.5 Needle and stitch plate Adjusting the needle stop up/down You can adjust the position in which the needle should be when the machine stops with «Needle stop up/ down». > To alter the needle stop position, tap «Needle stop up/down». Display Needle stop position Needle stops up. -
Page 26: Changing The Stitch Plate
Setting up the machine > Loosen the fixing screw. > Pull the needle away in a downward direction. > Insert the new needle with the flat side to the rear. > Slide the needle upwards as far as it will go. >... -
Page 27: Bobbin Thread
2.6 Bobbin thread Winding the bobbin > Place the empty bobbin on the spool axis such that the BERNINA label on the bobbin is not visible. > Place the spool on the right spool pin. > Insert the thread first in the eyelet positioned vertically above the spool and then in the right rear eyelet of the thread guide. - Page 28 Setting up the machine > Press the lever down. – The machine winds. Simultaneously, the display window «Set winding speed» will appear. > If required, adjust the winding speed. – The value set will be displayed. – As soon as the bobbin is full, the machine will stop. >...
-
Page 29: Threading The Bobbin Thread
Setting up the machine Threading the bobbin thread > Open the hook cover. > Hold the latch of the bobbin case. > Remove the bobbin case. > Remove the bobbin from the bobbin case. > Insert a new bobbin such that the label on the bobbin is visible. >... -
Page 30: Setting The Bobbin Thread Tension
Setting up the machine > Pull the thread to ensure that the bobbin is rotating clockwise. Setting the bobbin thread tension To achieve good quilting results, the correct bobbin thread tension is important. Each time you replace the bobbin thread, check whether the bobbin thread tension is 220 mN. Required parts and tools: •... - Page 31 Setting up the machine > Pull on the thread steadily and read the thread tension. > To reduce the thread tension, turn the larger screw on the bobbin counterclockwise. > To increase the thread tension, turn the larger screw on the bobbin clockwise. >...
-
Page 32: Inserting The Bobbin Case
> If you are using pre-wound bobbins, enter and confirm the indicated thread quantity in yards. > If you are using self-wound BERNINA bobbins, take the thread quantity of a full bobbin from the table in the appendix, and enter and confirm the value. (see page 73). -
Page 33: Upper Thread
Setting up the machine 2.7 Upper thread Threading preparation > Raise the needle. > IMPORTANT: Raise the presser foot. – The thread tension is released. The thread can be inserted without resistance. Threading the upper thread Place cross-wound spools and cones on the vertical spool pin. For smaller spools or parralel-wound spools, use the horizontal spool pin (optional accessory). - Page 34 Setting up the machine > Hold the thread above the lower thread guide with your left hand, pull it with your right hand in the direction of the arrow through the thread guide (4) and guide it through the slot (5) above the service door to the right-hand side of the machine.
- Page 35 Setting up the machine > Guide the thread up and thread into the take-up lever (8) from the back to the front. > Guide the thread down, first into the slot of the thread guide (9) underneath the service door, then from the right into the thread guide on the needle bar (10).
- Page 36 Setting up the machine > Pull the thread from left to right in front of the hook (12) and the needle and through the thread guide until it catches on the wire hook. > Slowly release the lever and the thread simultaneously. –...
-
Page 37: Threading The Twin Needle
Setting up the machine > Pull the thread over the thread cutter (13) from the back to the front, then cut. Check whether the thread is correctly positioned in the thread tension unit. > Lower the presser foot. > Pull the end of the thread. –... - Page 38 Setting up the machine Required parts and tools: • Manual therader Threading the left thread Prerequisite: • The twin needle is inserted. • Needle ist raised. • Presser foot is raised. IMPORTANT: The thread can be inserted between the thread tension discs. >...
- Page 39 Setting up the machine > Insert the thread first in the eyelet positioned vertically above the spool and then in the front left eyelet of the thread guide. > First, guide the thread on the left-hand side of the machine through the upper right thread guide, then pull in the direction of the arrow through the lower thread guide.
- Page 40 Setting up the machine > Guide the thread straight to the thread guide and down. > Open the service door and check whether the thread is positioned between the two front thread tension discs. If not, repeat the previous step. >...
- Page 41 Setting up the machine > Place the thread into the slot of the manual threader. > Thread it into the right needle using the needle threader.
-
Page 42: Settings
Settings Settings 3.1 Overview Setup-Program > Tap «Home». > Tap «Setup Pogram». «Securing stitches» «Setting Sound» «Personal settings» «Machine settings» «Monitoring functions» «Needle laser pointer» 3.2 Selecting the language > Tap «Home». > Tap «Setup Pogram». > Tap «Machine settings». -
Page 43: Setting Up The Screen
> Tap «Home». > Tap «Setup Pogram». > Tap «Personal settings». > Select the desired color (2) and pattern (3) for the screen background. The welcome message (1) is displayed above the BERNINA logo while the machine is starting up. -
Page 44: Adjusting The Screen Brightness
Settings > Tap «Welcome text». – The current welcome message will be displayed. > To completely delete the welcome message, tap the text field. > Enter the text of your choice and confirm your entry. Adjusting the screen brightness > Tap «Home». >... -
Page 45: Setting Sounds
Settings > Tap «Machine settings». > Tap «Screen settings». > Switch the sewing light on or off and adjust the brightness in the bottom section of the screen (2). 3.5 Setting sounds The machine can emit different sounds: Sounds to indicate when functions are selected and a warning sound when sewing too fast in BSR mode. -
Page 46: Adjusting The Needle Laser Pointer
Settings 3.6 Adjusting the needle laser pointer Please note: The needle laser pointer is available as optional accessory. The settings for the needle laser pointer only apply if the needle laser pointer is installed. Refer to the needle laser pointer manual for more information. -
Page 47: Setting The Securing Stitches
Settings > Switch the upper thread monitor (1) on or off. > Switch the bobbin thread monitor (2) on or off. 3.8 Setting the securing stitches > Tap «Home». > Tap «Setup Pogram». > Tap «Securing stitches». > Set the desired number of securing stitches. 3.9 Adjusting the upper thread tension >... -
Page 48: Managing User Profiles
Settings 3.10 Managing user profiles Personal settings can be saved in up to five user profiles. Creating a user profile > Tap «User profile» on the sewing screen. > To create a new user profile, tap «Plus». > Adjust the upper thread tension. >... -
Page 49: Selecting A User Profile
3.12 Quilting modes Your quilting machine has three BSR quilting modes and a manual mode available. BSR stands for BERNINA Stitch Regulator. The BSR ensures uniform stitch lengths, no matter how quickly you move the machine. To achieve uniform stitch lengths, two optical sensors in the stitch plate measure the movement of the fabric in relation to the stitch plate. -
Page 50: Displaying The Total Number Of Stitches
Settings • SPI 1: One stitch per inch • SPI 2: Two stitches per inch • SPI 4: Four stitches per inch Manual mode (MAN) In manual mode, the BSR is switched off. The stitch lengths depend on how fast the machine is being moved. -
Page 51: Saving Service Data
> To enter the telephone number for your specialist BERNINA dealer, tap «Phone number». > Enter and confirm the telephone number of the dealer. > To enter the website or the e-mail address of your specialist BERNINA dealer, tap «E-mail address». > Enter and confirm the IP address of the dealer. -
Page 52: Restoring Factory Settings
Settings 3.16 Restoring factory settings > Tap «Home». > Tap «Setup Pogram». > Tap «Machine settings». > Tap «Factory setting». > To restore the factory settings, tap «Confirm». -
Page 53: Tips For Problem-Free Quilting
High quilting quality is not achievable with embroidery threads or other threads. These threads can break often. Several thread types are suitable for quilting with your BERNINA Q 24: • High-quality cotton threads that can withstand the high speeds of longarm quilting are made from Egyptian cotton. -
Page 54: Using A Spool Disc
Tips for problem-free quilting What do the numbers/initials in the needle name mean? 130 = Shank length (1) 705 = Flat shank (2) H = Needle scarf (3) Q = Point type (here, for instance, a thin point) (4) 70 = Needle size (shank diameter) (5) Needle selection Needle and thread must be ideally matched. -
Page 55: Using A Spool Net
Tips for problem-free quilting On the horizontal spool holder The horizontal spool holder is available as optional accessory. > Place a spool disc on the horizontal spool holder. > Place the spool on the spool holder. > Place the second spool disc on the horizontal spool holder such that there is a little clearance between the spool discs and the spool. -
Page 56: Preparing To Work On A Quilt
Preparing to work on a quilt Preparing to work on a quilt 5.1 Loading the frame Requirements for good quilting results The preparation of the fabric is extremely important for a beautiful quilting result. • All corners must be exactly rectangular. •... -
Page 57: Basting Quilt Layers
Preparing to work on a quilt 5.2 Basting quilt layers To prevent the quilt from shifting during quilting, it must be basted on the top edge and on both sides. Baste the quilt as close to the edge as possible so that the basting stitches are not visible after the quilt is bordered. Basting the upper edge >... -
Page 58: Practical Quilting
Practical quilting Practical quilting 6.1 Standard procedure for quilting To start quilting > Place the starting point under the needle. > To pull the bobbin thread up, sew one stitch. Move the machine a little to the side and pull on the upper thread until the bobbin thread comes up. >... -
Page 59: Care And Maintenance
The current version of the machine software will be displayed. Updating firmware Downloading an update You can download the latest firmware version from www.bernina.com and set it up according to the firmware update installation instructions, which you can likewise find on the website. Perform firmware update Prerequisite: •... -
Page 60: Starting The Service Programm
The Service Program allows the service technician to fix errors and to readjust individual functions. Along with the diagnostic instructions in the service manual, the service program is accessible and usable for diagnosis by the user and remote diagnosis. The BERNINA specialist dealer can check the functions and give support for troubleshooting. -
Page 61: Machine
Care and maintenance > Touch the icon «Service Program». > Settings in the service program can be carried out according to the service manual. 7.2 Machine Cleaning the screen > Wipe the screen with a soft, slightly damp microfiber cloth. Calibrating the screen Damage to the screen caused by a sharp object NOTICE... -
Page 62: Cleaning The Bobbin Case
Care and maintenance > To calibrate the front screen, tap «Calibrating the front screen» (1). – A cross will be displayed on the screen. > Tap the middle of the cross with a blunt object. – Further crosses will be shown on the screen one by one in different positions. >... -
Page 63: Cleaning The Hook
Care and maintenance > The brake spring must be inserted into the bobbin case as illustrated. – The inner loop of the brake spring (1) must be higher than the outside. – The opening (2) of the brake spring must face in the same direction as the opening of the bobbin case. -
Page 64: Lubricating The Machine
> Remove the stitch plate. > Turn the handwheel until the hook race is visible and accessible. > Add one drop of BERNINA oil to the hook race. > Turn the handwheel two to three times, so that the oil can spread. -
Page 65: Quilting Frame
Care and maintenance 7.3 Quilting frame Checking and cleaning the frame Over time the frame may settle and the structure should be checked periodically for proper leveling. > Using a spirit level, make sure the frame is level front to back and left to right. >... -
Page 66: Errors And Faults
Errors and faults Errors and faults 8.1 Error messages Error messages Explanation Remedy The needle is not in top position. > Press the handwheel inward and turn counterclockwise. Upper thread used up. > Fit and thread a new upper thread cone. Response from bobbin thread >... - Page 67 > Clean/lubricate the machine according to instructions. lubricating. Insufficient free space on the There is not enough free capacity > Make sure that the BERNINA USB stick (optional BERNINA USB stick (optional on the BERNINA USB stick accessory) is used.
-
Page 68: Troubleshooting
> Reduce/increase the upper thread tension. loose. > Check the bobbin thread tension with the Bobbin thread tension gauge. Needle blunt or bent. > Use a new BERNINA quality needle. Needle substandard. > Use a new BERNINA quality needle. Thread substandard. > Use quality thread. - Page 69 Substandard or old thread. > Use quality thread. Stitch hole or hook tip damaged. > Get in contact with the specialist BERNINA dealer. Bobbin thread tension too high. > Increase the upper thread tension, or adjust the bobbin Lower thread breaks thread tension with the bobbin thread tension gauge.
- Page 70 Power switch to «0». > Set the power switch to «I». Machine not running > Get in contact with the specialist BERNINA dealer. Light switched off in the Setup > Switch on the sewing light. (see page 44) Neither the sewing light nor Program.
-
Page 71: Technical Specifications
Technical specifications Technical specifications Designation Value Unit Throat space 24 (610) inch (mm) Maximum sewing speed 2200 spm / rpm Weight Input voltage 100-240 Protection class (electrical engineering) -
Page 72: Storage And Disposal
If the machine is no longer required, dispose of it in an environmentally friendly way in accordance with the national guidelines or take it to the nearest BERNINA specialist shop. Do not dispose of the machine in the household waste. -
Page 73: Appendix
Appendix 11 Appendix 11.1 Amount of bobbin thread Thread Thread type Thread weight Thread quantity of a full BERNINA bobbin (yards) Superior Bottom Line 100 % polyester So Fine 50 100 % polyester So Fine 40 100 % polyester So Fine 30 100 % polyester Fantastico 100 % polyester... - Page 74 Appendix Thread Thread type Thread weight Thread quantity of a full BERNINA bobbin (yards) Mettler Silk Finish #50 100 % cotton Silk Finish #60 100 % cotton Seracor 100 % polyester dtex 139/2 FilTec Glide 100 % polyester Cairo quilt 100 % cotton Cairo quilt 100 % cotton...
-
Page 75: Index
Index Index Accessories ................ 15 Handles Activate/deactivate function.......... 17 Programming the handle buttons ........ 22 Bobbin case .............. 32, 62 Lubricating the machine............ 64 Cleaning ................. 62 Inserting................ 32 Navigation ................ 17 Bobbin thread............... 27 Needle Level indicator.............. 32 Changing................ 25 Pulling upward.............. - Page 76 Index Software version .............. 59 Sound settings .............. 45 Spool disc ................ 54 Spool net ................ 55 Stitch counter ............... 20 Storing the machine.............. 72 Thread selection.............. 53 Threading ............... 29, 33, 37 Bobbin thread .............. 29 Preparation .............. 33 Twin needle ..............
- Page 78 BERNINA International AG | CH-8266 Steckborn Switzerland | www.bernina.com | © Copyright by BERNINA International AG 1048015.00A.04 2020-09 EN...
Need help?
Do you have a question about the Q Series and is the answer not in the manual?
Questions and answers
can I update an existing user profile
No, you cannot update an existing user profile. You can only create a new profile with altered settings or delete an existing one.
This answer is automatically generated