Table of Contents
Advertisement
In choosing BERNINA, you are assured of years of rewarding sewing.
For over 100 years my family has concentrated on providing complete satisfaction to our
customers. And it is my personal wish to continue this tradition of offering you
"Welcome to
Swiss precision engineering combined with state of the art technology and an after sales service
second to none.
the BERNINA
The new BERNINA activa 125 are characterized by a youthful appeal which is combined with a
range of added value features to give you, dear Customer, more sewing pleasure than ever before.
family"
Enjoy modern, creative sewing with BERNINA: our wide range of accessories as well as
our sewing publications brimming with imaginative ideas and practical tips all add to the joy of
sewing BERNINA style.
Any questions you have will be dealt with courteously and efficiently by our highly
trained BERNINA dealers, who will also be glad to service your sewing computer for you.
H.P. Ueltschi
Owner BERNINA
Sewing Machine Company
Fritz Gegauf Ltd.
BERNINA Sewing Machines
CH-8266 Steckborn/Switzerland
•
•
030595.50.04_0201_a125_EN
Advertisement
Table of Contents

Related Manuals for Bernina Sewing Machine


Summary of Contents for Bernina Sewing Machine
- Page 1 Swiss precision engineering combined with state of the art technology and an after sales service second to none. the BERNINA The new BERNINA activa 125 are characterized by a youthful appeal which is combined with a range of added value features to give you, dear Customer, more sewing pleasure than ever before. family”...
-
Page 2: Important Safety Instructions
• it has been dropped or damaged • it has fallen into water • Return the sewing computer to the nearest authorized BERNINA dealer or service center for examination, repair, electrical or mechanical adjustment. 030595.50.04_0201_a125_EN... - Page 3 5. Keep fingers away from all moving parts. Special care is required around the sewing needle. 6. Always use the BERNINA original needle plate. The wrong plate can cause the needle to break. 7. Do not use bent needles.
-
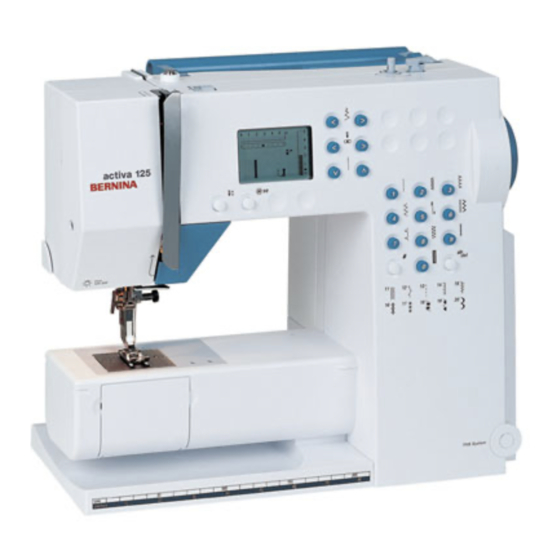
Page 4: Details Of The Sewing Computer
Details Details of the sewing computer Front view 030595.50.04_0201_a125_EN... - Page 5 Right end 1 Bobbin cover 2 Stitch plate 3 Attachment base for special accessories 4 Sewing table socket 5 Presser foot 6 Needle clamp with fixation screw 7 Thread guide 8 Thread take up cover 9 Thread path 10 Thread tension adjustment 11 Bobbin pre-tension 12 Reverse button /quick and...
- Page 6 Details Back view 030595.50.04_0201_a125_EN...
- Page 7 Left end 32 Carrying handle 33 Presser foot lifter (manual) 34 Thread cutter 35 Thread take up 36 Darning ring connection 37 Accessory box connection 38 Thread tension disc 39 Rear thread guide 40 Horizontal spool pin Sewing computer with Accessory box Accessory box 030595.50.04_0201_a125_EN Details...
-
Page 8: Setting Up The Sewing Computer
B • the sewing speed can be regulated by hand to interrupt or stop sewing = • press start-stop-button A again Note: If the foot control is connec- ted with the sewing machine, the Start-stop-unit is out functions. -
Page 9: Accessory Box
Accessory box** Free standing accessory box pull both feet out until they click into • place stand box in chosen position • Storing accessories Standard accessories are supplied in a plastic bag. The box is equipped with one small and one large drawer (B and C) as well as com- partments for bobbin holders D and presser feet E. -
Page 10: Foot Control
Setting up the sewing computer Power cable The power cable plug A into sewing computer • plug B into wall socket • Foot control cable plug C into sewing computer • Important! (USA/Canada only) This sewing computer has a polarized plug (one blade wider than the other). -
Page 11: Sewing Table
Sewing table* Increases the sewing surface. To attach raise the needle and presser • foot place the table over the free • arm and press firmly so that it engages on the fixing cam * available as a special accessory Free-Hand-System (FHS) presser foot lifter* (knee-operated) Attaching the presser foot lifter... -
Page 12: Winding The Bobbin
Setting up the sewing computer Winding the bobbin Winding the bobbin turn power switch on following the direction of the arrow take thread through the rear • • place empty bobbin on guide and round the pre-tension stud • spindle wind it several times round the empty bobbin •... -
Page 13: Bobbin Case
Bobbin case To remove the bobbin case To insert the bobbin case raise the needle hold the bobbin case latch • • turn power switch to «0» the finger on the case should • • open the bobbin cover point upwards •... -
Page 14: Inserting The Bobbin
Setting up the sewing computer Inserting the bobbin Insert the bobbin Pull the thread counter clock- Insert the bobbin so that the wise into the slot. thread runs clockwise. Changing the needle Removing the needle raise the needle • turn power switch to 0 •... -
Page 15: Changing The Presser Foot
Changing the presser foot Changing the presser foot Attaching the presser foot sole sole raise the needle and the place the presser foot sole • • presser foot shaft under the shaft so that the turn power switch to «0» peg sits under the opening of •... -
Page 16: Threading The Upper Thread
Setting up the sewing computer Threading the upper thread raise the needle and presser foot • turn the power switch to 0 • place spool on pin and attach the appropriate • spool disc (diameter of spool = disc size) take thread through rear guide A •... -
Page 17: Bringing Up The Lower Thread
Bringing up the lower thread hold the upper thread • sew one stitch • pull the upper thread until the bobbin thread appears • in the stitch plate hole pull bobbin thread out of the hole and insert both • threads through the slit in the presser foot towards the back pull threads over the cutter •... -
Page 18: Stitch Plate
Setting up the sewing computer Stitch plate Feed-dog Stitch plate markings the stitch plate is marked with seam guide lines in mm and inches • the millimetre markings are at the front • the inch markings are at the back •... -
Page 19: Thread Tension
Thread tension The basic setting is indicated when the red line on the tension • adjustment wheel is in line with the marking A the tension does not need adjusting for normal • sewing work for special sewing work, the tension can be •... -
Page 20: General Instructions
Operating instructions General instructions Main switch to 1 the sewing sewing computer is ready to sew • The screen shows 1 stitch width basic setting blinks constantly 2 stitch length basic setting blinks constantly 3 needle position (9 positions) 4 needle stop up/down (generally up) 5 stitch number 1 (straight stitch) 6 presser foot number 1 indicator (recommended foot for selected stitch) -
Page 21: Operating Instructions
Stitch* selection stitches 1–10: • touch the number of your choice; stitch number and basic width and length settings appear Note: touch 0 to select stitch number 10 (standard buttonhole) stitches 11–20: • touch #-button and the appropriate number * see p. 25 for the complete stitch selection Stitch width left button = narrow the stitch width •... - Page 22 Operating instructions Functions Functions are ... activated when the symbol appears on the screen. deactivated when the symbols no longer appear on the screen. Reverse sewing quick reverse: press button • Sewing computer sews reverse until button • is released (max. stitch length 3 mm) Applications: programming buttonholes •...
- Page 23 Balance Your sewing computer has been tested and factory set using a double layer of cretonne fabric and Metrosene 100/2 threads (Arova Mettler, Switzerland). Note: Normal position If the balance has been adjusted, return it to the normal setting once sewing is completed.
-
Page 24: Presser Feet
Presser feet Presser foot selection (snap-on system) Presser foot shaft Reverse pattern sole for snap-on soles Practical stitches Decorative stitches Buttonhole sole Zip sole Buttonholes Sewing in zips Sewing close along raised seam Overlock sole Vari-overlock seam Vari-overlock hem Oversewing seam edges Blind stitch sole Blind hemming Edge stitching... -
Page 25: Stitches
Stitches Practical and decorative 1 Straight stitch 2 Zig-zag 3 Vari-overlock 4 Running stitch 5 Securing stitch 6 Triple straight and zig-zag 7 Blind stitch 8 Double overlock 9 Super stretch stitch 10 Standard buttonhole 11 Darning program 12 Gathering stitch Quilting- and Decorative stitches 13–15 Quilting stitches 16–20 Decorative stitches... - Page 26 Stitches Stitch selection 1 Straight stitch 2 Zig-zag 3 Vari-overlock 4 Running stitch 5 Securing stitch 6 Triple straight and triple zig-zag 7 Blind stitch 8 Double overlock 9 Super stretch All non-stretch fabrics. All straight stitch work Most fabric types; all simple zig-zag such as oversewing fine fabrics.
- Page 27 10 Standard buttonhole 11 Darning program 12 Gathering stitch Fine to medium weight woven fabrics; blouses, shirts, trousers, bedlinens, etc. Automatic darning for fine and medium weight fabrics Most types of fabric. Gahering with shirring elastic. Butted seams = butting two pressed edges and sewing together. 030595.50.04_0201_a125_EN Stitches...
-
Page 28: Straight Stitch
Selected practical stitches: Straight stitch Straight stitch Stitch: Straight stitch No. 1 Needle: size and type suitable for the fabric selected (see p. 42) Thread: cotton/polyester Feed-dog: up (sewing position) Presser foot: Reverse pattern foot No. 1 Straight stitch (A) The sewing computer is ready to sew as soon as you switch on The screen shows Stitch No. -
Page 29: Securing Program
Securing program Stitch: Securing program No. 5 Needle: size and type suitable for the fabric selected (see p. 42) Thread: cotton/polyester Feed-dog: up (sewing position) Presser foot: Reverse pattern foot No. 1 Securing program for all fabrics • secures seam begin and end •... -
Page 30: Zig-Zag Stitch
Selected practical stitches: Zig-zag stitch Zig-zag stitch Stitch: Zig-zag No. 2 Needle: size and type suitable for the fabric selected (see p. 42) Thread: cotton or polyester Feed-dog: up (sewing position) Presser foot: Reverse pattern foot No. 1 Zig-zag stitch for all fabrics for neatening edges for decorative work... -
Page 31: Blind Hem
Blind hem Stitch: Blind hem No. 7 Needle: size and type suitable for the fabric selected (see p. 42) Thread: cotton or polyester Feed-dog: up (sewing position) Presser foot: Blind stitch foot No. 5 Blind hem for «invisible» hems in medium to heavy cotton, wool and blended fabrics Preparation neaten raw edges... -
Page 32: Darning Program
Selected practical stitches: Darning Darning program Stitch: Darning Program No. 11 Needle: size and type suitable for the fabric selected (see p. 42) Thread: darning thread Feed-dog: up (sewing position) Presser foot: Reverse pattern foot No. 1 Quick darning of holes or worn areas Replacement of damaged fibres/threads Darning with Reverse pattern foot No. -
Page 33: Zippers
Zippers Stitch: Straight stitch No. 1 Needle: size and type suitable for the fabric selected (see p. 42) Thread: cotton or polyester Feed-dog: up (sewing position) Presser foot: Zipper foot No. 4 Needle position: far right or far left Preparation: baste in zipper •... -
Page 34: Manual Buttonhole
Selected practical stitches: Buttonholes Manual buttonhole Buttonholes are not only practical closures, they can also be used to decorative effect Select the buttonhole stitch No. 10; the following appears on the screen: Mark the length of 1 Buttonhole number buttonholes 2 Buttonhole symbol (blinks) mark the buttonhole length in •... - Page 35 Stitch: Buttonhole No. 10 Needle: size and type suitable for the fabric selected (see p. 42) Thread: cotton or polyester Feed-dog: up (sewing position) Presser foot: Buttonhole foot No. 3 Preparation select the buttonhole (stitch No. 10) • screen shows the buttonhole number (10), the presser foot No. 3 •...
-
Page 36: Buttonhole With Gimp
Selected practical stitches: Buttonholes Buttonhole with gimp Gimp Hooking the cord onto presser gimp cord reinforces button- foot No. 3 • holes and enhances their insert the needle at the • appearance beginning of the buttonhole the loop of the cord should raise the presser foot •... - Page 37 Securing the cord Cutting buttonholes open pull the cord through the with the seam ripper • buttonhole use the back of the seam • pull cords through to back of ripper to nick the stitches • fabric cut from both ends towards •...
-
Page 38: Handlook Quilt Stitch
Selected practical stitches: Handlook quilt stitch Handlook quilt stitch Stitch: Quilt stitch No. 13 Needle: size and type suitable for the fabric selected (see p. 42) Upper thread: monofilament Bobbin thread: 30/2 cotton thread Feed-dog: up (sewing position) Presser foot: Reverse pattern foot No. -
Page 39: Vari-Overlock Seam
Vari-overlock seam Stitch: Vari-overlock No. 3 Needle: size and type suitable for the fabric selected (see p. 42) Thread: cotton or polyester Feed-dog: up (sewing position) Presser foot: Overlock foot No. 2 or Reverse pattern foot No. 1 Overlock foot No. 2 is specially designed for overlock stitches. The pin on the foot produces more thread in each stitch so that the elasticity of the seam is maintained. -
Page 40: Double Overlock Seam
Selected practical stitches: Overlock seams Double overlock seam Stitch: Double overlock No. 8 Needle: size and type suitable for the fabric selected (see p. 42) Thread: cotton or polyester Feed-dog: up (sewing position) Presser foot: Overlock foot No. 2 or Reverse pattern foot No. -
Page 41: Ribbing With Overlock Seam
Ribbing with overlock seam Stitch: Vari-overlock No. 3 Needle: size and type suitable for the fabric selected (see p. 42) Thread: cotton or polyester Feed-dog: up (sewing position) Presser foot: Overlock foot No. 2 or Reverse pattern foot No. 1 Overlock foot No. - Page 42 Important facts about sewing computer needles Sewing computer, needle and thread Your BERNINA uses needle system 130/705H. Needle and thread The most commonly sold needles are nos. 70 –120. The finer the needle, the lower the number. The table shows which needle is suitable for which threads.
- Page 43 Needles, Threads Needle and fabric Condition of needle The needle must be in perfect condition. Problems can occur with damaged needles. bent needle blunt needle hooked needle 030595.50.04_0201_a125_EN...
- Page 44 Needles Special materials are easier to sew if the appropriate needle is used. Special needles are available at your BERNINA dealer. Needle table Description Needle point Standard 130/705 H Normal point, needle slightly rounded Special 130/705-SES Fine ball point needles...
-
Page 45: Feed-Dog And Fabric Feed
Feed-dog and fabric feed Feed-dog and stitch length With each stitch the feed-dog moves forward by one step. The length of this step is determined by the stitch length selected. With an extremely short stitch length, the steps are also short. The fabric moves under the foot quite slowly, even at full sewing speed. -
Page 46: Needle, Thread, Fabric Feed
Needle, thread, fabric feed Feed-dog and fabric feed with compensating plates The feed-dog can work If the foot is at an angle, e.g. normally when the foot is level. when sewing over thick to thin or vice-versa, the feed-dog cannot grip and feed the fabric and the fabric hangs up. - Page 47 Cleaning If the sewing computer is stored in a cold room, it should be brought to a warm room about one hour before use. Cleaning Clean the sewing computer after every use turn power switch to 0 • remove presser foot and needle •...
-
Page 48: Sewing Light
Cleaning and maintenance Sewing light Replacing the bulb turn power switch to «0» remove the cover by lifting it • • loosen the screw slightliy and detaching from • the top remove the bulb • insert the new bulb • replace cover and tighten •... -
Page 49: Trouble Shooting
Use the correct spool disc. The needle is blunt or bent. • • Stitch plate or hook tip • damaged. Take your sewing computer to your BERNINA dealer. Skipped stitches Wrong needles used. Use only • 130/705H system. The needle is blunt, bent or •... - Page 50 Index Accessory box 9 Balance 23, 34 Blind hem 31 Bobbin 12 Bobbin case 13 Bobbin thread cutter 13 Bringing up the lower thread 17 Buttonholes 34– 37 Buttonhole with gimp 36 • Manual buttonhole 34 • Changing the needle 14 Changing the presser foot 15 Cleaning 47, 48 Compensating plates 46...
-
Page 51: Table Of Contents
Ribbing with overlock seam 41 Reverse sewing 22 Screen shows 20 Seam guide 11 Securing program 29 Selected practical stitches 28–41 Sewing light 48 Sewing computer needles 42 Spool pin 15 Standard accessories 8 Standard buttonhole 35 Stitch length 21 Stitch plate 18 Stitch width 21 Stitch selection 21... - Page 52 Contents Details Setting up the sewing computer Operating instructions Presser feet Stitches Selected practical stitches: • Straight stitch • Securing program • Zig-zag stitch • Blind hem • Darning program • Zippers • Buttonholes • Handlook quilt stitch • Overlock Needle, Thread, Fabric Feed Cleaning, Maintenance, Troubleshooting Index...
Need help?
Do you have a question about the Sewing Machine and is the answer not in the manual?
Questions and answers
The needle is bending when it goes down into shuttle, instead of connecting with the bobbin thread.