Table of Contents
Advertisement
Quick Links
Contents
Introduction .................................................... 1
Important Information Before Use ................... 2
Product Identification ...................................... 3
Model: MBP75SN
Description of LCD Display............................. 4
Battery Installation ......................................... 5
System Requirement...................................6
Overview of Hubble App..............................7
... 15
Tips for Measuring Human Temperature ...... 16
Measuring Human Temperature ................... 17
Measuring Object/Liquid Temperature .......... 18
Memory Function ......................................... 19
Cleaning and Disinfecting ............................. 20
Error Codes ................................................. 21
Technical Specification................................. 22
INSTRUCTION MANUAL
Please read this instruction manual carefully
before using your forehead thermometer
Advertisement
Table of Contents

Related Manuals for Avita MBP75SN


Summary of Contents for Avita MBP75SN
-
Page 1: Table Of Contents
Contents Introduction ............ 1 Important Information Before Use ....2 Product Identification ........3 Model: MBP75SN Description of LCD Display......4 Battery Installation ......... 5 System Requirement……………………………..6 Pairing the Thermometer to Your Mobile Device Overview of Hubble App………………………...7 ... 15 Switching Between 4 Kinds of Measuring Mode Tips for Measuring Human Temperature .. -
Page 2: Introduction
Introduction Important Information Before Use When using this product, please be sure to follow all the notes Utilizing infrared technology, this thermometer takes listed below. Any action against these notices may cause temperatures in seconds by measuring heat generated by the injury or affect the accuracy. -
Page 3: Product Identification
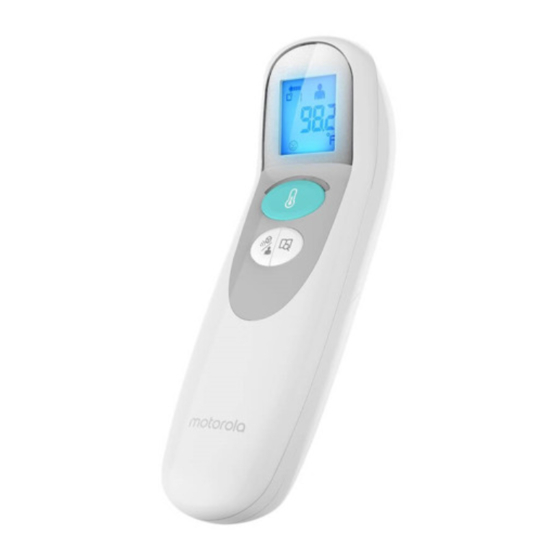
Product Identification Description of LCD Display LED Light Human/Object Button LCD Display Power/Measure Button 4 user profiles Memory Button Memory symbol Infrared Sensor Bluetooth symbol (lights up when thermometer is connected to the Distant Sensor smartphone) Low battery symbol Buzzer “Forehead temperature”... -
Page 4: Battery Installation
Battery Installation System Requirement Low battery warning: Smartphones/Tablets: Android™ and iOS® only. When the battery power becomes low, the low battery symbol will appear on the display. The thermometer can still be used System Requirements: iOS® 8.0, Android™ 4.2 or above during this time, but the batteries should be replaced as soon For more information, please visit: as possible. -
Page 5: Pairing The Thermometer To Your Mobile Device
Pairing the Thermometer to Your Mobile Device Download the “Hubble Connect for Smart Nursery” app Launch the set-up wizard and follow the steps to create a user 1. Go to the Google Play™ Store to search for Hubble Connect for Smart Nursery. profile and add the thermometer. - Page 6 Tap on the Smart Touchless Forehead Thermometer to enter Follow “Step 1”. Make sure that your thermometer is switched on thermometer set-up mode. (Picture A3) then press Next. (Picture A5) Tap Skip to set-up or scroll to review features. (Picture A4) Follow “Step 2”.
- Page 7 Searching for your device (Picture A7) Pairing the thermometer with your smart device. (Picture A9) Found your device. Please press on “MBP70-XXX”. (Picture You have now successfully paired the thermometer with your smart device. Tap “Continue” (Picture A10)
-
Page 8: Overview Of Hubble App
Overview of Hubble App User guide screen. (Picture A11) Overview of the Hubble App Total of 4 To create and add profiles the profile Indicates that the Online thermometer is connected to the smartphone. Indicates that the Offline thermometer is not connected to the smartphone. -
Page 9: Switching Between 4 Kinds Of Measuring Mode
Switching between 4 Kinds of Measuring Mode Tips for Measuring Human Temperature 1. Under power on status, you can press the Human/Object Button to switch different measuring mode. There are 4 Bear in mind that the thermometer needs to have been in the kinds of mode which including Human, Object, room in which the measurement is taken for at least 30 Human/Night, and Object/Night Mode (in order). -
Page 10: Measuring Object/Liquid Temperature
Measuring Human Temperature Measuring Object/Liquid Temperature 3. Position the thermometer around 0.5-3cm from the center 1. Press the “Measure Button” to turn the thermometer on. All of the patient's forehead with the sensor aimed between symbols on the display will momentarily appear. the eyebrows. -
Page 11: Memory Function
Memory Function Cleaning and Disinfecting For home use device disinfection, 70% Ethanol or Isopropyl Memory Recall: alcohol(available in the pharmacy) can be used. There is a total of 4 users; each user can store 50 sets of - Clean the measuring sensor after each use. Use a clean memory data for recording forehead temperature cloth or cotton bud that can be moistened with 70 % alcohol. -
Page 12: Error Codes
Error Codes Operating the Bluetooth function • Measuring range : When a malfunction or incorrect temperature measurement occurs, an error message will appear as described below. Human Body : 34°C~43°C Object : 0.1°C~99.9°C LCD Display Cause Solution • Calibration Accuracy: The temperature Human Body : measured is higher than... - Page 13 FEDERAL COMMUNICATIONS COMMISSION Canada, Industry Canada (IC) Notices INTERFERENCE STATEMENT This device complies with Canada licence-exempt RSS This equipment has been tested and found to comply with the standard(s). Operation is subject to the following two conditions: limits for a Class B digital device, pursuant to part 15 of the FCC (1) this device may not cause interference, and (2) this device Rules.
- Page 14 MDSS GmbH Schiffgraben 41 30175 Hannover Germany Manufacture: AViTA Corporation 9F., No. 78, Sec. 1, Kwang-Fu Rd., San-Chung Dist., New Taipei City, Taiwan(R.O.C) Made in P.R.C P-200191 2020-06...
Need help?
Do you have a question about the MBP75SN and is the answer not in the manual?
Questions and answers