Advertisement
Scan for full manual
Step 1: Check what's in the box
KN-100 Kramer Network Server
2 Power cord types (US + European)
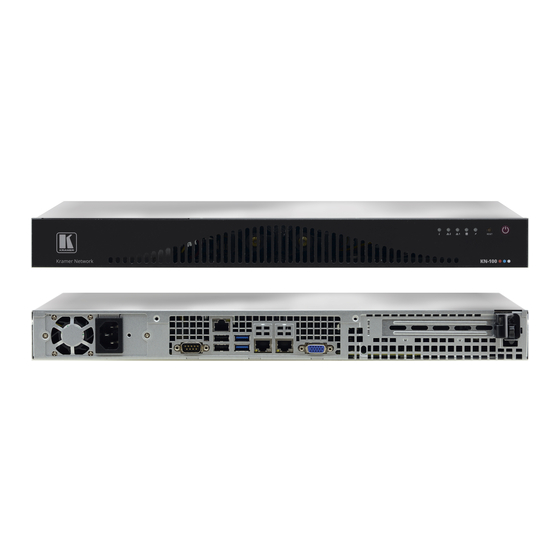
Step 2: Get to know your KN-100
#
Feature
1
Indicator LEDs
2
Reset Button
3
Power Button
4
Power Socket
5
RS-232 9-pin D-sub Connector
6
USB 2.0 Ports (2)
7
IPMI (Intelligent Platform Management
Interface) LAN RJ-45 Connector
8
USB 3.0 Ports (2)
9
LAN 1 ETHERNET RJ-45 Connector
10
LAN 2 ETHERNET RJ-45 Connector
11
VGA 15-pin HD Port
KN-100 Quick Start (P/N: 2900-300958QS REV 1)
KN-100 Quick Start Guide
This guide helps you install and use your KN-100 for the first time.
Go to
www.kramerav.com/downloads/KN-100
upgrades are available.
Function
Press to reboot the system.
Press to toggle setting the device to standby mode / turning the device on.
To turn the power off, disconnect the power connector from the mains.
Connect to the power cord and to the mains electricity.
Connect to a system controller.
Connect to a keyboard and mouse (if required).
N/A
Connect to USB devices.
Connect to the Ethernet.
Connect to the Ethernet.
Connect to a display.
to download the latest user manual and check if firmware
1 Set of rack ears
1 Quick start guide
Flashes to indicate fan failure.
Lights continuously to indicate system overheat.
Flashes when there is network activity on LAN port 2.
Flashes when there is network activity on LAN port 1.
Flashes to indicate hard drive activity.
Lights when the device is powered.
P/N:
2 9 0 0 - 3 0 0 9 5 8 QS
Rev:
1
Advertisement
Table of Contents

Related Manuals for Kramer KN-100


Summary of Contents for Kramer KN-100
- Page 1 KN-100 Quick Start Guide This guide helps you install and use your KN-100 for the first time. Go to www.kramerav.com/downloads/KN-100 to download the latest user manual and check if firmware Scan for full manual upgrades are available. Step 1: Check what’s in the box...
- Page 2 Step 4: Connect the inputs and outputs Always switch OFF the power on each device before connecting it to your KN-100. For best results, we recommend that you always use Kramer high-performance cables to connect AV equipment to KN-100.
Need help?
Do you have a question about the KN-100 and is the answer not in the manual?
Questions and answers