Table of Contents
Advertisement
Quick Links
Advertisement
Table of Contents

Related Manuals for UGO BASILE PAM

Summary of Contents for UGO BASILE PAM
- Page 1 P.A.M. PRESSURE APPLICATION MEASUREMENT 3 8 5 0 0 Cat. No.
- Page 3 MUST BE FOLLOWED TO ENSURE SAFE OPERATION AND TO RETAIN THE INSTRUMENT IN SAFE CONDITIONS. SERVICE AND ADJUSTMENTS SHOULD BE CARRIED OUT BY QUALIFIED PERSONNEL, AUTHORIZED BY UGO BASILE ORGANIZATION. ANY ADJUSTMENT, MAINTENANCE AND REPAIR OF THE OPENED INSTRUMENT UNDER VOLTAGE SHOULD BE AVOIDED AS MUCH AS POSSIBLE AND, WHEN INEVITABLE, SHOULD BE CARRIED OUT BY A SKILLED PERSON WHO IS AWARE OF THE HAZARD INVOLVED.
- Page 4 The new P.A.M. (Pressure Application Measurement) The operator simply wears a special force sensor on device from Ugo Basile is a novel, easy-to-use tool for his or her thumb and measures the force which elicits measuring mechanical pain threshold in experimental the animal response (normally, limb withdrawal).
- Page 5 UGO BASILE S.R.L. CHECK-LIST BIOLOGICAL RESEARCH PAM PRESSURE APPLICATION MEASUREMENT APPARATUS CLIENTE / CUSTOMER______________________________________________ Ordine No. / Order No. ____________________ Data / Date____/_____/______ Cat. 38500 P.A.M. Pressure Application Measurement UB code CAT.No. Q.ty DESCRIPTION DESCRIZIONE 38500-306 INSTRUCTION MANUAL MANUALE D’ISTRUZIONE...
-
Page 7: Table Of Contents
14 4.4.5 RASE EMORY 14 4.4.6 ACK TO 15 4.5 ONFIGURE ....................... 15 5 OTHER IMPORTANT FEATURES OF PAM ............17 5.1 ATTERY OLTAGE ARNING ................... 17 5.2 EMORY IMIT ARNING ................... 17 5.3 ALENDAR LOCK ....................... 17 ... - Page 8 UGO BASILE - I Page ii TALY CONTENTS 5.7 KIPPING THE INTRODUCTION ................... 19 6 USING THE PC SOFTWARE PROVIDED WITH PAM ........20 6.1 PAM PC TARTING THE SOFTWARE ................. 20 6.2 ONITORING TESTS ..................... 21 6.3 PAM ................... 23 ...
- Page 10 UGO BASILE - I Page iv TALY CONTENTS...
-
Page 11: General
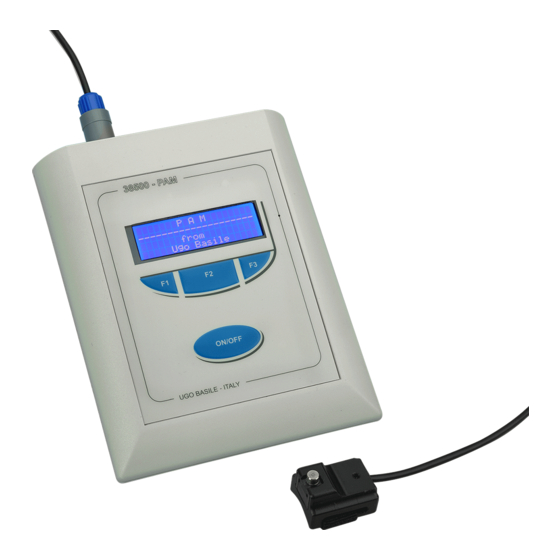
P.A.M. PRESSURE APPLICATION MEASUREMENT 3 8 5 0 0 Cat. GENERAL PAM is designed to measure and record the forces exerted on a subject’s joint, paw or muscle. Its fields of application include: Arthritis Chronic and Acute Pain Allodynia and Hyperalgesia Phenotyping and Functional Genomics PAM is battery-operated and is charged via the included USB cable. -
Page 12: Instrument Description
The rate of application of the force is decided by the operator and the PAM includes software tools that help the operator in consistently applying the force at the desired rate. The results of, typically, several thousand tests may be stored in PAM for transfer to a PC when convenient. -
Page 13: Electronic Unit
16 hours. When PAM is switched OFF, it goes into a standby mode in which it takes almost no current from the battery although it still updates its internal calendar clock. PAM is switched ON by pressing the ON/OFF button. -
Page 14: Joint Transducers (Small And Large)
Each transducer contains a memory chip which identifies the type of transducer and its specific characteristics including all relevant factory calibration information. This feature allows PAM to adjust automatically to each transducer and ensures that transducers and PAM instruments may be interchanged without the need for routine re-calibration. -
Page 15: Installation
UGO BASILE - I Page 5 TALY 38500 Instruction Manual (Rev.1) paw with a “Randall-Selitto approach“ (as shown is Figure 6). The same principle can be applied to the animal’s tail or muscles. Figure 6 “Paw Transducer” The Paw Transducer is composed by: a. -
Page 16: Charging The Internal Battery
3 hours. 3.4 Connections Plug one of the force transducers and the foot pedal into the PAM electronic unit, by using the connectors located in the back panel. 3.5 Installing the PAM Software The software provided with PAM should be installed on a suitable Windows PC, running Windows Vista or XP. -
Page 17: Operation
4.1 First time operation After charging PAM for at least 1 hour, plug in the large transducer and turn the instrument ON by pressing the ON/OFF button. Once the introduction is completed, the initial menu will appear as below. - Page 18 Test 1 Exit Test Check that no force is being applied to the connected transducer and then press Test. PAM checks the transducer zero and then displays: Measure Peak Force Apply the force NOW Apply gentle force to the transducer. The display changes to typically.
- Page 19 UGO BASILE - I Page 9 TALY 38500 Instruction Manual (Rev.1) Test 1 Peak Force 234.5gf at 3.55s of 4.30s Reject Accept Press Accept and the screen changes to: 23/07/09 14:25:43 Test 2 Exit Test Press Exit to return to:...
-
Page 20: Routine Operation Of The Instrument
4.2.3 Menu operation PAM is operated through a number of menus by pressing the three soft buttons, F1, F2 and F3 below the display. The current functions of these soft buttons are indicated by the lower line or lines of the display. -
Page 21: Urning The Instrument Off
(through the Configure menu) to any value from 2 up to 29 minutes or never. The factory default setting is never. PAM will also switch itself OFF automatically if the battery voltage falls below a critical level. 4.3 Main Menu The Main Menu is the first menu which appears when PAM is switched ON. -
Page 22: Measure Peak Force
TALY 38500 Instruction Manual (Rev. 1) The description will depend on the particular transducer which is plugged in. After a few seconds, PAM will complete an Autozero and then the following screen will be displayed. Measure Peak Force -------------------- Next... - Page 23 If the result is accepted, the results are stored in PAM’s memory and the user is given the option to finish making measurements or do another test.
-
Page 24: View Acquired Data
4.4.4 Transfer Data to PC This option allows data stored in PAM’s memory to be transferred to a PC. It requires that PAM is connected to a PC via the USB cable supplied and that the PC is running appropriate software such as the PAM PC software provided with the instrument. Detailed operation is covered later in this manual under PC Software. -
Page 25: Menu
Pressing Set config allows the user to adjust a number of configuration settings in PAM. These include options related to the measurement process such as whether the measurement is ended automatically by removing the applied force or manually by pressing the foot trigger switch but also covers more general settings such as the brightness of the display and the period of inactivity before PAM will switch itself off. - Page 26 Adjust the period of inactivity after which the display dims (never) Adjust the target force rate (120gf/s) Set current date and time – this can be set by the PAM control unit or by the PC Return to the Main Menu (by pressing Exit).
-
Page 27: Other Important Features Of Pam
At this time, PAM may still be used but the USB lead should be connected to an active PC or a USB power adapter to charge the battery as soon as possible. If the battery is so low that PAM cannot operate, then the instrument switches OFF immediately. -
Page 28: Applied Force Ratemeter
Whether the operator should be asked to indicate Left or Right limb or not (default). Whether PAM should use Subject Numbers or not (default). Whether PAM should use the applied force ratemeter during tests or display live force and time in text (default). -
Page 29: Updating The Pam Firmware
5.6 Updating the PAM firmware The hardware used in PAM is very flexible and many of PAM’s features are determined by its internal software program or firmware, as it is often called. When improvements and additions are made to the firmware, existing users may update easily to the new version. -
Page 30: Using The Pc Software Provided With Pam
PAM Software program from the Windows Start Menu. The following screen will appear If the PAM button is not showing then the USB interface in PAM has not been detected, the PAM is therefore not connected and the user should click Exit, disconnect the USB lead for a few seconds then re-connect the USB lead and run the PAM PC program again. -
Page 31: Onitoring Pam Tests
On the start screen above, click Use PAM Device and a box should appear with Waiting for PAM. The traffic lights should all be grey. If PAM is connected, during tests, to a PC which is Waiting for PAM, the PC will display the force curve while the force is applied, as shown below. - Page 32 This rate stored in the PAM controller. To change the slope on the visual display graphic side of the software, one must return to the PAM controller, toggle through the selected menus to reach the proper instructions.
-
Page 33: Downloading Data From Pam
38500 Instruction Manual (Rev.1) 6.3 Downloading data from PAM All Data Downloading is controlled by the PAM Controller, which can be thought of as the brain of the instrument. First, ensure that the PAM controller is properly connected to the PC, and that the software is working properly. -
Page 34: Analyzing Downloaded Data
Use the drive, folder and file selection boxes to select the required data file. If necessary, refer to section 7.2 for an explanation of the automatic file naming system used by PAM PC. The display of the first test stored in a typical downloaded file is shown below. - Page 35 UGO BASILE - I Page 25 TALY 38500 Instruction Manual (Rev.1) Each file may contain a large number of measurements. Use the Previous and Next buttons to scroll through all saved tests until the software shows the required test. If the left or the right mouse button is clicked in the display area of the graph, the vertical white cursor line is displayed and the force and time relating to the dark cursor (corresponding to the peak) position are displayed below the graph.
-
Page 36: Excel Files
PAM control unit), an Excel compatible .xls file is created automatically and stored in the PC. This file has the same name as the corresponding PAM data file and is stored in the same folder. The data in the Excel file consists of columns for measurement number, peak force and peak position, filled with the values for each of the tests downloaded. -
Page 37: Customer Support
38500 PAM Pressure Application Measurement, consisting of: 38500-001 Electronic Unit 38500-002 Large Joint Transducer 38500-003 Small Joint Transducer 38500-010 Software CD 38500-306 Instruction Manual 38500-323 External trigger switch Optional: 38500-006 Paw Transducer 38550 PAM, special high-pressure model for large animals... -
Page 38: Bibliography
N. J. Barton et alia: “A novel behavioural technique for measuring hypersensitivity in a rat model of joint pain” Journal of Neuroscience Methods 163: 67-75, 2007. Other Papers Mentioning UB PAM J. Leuchtweis et al.: “Validation of the Digital Pressure Application... - Page 39 N o t e s _ _ _ _ _ _ _ _ _ _ _ _ _ _ _ _ _ _ _ _ _ _ _ _ _ _ _ _ _ _ _ _ _ _ _ _ _ _ _ _ _ _ _ _ _ _ _ _ _ _ _ _ _ _ _ _ _ _ _ _ _ _ _ _ _ _ _ _ _ _ _ _ _ _ _ _ _ _ _ _ _ _ _ _ _ _ _ _ _ _ _ _ _ _ _ _ _ _ _ _ _ _ _ _ _ _ _ _ _ _ _ _ _ _ _ _ _ _ _ _ _ _ _ _ _ _ _ _ _ _ _ _ _ _ _ _ _ _ _ _ _ _ _ _ _ _ _ _ _ _ _ _ _ _ _ _ _ _ _ _ _ _ _ _ _ _ _ _ _ _ _ _ _ _ _ _ _ _ _ _ _ _ _ _ _ _ _ _ _ _ _ _ _ _ _ _ _ _ _ _ _ _ _ _ _ _ _ _ _ _ _ _ _ _ _ _ _ _ _ _ _ _ _ _...
- Page 40 N o t e s _ _ _ _ _ _ _ _ _ _ _ _ _ _ _ _ _ _ _ _ _ _ _ _ _ _ _ _ _ _ _ _ _ _ _ _ _ _ _ _ _ _ _ _ _ _ _ _ _ _ _ _ _ _ _ _ _ _ _ _ _ _ _ _ _ _ _ _ _ _ _ _ _ _ _ _ _ _ _ _ _ _ _ _ _ _ _ _ _ _ _ _ _ _ _ _ _ _ _ _ _ _ _ _ _ _ _ _ _ _ _ _ _ _ _ _ _ _ _ _ _ _ _ _ _ _ _ _ _ _ _ _ _ _ _ _ _ _ _ _ _ _ _ _ _ _ _ _ _ _ _ _ _ _ _ _ _ _ _ _ _ _ _ _ _ _ _ _ _ _ _ _ _ _ _ _ _ _ _ _ _ _ _ _ _ _ _ _ _ _ _ _ _ _ _ _ _ _ _ _ _ _ _ _ _ _ _ _ _ _ _ _ _ _ _ _ _ _ _ _ _ _ _ _...
- Page 41 N o t e s _ _ _ _ _ _ _ _ _ _ _ _ _ _ _ _ _ _ _ _ _ _ _ _ _ _ _ _ _ _ _ _ _ _ _ _ _ _ _ _ _ _ _ _ _ _ _ _ _ _ _ _ _ _ _ _ _ _ _ _ _ _ _ _ _ _ _ _ _ _ _ _ _ _ _ _ _ _ _ _ _ _ _ _ _ _ _ _ _ _ _ _ _ _ _ _ _ _ _ _ _ _ _ _ _ _ _ _ _ _ _ _ _ _ _ _ _ _ _ _ _ _ _ _ _ _ _ _ _ _ _ _ _ _ _ _ _ _ _ _ _ _ _ _ _ _ _ _ _ _ _ _ _ _ _ _ _ _ _ _ _ _ _ _ _ _ _ _ _ _ _ _ _ _ _ _ _ _ _ _ _ _ _ _ _ _ _ _ _ _ _ _ _ _ _ _ _ _ _ _ _ _ _ _ _ _ _ _ _ _ _ _ _ _ _ _ _ _ _ _ _ _ _ _...
Need help?
Do you have a question about the PAM and is the answer not in the manual?
Questions and answers