Table of Contents
Advertisement
Quick Links
Advertisement
Table of Contents

Related Manuals for V-ZUG CookTop Teppan Yaki I40


Summary of Contents for V-ZUG CookTop Teppan Yaki I40
- Page 1 Operating instructions CookTop Teppan Yaki I40 Induction hob...
- Page 2 Validity These operating instructions apply to: Model designation Type CookTop Teppan Yaki I40 CTI6T-31140 Variations depending on the model are noted in the text. © V-ZUG AG, CH-6302 Zug, 2021...
-
Page 3: Table Of Contents
Contents Product fiche ............ 18 2 Disposal 18 Safety precautions 4 Index 19 Symbols used............ 4 General safety precautions........ 4 Notes 20 Appliance-specific safety precautions .... 4 Service & Support 23 Instructions for use.......... 5 Using for the first time 7 Your appliance 7... -
Page 4: Safety Precautions
Safety precautions Symbols used Cleaning and user mainten- ance shall not be undertaken Denotes important safety precau- tions. by children without supervi- Failure to observe said precautions sion. can result in injury or in damage to ▪ If an appliance is not the appliance or fittings! equipped with a mains cable Information and precautions that... -
Page 5: Instructions For Use
1 Safety precautions ▪ Accessible parts can get hot ▪ Do not operate the appliance during use. Children under 8 using an external time switch years of age must not oper- or a separate remote control ate the appliance unless they system. - Page 6 1 Safety precautions ▪ Retain these operating instructions for Caution: Risk of injury future reference. If you sell the appli- ▪ Do not tamper inside the appliance. ance or pass it on to a third party, Any work inside the appliance may only please ensure these operating instruc- be performed by our Customer Ser- tions accompany the appliance, to-...
-
Page 7: Using For The First Time
Using for the first time The appliance must be installed and connected to the electricity supply in accord- ance with the separate installation instructions. Have a qualified fitter/electrician carry out the necessary work. During the first few hours of use, a cooking zone can give off an unpleasant smell. This is normal for brand new appliances. -
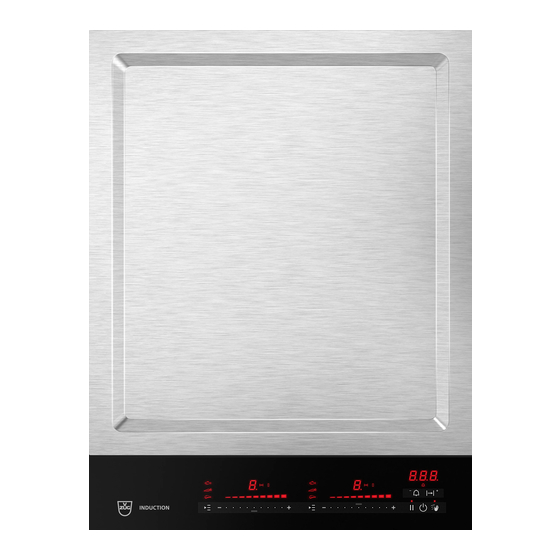
Page 8: Operating And Display Elements
4 Operating the appliance Operating and display elements 1 2 3 Buttons Appliance ON/OFF Timer/function as a minus button Slider (for setting the power level) Pause cooking ON/OFF and restore function Operating time / function as a plus Multi-function button / Temperature button selector Wipe protection ON/OFF and... -
Page 9: Selecting The Frying Zone
4 Operating the appliance Selecting the frying zone ▸ Press the slider for the required frying zone or slide your finger along it to set the fry- ing temperature. – The frying zone indicator illuminates above the corresponding slider. – The frying temperature selected illuminates in the temperature display. –... -
Page 10: Bridging Function
4 Operating the appliance Bridging function The bridging function allows two individual cooking zones lying one behind the other to be switched on together and to be adjusted together. Switching the bridging function on ▸ Touch both sliders at the same time. –... -
Page 11: Restore Function
4 Operating the appliance ▸ Touch the button again to resume cooking. – The frying zones resume operation using the previous settings. Restore function If the appliance has been inadvertently switched off with the button, the settings can be restored within 6 seconds. ▸... -
Page 12: Timer
4 Operating the appliance Switching the operating time function off before time ▸ Touch the button. ▸ Touch the slider for the desired frying zone. ▸ Touch the buttons at the same time. – flashes in the display. – The frying zone continues to run. End of the operating time When the operating time is up –... -
Page 13: Childproof Lock
4 Operating the appliance If the setting is not changed, it will be automatically accepted after 5 seconds. Alternat- ively, if another setting is selected it will be accepted immediately. Switching the timer off before time If no Frying zone is in use, first switch the appliance on. ▸... -
Page 14: User Settings
5 User settings User settings The following user settings can be set and saved individually: User setting Setting value Factory setting Acoustic signal loudness Medium High Acoustic signal at end of No acoustic signal operating time / timer Automatically off after 10 seconds Automatically off after 1 minute Recommended value Default time 0 minutes... -
Page 15: Cancelling User Settings
6 Care and maintenance Cancelling user settings ▸ Press the button. – Any changes made to the default values are not saved. – The «User settings» mode is ended. Care and maintenance Clean the appliance only when it has completely cooled down. Risk of burns! Always clean the appliance after use. -
Page 16: Trouble-Shooting
7 Trouble-shooting Trouble-shooting You may be able to trouble-shoot the following errors yourself. If not, note down the error message in full (message and E numbers) and then call Customer Services or report it to us online. Error messages Display Possible cause Solution illuminates... -
Page 17: Other Possible Problems
8 Accessories Display Possible cause Solution flash altern- ▪ The automatic safety ▸ Switch the frying zone back on ately shut-off was triggered. again if required. ▪ The cooking zone is hot and cookware is standing on it. If a frying zone has been running for longer without any settings being changed, the appliance switches the frying zone off automatically, after how much time de- pends on the power level set. -
Page 18: Technical Data
9 Technical data Technical data Product fiche In accordance with EU Regulation No. 66/2014 Model number 31140 Type designation CTI6T-31140 Number of frying zones Frying surfaces W: 31 × D: 17.7 cm W: 31 × D: 17.7 cm Disposal 10.1 Packaging Never allow children to play with packaging material due to the danger of injury or suffocation. - Page 19 Index Overview of frying temperatures ...... 9 Accessories ............17 Accessories supplied......... 7 Pause cooking..........10 Appliance Problems ............16 Switching on and off ........ 8 Product fiche............. 18 Appliance disposal .......... 18 Appliance overview ..........7 Appliance-specific safety precautions Queries .............. 23 ................
- Page 20 Notes...
- Page 23 Your repair order Call the free service number 0800 850 850 to contact your nearest V-ZUG service centre. You can arrange an on-site visit by us by phone if you wish. General queries, accessories and service agreement V-ZUG will be happy to help you with any general administrative or technical queries, to accept your orders for accessories and spare parts and to inform you about our pro- gressive service agreements.
- Page 24 ▸ Touch « » on the slider. To switch appliance off ▸ Touch the button. 1097724-01 V-ZUG Ltd, Industriestrasse 66, CH-6302 Zug Tel. +41 58 767 67 67, Fax +41 58 767 61 61 info@vzug.com, www.vzug.com Service Centre: Tel. 0800 850 850...
Need help?
Do you have a question about the CookTop Teppan Yaki I40 and is the answer not in the manual?
Questions and answers