Table of Contents
Advertisement
Quick Links
VS-42H2 Quick Start Guide
This guide helps you install and use your VS-42H2.
Go to
upgrades are available.
Scan for full manual
Step 1: Check What's in the Box
VS-42H2 4x2 HDMI Matrix Switcher
1 Power supply (5V DC)
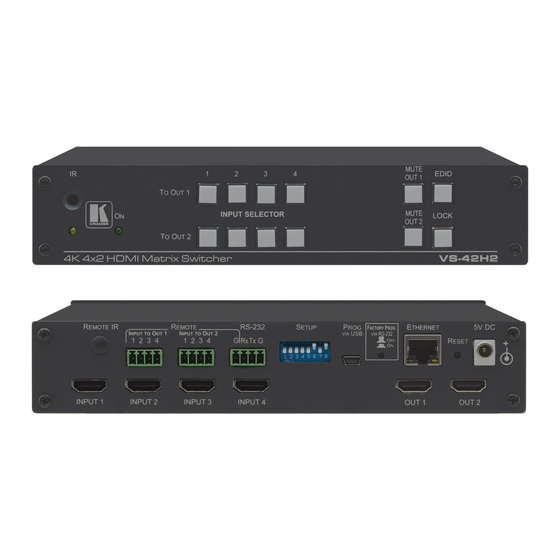
Step 2: Get to know your VS-42H2
#
Feature
1
IR LED
2
IR Sensor
3
ON LED
INPUT SELECTOR
4
TO OUT 1, 1–4
INPUT SELECTOR
5
TO OUT 2, 1–4
6
MUTE OUT 2 Button
7
MUTE OUT 1 Button
8
EDID Button
9
LOCK Button
VS-42H2 Quick Start (P/N: 2900-300947QS REV 1)
www.kramerav.com/manual/VS-42H2
4 Rubber feet
1 Quick start guide
Function
Lights yellow when receiving an IR signal.
Receives signals from the infrared remote control transmitter.
Lights green when the device is powered on.
Press one of the four inputs to switch it to OUT 1.
Press one of the four inputs to switch it to OUT 2.
Press to toggle mute of the OUT 2 signal.
Press to toggle mute of the OUT 1 signal.
Press to capture the EDID (see Step 6).
Press and hold to lock the front panel buttons. Press and hold again to unlock.
to download the latest user manual and check if firmware
Infrared remote control transmitter
P/N:
2900- 300947QS
Rev:
1
Advertisement
Table of Contents

Related Manuals for Kramer VS-42H2


Summary of Contents for Kramer VS-42H2
- Page 1 VS-42H2 Quick Start Guide This guide helps you install and use your VS-42H2. www.kramerav.com/manual/VS-42H2 Go to to download the latest user manual and check if firmware upgrades are available. Scan for full manual Step 1: Check What’s in the Box...
- Page 2 Connect to up to two HDMI acceptors. Connectors Step 3: Install VS-42H2 Attach the rubber feet and place on a table or mount VS-42H2 in a rack (using an optional RK-T2B rack mount). Step 4: Connect the inputs and outputs Always switch OFF the...
- Page 3 Connecting the remote input selection switches: These remote switches replicate the input selection buttons on the front panel of VS-42H2. Step 5: Connect the power Connect the 5V DC power adapter to VS-42H2 and plug it into the mains electricity. Safety Instructions Caution: There are no operator serviceable parts inside the unit.
- Page 4 Copy the EDID from an Output to one or more Inputs: 1. Press the EDID button to enter the EDID setting mode. The EDID button lights. Note: If there is no button activity for 10 seconds, the device automatically exits the EDID setting mode to normal operation, the EDID button no longer lights and any changes made are lost.
Need help?
Do you have a question about the VS-42H2 and is the answer not in the manual?
Questions and answers