BMPRO JAYCOMMAND Owner's Manual
Hide thumbs
Also See for JAYCOMMAND:
- Owner's manual (40 pages) ,
- Manual (36 pages) ,
- Help manual (6 pages)
Table of Contents
Advertisement
Advertisement
Table of Contents

Related Manuals for BMPRO JAYCOMMAND


Summary of Contents for BMPRO JAYCOMMAND
- Page 1 OWNER’S MANUAL TEAMBMPRO.COM...
- Page 3 To learn more about the BMPRO range of products, please visit our website teambmpro.com TEAM BMPRO...
-
Page 4: Safety Precautions
Clean the housing of this product lightly with a dry or moist cotton cloth. Do not use alcohol, thinners, benzene or any other chemical cleaner. The JAYCOMMAND is a high precision electronic product. It contains no user- serviceable parts inside. Do not try to dismantle, modify or repair it yourself. -
Page 5: Information For The User
This device must accept any interference received, including what may have cause undesired operation. WARNING Any changes or modification are not approved by BMPRO and will void compliance of the product and the user’s authority to operate this equipment. Le présent appareil est conforme aux CNR d’Innovation, Sciences et Développement économique Canada applicables aux appareils radio exempts... -
Page 6: Table Of Contents
CLEARING NODE OF ALL PREVIOUSLY PAIRED DEVICES ..15 BMPRO CLOUD ..... . . 17 CONNECT TO THE BMPRO CLOUD . - Page 7 THE APP ......23 APP HOME SCREEN ..... .24 TANKS SCREEN.
-
Page 8: About The Jaycommand
ABOUT THE JAYCOMMAND The JAYCOMMAND brings smart home technology to your RV, taking control and management of your RV features to new horizons! Figure 1: JAYCOMMAND System Diagram... -
Page 9: Node
NODE The heart of the JAYCOMMAND system, the NODE, is an RV management system that powers and monitors your RV features and accessories. The NODE communicates via Bluetooth Low Energy with the CONTROLLER, SWITCH and your own smartphone, to receive the commands to control power to all your RV features and accessories. -
Page 10: Controller
JAYCOMMAND Firmware Update Available UPDATE Figure 2: Update firmware message CONTROLLER The CONTROLLER is a sleek, wall-mounted controller that gives you the freedom to monitor and control multiple RV functions, all from one convenient location in your RV. With a user-friendly, easy to understand App for Android and iOS, the APP brings information to your fingertips. -
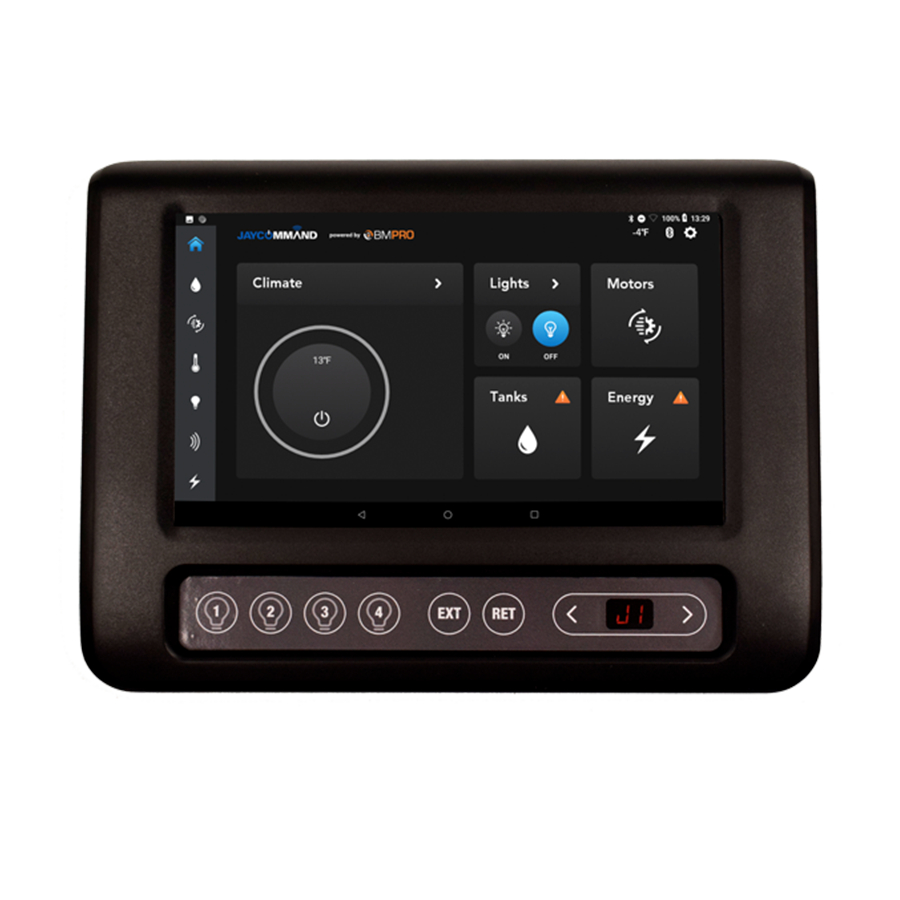
Page 11: Description Of Parts
DESCRIPTION OF PARTS Figure 3: The CONTROLLER and its parts 1. CONTROLLER Home Screen Button 2. Connection Bar When connected to Bluetooth, the icon will appear on screen. When connected to the cloud, the icon will appear on screen. Both icons will appear when both services are available 3. - Page 12 8. Control Panel To provide quick access to lights, water pump and motor operation while the CONTROLLER is in use. 9. Lights Turn lights and water pumps on/off: All Interior Lights All Exterior Lights All Lights Water Pump Control 10. Motor Operation To extend (EXT) and retract (RET) any motors installed in the RV.
-
Page 13: Control Panel Menu Functions
CONTROL PANEL MENU FUNCTIONS The menu functions on the Control Panel allow you to operate various motors, quickly switch off loads and pair or clear the NODE. The following functions apply depending on what is available in your RV. Awnings Jacks Navigate to the desired awning: Navigate to the desired Jack:... -
Page 14: Pairing To The Node
PAIRING TO THE NODE Pairing your CONTROLLER, smartphone or tablet to the NODE is done in three easy steps. The APP will guide you through the pairing process. NOTE: The CONTROLLER will have been paired to your NODE at the factory. You should only need to pair your own device or smartphone to the NODE. -
Page 15: Cannot Pair To The Node
CANNOT PAIR TO THE NODE If you are pairing a mobile device to the NODE and "--" appears on screen, it is mostly likely that four devices are connected to the NODE simultaneously. To resolve this, either: • Close the app on one of the devices that are connected to the NODE and try again, OR • ... - Page 16 Navigate to the PA function on the CONTROLLER display. Press and hold EXT until the number 1 scrolls across the CONTROLLER display. The NODE is now clear of all connected devices. Figure 7: Go to PA, then Press and hold EXT until the number 1 scrolls across the CONTROLLER Pair the CONTROLLER to the NODE again.
-
Page 17: Bmpro Cloud
BMPRO CLOUD The JAYCOMMAND has cloud control, which allows you to remotely connect, monitor and control your RV from your smart device. CONNECT TO THE BMPRO CLOUD To connect to the BMPRO Cloud for the first time: Connect your CONTROLLER to the Internet via Wi-Fi. -
Page 18: Cloud Control
CLOUD CONTROL To control the RV from cloud, launch the APP on your smart device. Select Log in to BMPRO Cloud, or in General Settings, select Remote Connection Enter the same email address and password used in the last step. -
Page 19: Account Not Verified
ACCOUNT NOT VERIFIED If the email address was not verified then the following message will appear: Figure 12: Error Message Press RESEND VERIFICATION EMAIL to complete the email verification process. FORGOT YOUR PASSWORD If you forgot the Cloud account password, press Forgot your password in the login page, enter your email address and press SEND EMAIL. -
Page 20: Winegard
WINEGARD To set up Winegard • Go to the Settings menu. • Scroll down and select Winegard Settings. Logging into Winegard network Press the search button to search for the available networks, select the desired network and enter the password or enter the network name and password. If your network is not seen, make sure the Winegard is turned on and Scan again. - Page 21 Winegard Status The current status of the Winegard is displayed on the Winegard tile in the “General Settings” area. SETUP This is seen when no Winegard network has been connected previously. Press the tile to connect to a Winegard network. UNAVAILABLE This means that the Winegard network is not available and may be seen during a transition from one mode to another.
- Page 22 Save and/or forget WiFi Network • After the WiFi credentials are entered, the WiFi network will be saved. • Press “Done” to connect last saved network. • Press “X” to delete the saved network. Figure 17: WiFi credentials window...
-
Page 23: The App
RV remotely. COMPATIBLE DEVICES The APP is compatible with Android 4.4 or later and iOS 11 or later. Search for JAYCOMMAND in the Apple App Store or Google Play. Figure 18: QR Codes OPERATING THE RV FROM THE APP... -
Page 24: App Home Screen
APP HOME SCREEN The APP home screen provides a general overview of the key features of your RV. It also provides a quick way to control specific RV lights and the RV's climate system, direct from the home screen. Figure 19: The APP Home Screen TANKS SCREEN You can control the water pump, electric, gas heaters and tank heaters from the Tanks screen, if applicable. -
Page 25: Leveling And Motors Screen
LEVELING AND MOTORS SCREEN The Leveling and Motors Screen control the Slide-outs, Awnings, Jacks and Ramp Door. It also contains controls for the Leveling System installed in the RV. WARNING Before operating any motors, ensure the area is free from obstacles and other hazards. -
Page 26: Motor Control
Figure 22: Individual Jack Control If a fault occurs with the leveling system, a pop-up will appear. To clear the fault, follow the instructions in the pop-up and press “OK”. Figure 23: Example of a fault MOTOR CONTROL Only one motor may be operated at a time. Once a motor is in operation, motor control will be disabled in any other device running the APP. -
Page 27: Motor Lockout Feature
MOTOR LOCKOUT FEATURE The motor will be automatically locked out if a high input is detected on the brakes. This will be shown on the JAYCOMMAND unit at pin 64. The motor cannot be turned back on until the lockout is disabled. -
Page 28: Climate Screen
CLIMATE SCREEN The Climate Screen allows you to control the temperature of your RV. The zones that appear depend on the vehicle configuration. Figure 26: Climate page Choose from Cool, Cool Auto or Heat to adjust the temperature between 60°F – 90°F / 16°C – 32°C. COOL &... -
Page 29: Fan
The fan can be operated for air circulation in each zone. Figure 28: Fan Mode HEAT If available, the RV may be heated from the furnace, heat pump or a combination of both. The furnace can only be controlled from the Main Climate Zone. To set temperature: Turn climate on. -
Page 30: Lights Screen
LIGHTS SCREEN Lights can be turned on and off from the light screen. Brightness can also be adjusted on certain lights. Figure 30: Lights Screen... -
Page 31: Energy Center
ENERGY CENTER BATTERY MONITORING Battery Monitoring allows you to monitor RV and/or chassis voltages. If no RV and chassis batteries are connected, the APP will monitor the system voltage of the NODE. If the voltage drops below 12V, a warning will appear on the screen. AUTOMATIC GENERATOR START You can keep your battery and climate levels steady by using Automatic Generator Start (AGS). -
Page 32: Energy Center Settings
ENERGY CENTER SETTINGS The Energy Center Settings are used to set the parameters to control AGS usage. To access Energy Center Settings: From the APP home screen, press the Settings icon Press Energy Center Settings. Figure 32: Energy Center Settings Use AGS to Support This setting is used to determine if AGS will support battery levels, climate or both. -
Page 33: Generator Via Bluetooth
Run time limits The minimum time the generator will continue to run for after the target battery voltage and/or temperature is achieved can be set using this setting. The maximum time is the total run time that the generator will operate to achieve the target battery voltage and/or temperature. -
Page 34: Generator Fault
GENERATOR LOCKOUT FEATURE The generator will be automatically locked out if a high input is detected on the brakes. This will be shown on the JAYCOMMAND unit at pin 64. The generator cannot be turned back on until the lockout is disabled. -
Page 35: Solar Controller
SOLAR CONTROLLER The Solar Controller screen allows you to view the status of any connected solar panels. Figure 34: Solar Controller Solar Controller This section displays the input voltage and current from the solar panel and the output voltage and current of the battery. Solar Temperature This section displays the solar controller regulator and battery temperature. - Page 36 SOLAR CONTROLLER SETTINGS The Solar Controller Settings are used to configure the Solar Controller to your liking. To access Solar Controller Settings: From the APP home screen, press the Settings icon Press Solar Controller Settings. Figure 35: Solar Controller Settings...
-
Page 37: Solar Controller Settings
Display Solar Controller Allows you to toggle Solar Controller information to be hidden if you do not want it to be displayed in the APP. If Solar Controller information is hidden, you can toggle it to be displayed. Operating Status Displays the current operating status of the Solar Controller. -
Page 38: General Settings
• Check the wireless Battery Levels of any installed SWITCH. • View Energy Center Settings. • View Solar Controller Settings. • Access a digital version of the JAYCOMMAND Owner’s Manual. • Set Motor Settings, which depending on the level of controller installed, can be used to set zero-point calibration. -
Page 39: Unit Conversion
• View information About JAYCOMMAND: all about the JAYCOMMAND system, NODE Firmware version, JAYCOMMAND APP version, etc. • Set your unit Preferences for temperature and pressure. • View the Diagnostics page, showing any detected faults. UNIT CONVERSION To change the unit of temperature, go to the... -
Page 40: Diagnostics
DIAGNOSTICS The diagnostics page will display any detected faults to the JAYCOMMAND system. To clear circuit faults, remove the suspected short and toggle the suspected output to clear the fault indicator. For lights, tank heater, water heater, water pump, electric and gas heaters, if a short occurs on these outputs, a red fault indicator will appear. - Page 41 The Diagnostics page will display any faults detected on the Solar Controller. The following types of faults will be displayed in the Diagnostics page if detected: • Battery Over Voltage • Battery Under Voltage • Battery Over Temperature • Battery Under Temperature •...
-
Page 42: Switch
SWITCH The SWITCH communicates via Bluetooth to the NODE, giving you additional control of RV features. NOTE: Any SWITCH you install in your RV has been paired to the NODE at the factory and is ready for immediate use. CHECKING THE BATTERY IN YOUR SWITCH The SWITCH is powered by a standard 3V Lithium Cell coin battery (CR2032). -
Page 43: Faqs And Troubleshooting
FAQS AND TROUBLESHOOTING PAIRING WITH THE NODE 1. I tried pairing my phone to the NODE, but it didn’t connect? If pairing fails, before attempting to pair your smartphone again: Toggle the smartphone’s Bluetooth off and on. Toggle the smartphone’s flight mode off and on. Restart the APP. -
Page 44: Switch
7. I can’t use the CONTROLLER and why does it display 88? The CONTROLLER will display 88 on its menu display if there is a system error which prevents the use of the JAYCOMMAND system. If you encounter an 88 error, please contact your RV dealership for further assistance. -
Page 46: Appendices
APPENDICES SPECIFICATIONS NODE SPECIFICATIONS Input Voltage Range 8V to 15V DC Ambient Temperature -4°F to 140°F (-20°C to 60°C) IP Rating IP20 FCC 47 CR15.109, CAN ICES-3 (B) / NMB-3 (B), IEC Approvals 61000-4-2 Level III, IEC60068-2-27 Table A.1, IEC 60068-2-64 Spectrum A.3 Category 1 CONTROLLER SPECIFICATIONS Input Voltage Range... -
Page 47: Limited Warranty Terms And Conditions
• BMPRO will not be liable for any costs, charges or expenses incurred in the process of returning a product to initiate a warranty claim. - Page 48 BMPRO TEAM service@teambmpro.com BMPRO Unit 1, 821 E Windsor Ave, Elkhart IN 46514 USA .COM teambmpro.com...
Need help?
Do you have a question about the JAYCOMMAND and is the answer not in the manual?
Questions and answers
What do you mean by "remove the short" on the diagnostics page?
"Remove the short" means fixing or eliminating a short circuit in the wiring of the HVAC output, such as the compressor output. This involves identifying and correcting the electrical fault where unintended contact or low-resistance connection is causing excessive current flow. Once the short is removed, you must turn off and then turn on the HVAC to reset the fault display.
This answer is automatically generated
screen is black,, tried resetting with key pad only get 4 lines between the < > nothing on the main screen still black