BMPRO JAYCOMMAND Owner's Manual
Smart rv system
Hide thumbs
Also See for JAYCOMMAND:
- Owner's manual (48 pages) ,
- Manual (36 pages) ,
- Help manual (6 pages)
Table of Contents
Advertisement
Advertisement
Table of Contents

Related Manuals for BMPRO JAYCOMMAND


Summary of Contents for BMPRO JAYCOMMAND
- Page 1 OWNER’S MANUAL DISPLAY NODE SYSTEM COMPONENTS TEAMBMPRO.COM...
- Page 3 To learn more about the BMPRO range of products, please visit our website teambmpro.com TEAM BMPRO...
-
Page 4: Safety Precautions
Clean the housing of this product lightly with a dry or moist cotton cloth. Do not use alcohol, thinners, benzene or any other chemical cleaner. The JAYCOMMAND is a high precision electronic product. It contains no user- serviceable parts inside. Do not try to dismantle, modify or repair it yourself. -
Page 5: Information For The User
WARNING Any changes or modification are not approved by BMPRO and will void compliance of the product and the user’s authority to operate this equipment. This equipment has been tested and found to comply with the limits for a Class B digital device, pursuant to Part 15 of the FCC Rules. -
Page 6: Table Of Contents
INFORMATION FOR THE USER ....5 ABOUT THE JAYCOMMAND ....8 NODE . - Page 7 THE APP ......15 COMPATIBLE DEVICES .....15 OPERATING THE RV FROM THE APP .
-
Page 8: About The Jaycommand
ABOUT THE JAYCOMMAND The JAYCOMMAND brings smart home technology to your RV, taking control and management of your RV features to new horizons! MOTOR AWNINGS/ HVAC/ LIGHTS GENERATOR TANK SENSORS CONTROLLERS SLIDES THERMOSTATS DISPLAY NODE SWITCH CAN BUS & POWER... -
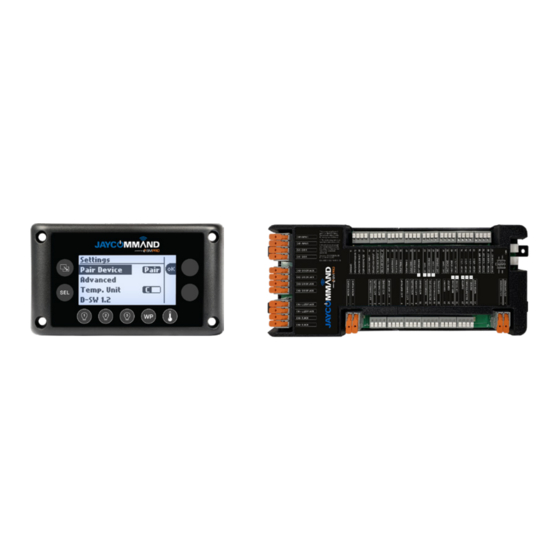
Page 9: Node
NODE The heart of the JAYCOMMAND system, the NODE, is an RV management system that powers and monitors your RV features and accessories. The NODE communicates via RV-C to the DISPLAY and Bluetooth Low Energy with your smartphone, to receive the commands to control power to all your RV features and accessories. -
Page 10: Display
DISPLAY The DISPLAY is a sleek, wall-mounted display that gives you the freedom to monitor and control multiple RV functions. The APP allows you to monitor and control your RV on up to 4 personal devices via Bluetooth. The APP is available both for Android and iOS. MONITOR Water tanks, Temperature, Tire Pressure, Battery and LPG. -
Page 11: Description Of Parts
DESCRIPTION OF PARTS FIGURE 3: The DISPLAY Page Navigation Button Move between function screens, eg. From Tanks to Water screen Menu Navigation Button This button allows navigation between items within a page, e.g. in the Water page move from Pump to Elec Heater 3-4. -
Page 12: Pairing To The Node
NODE. FIGURE 4: Pairing to the NODE When your smartphone is paired with the NODE, the Bluetooth icon is displayed on the JAYCOMMAND APP home screen. CONGRATULATIONS, YOU’RE CONNECTED! For additional support please refer to FAQs & Troubleshooting. -
Page 13: The Display
THE DISPLAY Use the Page Navigation Button to move from page to page Use the Menu Navigation Button to move between menu items within a page TANKS The Tanks display shows the levels of fresh, gray and black water tanks. Levels are displayed as: FULL 2/3 FULL 1/3 FULL... -
Page 14: Energy
If Furnace Mode is selected, the AC-Fan option displays. AC-Fan: Settings: OFF / LOW FIGURE 9: Climate Screen with AC-Fan ENERGY ON: Press and hold the ON action button, until the generator turns on. OFF: Press and hold the OFF action button, until the generator turns off. -
Page 15: The App
Download the APP to your smartphone or tablet and enjoy the freedom to monitor and control the onboard features of your RV remotely. The JAYCOMMAND APP allows you to access more features of your connected RV that may not be available on the DISPLAY. -
Page 16: Tanks Screen
Slide-outs, Awnings, Landing Legs and Jacks. It contains controls for certain Leveling Systems installed in the RV. NOTE: All Jayco-approved leveling systems are compatible with the JAYCOMMAND system. FIGURE 15: Tanks Screen WARNING Before operating any motors, ensure the area is free from obstacles and other hazards. -
Page 17: Leveling Control
LEVELING CONTROL If equipped, the leveler can be controlled from your smartphone. Individual jack controls are also available on some models. FIGURE 16: Motors Lock Screen FIGURE 17: Leveling Screen FIGURE 18: Jack Control Note: Depending on the type of leveling system installed, the tongue jack may not be available. -
Page 18: Motor Control
MOTOR CONTROL Only one motor may be operated at a time. Once a motor is in operation, motor control will be disabled in any other device running the APP. This does not include the leveling system. To operate motors on your own device, swipe to unlock the Motors screen. -
Page 19: Fan
The fan can be operated for air circulation in each zone. FIGURE 23: Fan Mode HEAT If available, the RV may be heated from the furnace, heat pump or a combination of both. The furnace can only be controlled from the Main Climate Zone. -
Page 20: Energy Center
If there are four failed starts, the JAYCOMMAND APP will stop attempting to start the generator. If the generator fails to start, please consult your FIGURE 27: Automatic generator’s owner’s manual. -
Page 21: Energy Center Settings
ENERGY CENTER SETTINGS The Energy Center Settings are used to set the parameters to control AGS usage. To access Energy Center Settings: From the APP home screen, press the Settings icon Press Energy Center Settings. Use AGS to Support This setting is used to determine if AGS will support battery levels, climate or both. - Page 22 Run Time Limits Used to set the minimum time the generator will continue to run for after the target battery voltage and/or temperature is achieved. The maximum time is the total run time that the generator will operate to achieve the target battery voltage and/or temperature.
-
Page 23: Solar Controller
SOLAR CONTROLLER The Solar Controller screen allows you to view the status of any connected solar panels. Solar Controller This section displays the input voltage and current from the solar panel and the output voltage and current of the battery. Solar Temperature This section displays the solar controller regulator and battery temperature. -
Page 24: Solar Controller Settings
SOLAR CONTROLLER SETTINGS The Solar Controller Settings are used to configure the Solar Controller to your liking. To access Solar Controller Settings: From the APP home screen, press the Settings icon Press Solar Controller Settings. Display Solar Controller Allows you to toggle Solar Controller information to be hidden if you do not want it to be displayed in the APP. -
Page 25: General Settings
• View Energy Center Settings. • View Solar Controller Settings. • Access a digital version of the JAYCOMMAND Owner’s Manual. • Set Motor Settings, which depending on the level of controller installed, can be used to set zero- point calibration. -
Page 26: Diagnostics
DIAGNOSTICS The diagnostics page will display any detected faults to the JAYCOMMAND system. To clear circuit faults, remove the suspected short and toggle the suspected output to clear the fault indicator. For lights, tank heater, water heater, water pump, electric and gas heaters, if a short occurs on these outputs, a red fault indicator will appear. - Page 27 The Diagnostics page will display any faults detected on the Solar Controller. The following types of faults will be displayed in the Diagnostics page if detected: • Battery Over Voltage • Battery Under Voltage • Battery Over Temperature • Battery Under Temperature •...
-
Page 28: Faqs And Troubleshooting
3. How do I update the APP on my smartphone? Most smartphones allow automatic updates. To confirm your JAYCOMMAND APP is up to date try the following: Verify mobile network or WiFi connection on your smartphone Launch your APP store app. (Google Play Store or Apple APP Store) -
Page 29: Switch
SWITCH 1. I’ve replaced the SWITCH in my RV, but it doesn’t work? You may need to pair the SWITCH to the NODE before you can use the SWITCH. The SWITCH is paired to the NODE in five steps: Using the button on the DISPLAY, navigate to the SETTINGS menu. -
Page 30: Appendices
APPENDICES SPECIFICATIONS NODE SPECIFICATIONS Input Voltage Range 8V to 15V DC Ambient Temperature -4°F to 140°F (-20°C to 60°C) IP Rating IP20 FCC 47 CR15, CAN ICES-3 (B) / NMB-3 (B), IEC Approvals 61000-4-2 Level III, IEC60068-2-27 Table A.1, IEC 60068-2-64 Spectrum A.3 Category 1 DISPLAY SPECIFICATIONS Input Voltage Range... -
Page 31: Limited Warranty Terms And Conditions
• BMPRO may seek reimbursement of any costs incurred when a product is found to be in proper working order or damaged as a result of any of the warranty exclusions listed above. - Page 32 BMPRO TEAM service@teambmpro.com BMPRO Unit 1, 821 E Windsor Ave, Elkhart IN 46514 USA .COM teambmpro.com...
Need help?
Do you have a question about the JAYCOMMAND and is the answer not in the manual?
Questions and answers