BMPRO JAYCOMMAND Owner's Manual
Hide thumbs
Also See for JAYCOMMAND:
- Owner's manual (48 pages) ,
- Manual (36 pages) ,
- Help manual (6 pages)
Table of Contents
Advertisement
Advertisement
Table of Contents

Related Manuals for BMPRO JAYCOMMAND


Summary of Contents for BMPRO JAYCOMMAND
- Page 1 OWNER’S MANUAL TEAMBMPRO.COM...
- Page 3 To learn more about the BMPRO range of products, please visit our website teambmpro.com TEAM BMPRO...
-
Page 4: Safety Precautions
WARNING Correct installation is the most critical factor in ensuring the safe use of the JAYCOMMAND. If every consideration of these instructions has been satisfied, the JAYCOMMAND will be safe to operate. -
Page 5: Information For The User
This device must accept any interference received, including what may have cause undesired operation. WARNING Any changes or modification are not approved by BMPRO and will void compliance of the product and the user’s authority to operate this equipment. Le présent appareil est conforme aux CNR d’Innovation, Sciences et Développement économique Canada applicables aux appareils radio exempts de licence. -
Page 6: Table Of Contents
REV 1.0 product that will provide years of service. DISCLAIMER: BMPRO accepts no liability for any loss or damage which may occur from the improper or unsafe use of its products. Warranty is only valid if the unit has not been Copyright ©... - Page 7 SmartPressure Tire Monitoring System (Tpms) ENERGY CENTER Battery Monitoring Generator Fuel Fuel Pump Running Indicator GENERAL SETTINGS About JAYCOMMAND Diagnostics SWITCH Checking the Battery in your Switch Replacing the Battery in your Switch How to Install Tire Pressure Sensors How to Check Battery Status...
-
Page 8: About The Jaycommand
ABOUT THE JAYCOMMAND The JAYCOMMAND brings smart home technology to your RV, taking control and management of your RV features to new horizons! CONTROLLER SWITCH Figure 1: JAYCOMMAND System Diagram... -
Page 9: Node
9 Owner’s Manual NODE The heart of the JAYCOMMAND system, the NODE, is a RV management system that powers and monitors your RV features and accessories. The NODE communicates via Bluetooth Low Energy with the CONTROLLER, SWITCH and your own smartphone, to receive the commands to control power to all your RV features and accessories. -
Page 10: Controller
APP on the CONTROLLER. These updates cannot be postponed. While the NODE is powered, update the NODE at the prompt to ensure that the NODE is compatible with the APP. JAYCOMMAND Firmware Update Available UPDATE Figure 2: Update firmware message... -
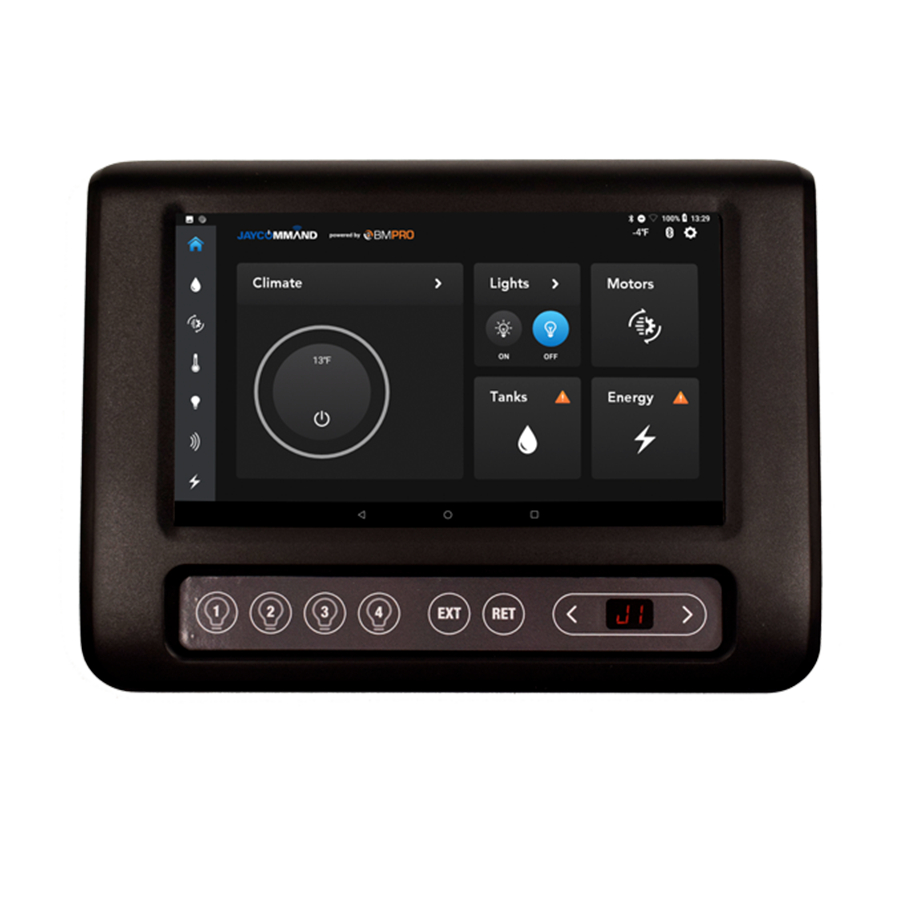
Page 11: Description Of Parts
DESCRIPTION OF PARTS Figure 3: The CONTROLLER and its parts 1. CONTROLLER Home Screen Button 2. Connection Bar When connected to Bluetooth, the icon will appear on screen When connected to the cloud, the icon will appear on screen. Both icons will appear when both services are available 3. - Page 12 8. Control Panel To provide quick access to lights, water pump and motor operation while the CONTROLLER is in use. 9. Lights Turn lights and water pumps on/off: All Interior Lights All Exterior Lights All Lights Water Pump Control 10. Motor Operation To extend (EXT) and retract (RET) any motors installed in the RV.
-
Page 13: Control Panel Menu Functions
CONTROL PANEL MENU FUNCTIONS The menu functions on the Control Panel allow you to operate various motors, quickly switch off loads and pair or clear the NODE. The following functions apply depending on what is available in your RV. Awnings Jacks Navigate to desired awning: Navigate to desired Jack:... -
Page 14: Pairing To The Node
PAIRING TO THE NODE Pairing your CONTROLLER, smartphone or tablet to the NODE, is done in three easy steps and the APP will guide you through the pairing process. NOTE: The CONTROLLER will have been paired to your NODE at the factory. You should only need to pair your own device or smartphone to the NODE. - Page 15 CANNOT PAIR TO THE NODE When pairing a mobile device to the NODE and "--" appears on screen, it is mostly likely that four devices are connected to the NODE simultaneously. To resolve this, either • Close the app on one of the devices that are connected to the NODE and try again, OR • ...
- Page 16 Navigate to the PA function on the CONTROLLER display Press and hold EXT until the number 1 scrolls across the CONTROLLER display. The NODE is now clear of all connected devices. Figure 7: Go to PA, then Press and hold EXT until the number 1 scrolls across the CONTROLLER Pair the CONTROLLER to the NODE again.
-
Page 17: Connect To The Bmpro Cloud
CONNECT TO THE BMPRO CLOUD The JAYCOMMAND has cloud control, which allows you to remotely connect, monitor and control your RV from your smart device. To connect to the BMPRO Cloud for the first time: Connect your CONTROLLER to the Internet via Wi-Fi... -
Page 18: Cloud Control
CLOUD CONTROL To control the RV from cloud, launch the a APP on your smart device Select Log in to BMPRO Cloud or in General Settings, select Remote Connection Enter the same email address and password used on the APP... -
Page 19: Winegard
WINEGARD To set up Winegard Download the Winegard App from Google Play Store to your mobile device, On the APP: • Go to the Settings menu • Scroll down and select Winegard Settings • Enter the network name and password from the Winegard Manual Figure 12: Enter network name and password to access Winegard. -
Page 20: The App
COMPATIBLE DEVICES The APP is compatible with Android 4.4 or later and iOS 11 or later. Search for JAYCOMMAND in the Apple App Store or Google Play. Figure 13: Compatible with Apple and Google Play OPERATING THE RV FROM THE APP... -
Page 21: Water Screen
WATER SCREEN Users can control the water pump, electric, gas heaters and tank heaters from the water screen, if applicable. The water screen displays the levels of your fresh, gray and black water tanks. The water levels displayed are, Empty, 1/3, 2/3 and Full. Figure 15: Water Screen LEVELING AND MOTORS SCREEN The Leveling and Motors Screen contains buttons to control the Slide-outs,... -
Page 22: Leveling Control
LEVELING CONTROL If equipped, the leveler can be controlled from the CONTROLLER and the BYO devices. Individual jack controls also available on some models. Figure 16: Leveling Screen Figure 17: Individual Jack Control... -
Page 23: Motor Control
When a fault occurs with the leveling system, popups will appear on screen. To clear the fault, follow the instructions on the popup and press OK. Figure 18: Example of a fault MOTOR CONTROL Only one motor may be operated at a time. Once a motor is in operation, motor control will be disabled in any other device running the APP. -
Page 24: Climate Screen
CLIMATE SCREEN The Climate Screen allows you to control the temperature of your RV. The zones that appear, depend on the vehicle configuration. Figure 20: Climate page Choose from Cool, Cool Auto or Heat to adjust the temperature between 60°F – 90°F / 16°C – 32°C. COOL &... -
Page 25: Fan
The fan can be operated for air circulation in each zone. Figure 22: Fan Mode HEAT If available, the RV may be heated from the furnace, heat pump or a combination of both. The furnace can only be controlled from the Main Climate Zone. To set temperature: Turn climate on and adjust temperature to the desired setting Select your mode of operation... -
Page 26: Lights Screen
LIGHTS SCREEN If wired to the brakes, lights can be turned on and off from the light screen. Furthermore, brightness can also be adjusted on certain lights. Figure 24: Lights Screen... -
Page 27: Smartpressure Tire Monitoring System (Tpms)
The SmartPressure sensor will transmit every 10 minutes when your RV is stationary and every 1 minute when in motion. If the JAYCOMMAND system has not received a message from the tire sensor for more than 25 minutes, a ‘–-’ symbol will then appear on the screen. If the pressure or temperature is out of limits, a warning icon will appear on the screen. -
Page 28: Energy Center
ENERGY CENTER BATTERY MONITORING Battery Monitoring allows you to monitor coach and/or chassis voltages. If no coach and chassis batteries are connected, the APP will monitor the system voltage of the NODE. Furthermore, if the voltage drops below 12V, a warning will appear on the screen. -
Page 29: Fuel
• Utilize the Motor Settings, which depending on the level of controller installed, can be used to set zero-point calibration. • About JAYCOMMAND : All about the JAYCOMMAND system, NODE Firmware version, JAYCOMMAND eApp version, etc. • Set your unit preferences for temperature and pressure... -
Page 30: About Jaycommand
Figure 27: General Settings Screen ABOUT JAYCOMMAND This page provides information about the JAYCOMMAND System. -
Page 31: Diagnostics
DIAGNOSTICS To clear these faults, remove suspected short and toggle the suspected output to clear fault indicator For lights, tank heater, water heater, water pump, electric and gas heaters, if a short occurs on these outputs, a red fault indicator will appear. The gas water heater has its own warning output and if it signals a fault, a warning will appear on the gas water heater button The motor outputs do not indicate a warning if the wires are shorted... -
Page 32: Switch
SWITCH The SWITCH communicates via Bluetooth to the NODE, allowing you additional control of RV features. NOTE: Any SWITCH you install in your RV, has been paired to the NODE at the factory and is ready for immediate use. CHECKING THE BATTERY IN YOUR SWITCH The SWITCH is powered by a standard, 3V Lithium Cell coin battery (CR2032). -
Page 33: Replacing The Battery In Your Switch
REPLACING THE BATTERY IN YOUR SWITCH To replace the battery, unclip the SWITCH Button Pad. Using a flathead screwdriver, pry open the SWITCH Button Pad and remove the battery from the holder. Insert the new battery holder with the positive side facing up. Figure 30: Accessing the battery in the SWITCH HOW TO INSTALL TIRE PRESSURE SENSORS... -
Page 34: Pairing The Tire Pressure Sensor
PAIRING THE TIRE PRESSURE SENSOR To pair the tire pressure sensors, select Pair, which will start the pairing process on the selected tire for 30 seconds. Install the BMPRO SmartPressure Tire Sensor to your desired tire within this time. Once successful, pressure and temperature settings for the tire will be displayed... -
Page 35: Faqs And Troubleshooting
FAQS AND TROUBLESHOOTING PAIRING WITH THE NODE 1. I tried pairing my phone to the NODE, but it didn’t connect? If pairing fails, before attempting to pair your smartphone again: Toggle the smartphone’s Bluetooth off and on Toggle the smartphone’s Flightmode off and on Restart the APP Cycle power to the NODE off and on. -
Page 36: Switch
7. I can’t use the CONTROLLER and why does it display 88? The CONTROLLER will display 88 on its menu display if there is a system error which prevents the use of the JAYCOMMAND system. If you encounter an 88 error, please contact your RV dealership for further assistance. - Page 37 When ‘PA’ appears on the display, press the RET button to start the pairing process between the SWITCH and NODE Press any two buttons on the SWITCH at the same time Press EXT on the CONTROLLER to accept the pairing of the SWITCH to the NODE...
-
Page 38: Appendices
APPENDICES SPECIFICATIONS NODE SPECIFICATIONS Input Voltage Range 8V to 15V DC Ambient -20°C to 60°C Temperature -4°F to 140°F IP Rating IP20 FCC 47 CR15.109, CAN ICES-3 (B) / NMB-3 (B), IEC Approvals 61000-4-2 Level III, IEC60068-2-27 Table A.1, IEC 60068-2-64 Spectrum A.3 Category 1 CONTROLLER SPECIFICATIONS Input Voltage Range... -
Page 39: Limited Warranty Terms And Conditions
• BMPRO will not be liable for any costs, charges or expenses incurred in the process of returning a product to initiate a warranty claim. - Page 40 BMPRO TEAM +61 3 9763 0962 sales@teambmpro.com BMPRO 19 Henderson Rd, Knoxfield VIC 3180 Australia .COM teambmpro.com...
Need help?
Do you have a question about the JAYCOMMAND and is the answer not in the manual?
Questions and answers
Hello, I have a 2020 Jayco Talon 385T with Jaycommand BMPRO system.. It came pre wired for 3rd AC which I have added and hooked up to Controller… how do I get system to see it where I can control it as I do my other 2 AC’s?