Table of Contents
Advertisement
Quick Links
Advertisement
Table of Contents

Related Manuals for Ocean Matrix OMX-SW8X8NT


Summary of Contents for Ocean Matrix OMX-SW8X8NT
- Page 1 OMX-SW8x8NT...
-
Page 2: Table Of Contents
Resetting the Machine Technical Specifications Figures Figure 1: OMX-SW8x8NT Video Matrix Switcher – Front Panel Figure 2: Connecting the Video Sources and Acceptors to the Rear Panel Figure 3: OMX-SW8x8NT Dipswitch Configuration Figure 4: Connecting a PC without using a Null-modem Adapter... - Page 3 Contents Tables Table 1: OMX-SW8x8NT Front Panel Features Table 2: OMX-SW8x8NT Rear Panel Features Table 3: Recommended Ambient Temperature and Humidity Range Table 4: Dipswitch Settings Table 5: SELF Address Dipswitch Settings Table 6: Technical Specifications of the OMX-SW8x8NT...
-
Page 4: Introduction
Review the contents of this user manual Overview The high performance OMX-SW8x8NT is a true vertical interval video / audio matrix switcher, letting you route any input to any or all of the outputs simultaneously. -
Page 5: Your Omx-Sw8X8Nt 8X8 Audio / Video Matrix Switcher
Your OMX-SW8x8NT 8x8 Audio / Video Matrix Switcher Control the OMX-SW8x8NT using the front panel buttons, or remotely via RS-485 or RS-232 serial commands transmitted by a touch screen system, PC, or other serial controller. The OMX-SW8x8NT is dependable, rugged and fits into two vertical spaces (2U) of a standard 19"... -
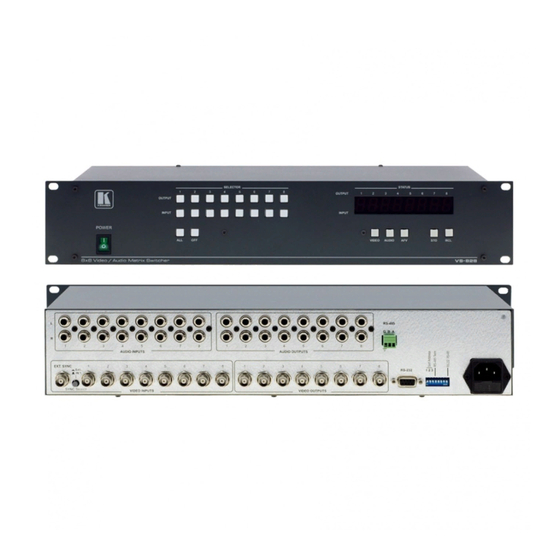
Page 6: Figure 1: Omx-Sw8X8Nt Video Matrix Switcher - Front Panel
Your OMX-SW8x8NT 8x8 Audio / Video Matrix Switcher Figure 1: OMX-SW8x8NT Video Matrix Switcher – Front Panel... -
Page 7: Table 1: Omx-Sw8X8Nt Front Panel Features
Your OMX-SW8x8NT 8x8 Audio / Video Matrix Switcher Table 1: OMX-SW8x8NT Front Panel Features Feature Function POWER Switch Illuminated switch for turning the unit ON or OFF INPUT Buttons Select the input to switch to the output OUTPUT Buttons Select the output to which the input is switched... -
Page 8: Installing On A Rack
5.2 Instructions for Rack-Mounting To install the OMX-SW8x8NT in a 19" rack, place the ears of the machine against the rack rails, and insert the screws through each of the four holes in the rack ears... -
Page 9: Connecting The Omx-Sw8X8Nt
Figure 2: Connecting the Video Sources and Acceptors to the Rear Panel 1 Note that you can connect up to 8 OMX-SW8x8NT units to a PC or other RS-232 or RS-485 controller 2 Switch OFF the power on each device before connecting it to your OMX-SW8x8NT. After connecting your... -
Page 10: Setting The Dipswitches
OMX-SW8x8NT unit in the sequence, specifying which OMX-SW8x8NT unit is being controlled, when several OMX-SW8x8NT units are controlled by a PC or serial controller. Set the SELF ADDRESS on a OMX-SW8x8NT unit via dipswitches 1, 2, and 3, according to Table 5. -
Page 11: Setting Connection Dipswitches
Connecting the OMX-SW8x8NT Up to 8 machines may be cascaded for control via a single port by configuring one machine as the Master (SELF ADDRESS = 1) , while all the others are assigned as Slaves or with an ID other than "1". -
Page 12: Controlling Via Rs-232 (For Example, Using A Pc)
If a Shielded cable is used, connect the shield to PIN 5 Figure 4: Connecting a PC without using a Null-modem Adapter 1 When connecting a single OMX-SW8x8NT unit via RS-232, set the SELF ADDRESS dipswitches to Machine # 1, according to Table 5... -
Page 13: Controlling Via Rs-232 And Rs-485
4. Interconnect the RS-485 ports on all the OMX-SW8x8NT units: from the RS-485 port on the first OMX-SW8x8NT unit, to the RS-485 port on the second OMX-SW8x8NT unit, and so on – up to the RS-485 port on the last unit. -
Page 14: Rgb/Yuv Switching With Rs-232 (Pc Control)
Self Address = 3 Figure 5: RS-232 and RS-485 Operation 6.4 RGB/YUV Switching with RS-232 (PC Control) Three OMX-SW8x8NT units can be connected in a YUV/RGB setup where each video signal is composed of three sub-signals that should be switched together. -
Page 15: Operating Omx-Sw8X8Nt Matrix Switchers
The front panel buttons RS-232/ RS-485 serial commands transmitted by a touch screen system, PC or other serial controller 7.1 Displaying Unit Characteristics The OMX-SW8x8NT 7-segment Display shows the selected audio or video input switched to the marked output. The unit characteristics are displayed in the following circumstances: Immediately (and automatically) after switching on the power;... -
Page 16: Choosing The Audio-Follow-Video Or Breakaway Option
Operating OMX-SW8x8NT Matrix Switchers 7.3 Choosing the Audio-Follow-Video or Breakaway Option You can switch stereo audio signals in one of two ways, either: Audio-follow-video (AFV), in which all operations relate to both the video and the audio channels; or Breakaway, in which video and audio channels switch independently 7.3.1... -
Page 17: Recalling An Input/Output Configuration
Operating OMX-SW8x8NT Matrix Switchers 7.4.2 Recalling an Input/Output Configuration To recall an input/output configuration, do the following: 1. Press the RCL button. The RCL button blinks. 2. Press the appropriate INPUT SELECTOR button (the INPUT SELECTOR button # corresponding to the setup #). The memory recalls the stored data from that reference. -
Page 18: Technical Specifications
Technical Specifications Technical Specifications Table 6 details the OMX-SW8x8NT technical specifications Table 6: Technical Specifications of the OMX-SW8x8NT INPUTS: 8 composite video 1Vpp/75 on BNC connectors 1 sync/video genlock with sync select switch 8 audio stereo up to +4dBm/62k on RCA connectors...
Need help?
Do you have a question about the OMX-SW8X8NT and is the answer not in the manual?
Questions and answers