Table of Contents
Advertisement
Quick Links
General
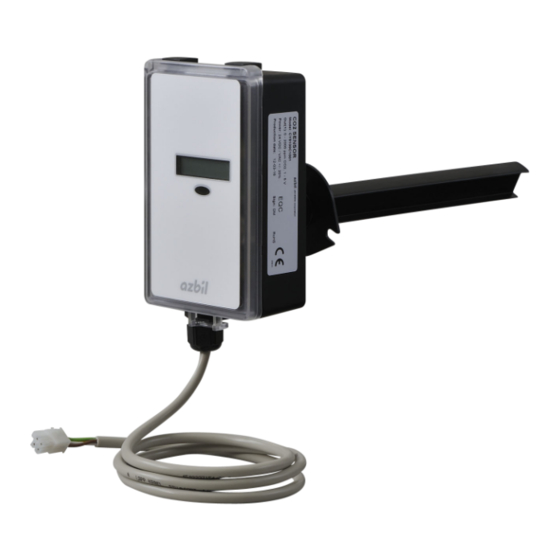
Duct CO
sensor Model CY8100C1001 in combination with
2
Part No. 83165722-002 is a duct-mount CO
detecting carbon dioxide (CO
product is used in a wide range of applications such as
monitoring of CO
concentration in a return duct, control of
2
outdoor air intake, and so on.
Features
●
Non-dispersive infrared (NDIR) sensor
●
Linear output signal in 1 V DC to 5 V DC range
●
Long-term stability
●
CE Marking certified product:
Model CY8100C1001 conforms to all the applicable
standards of CE Marking.
Model Number
Model number
CY8100C1001
Part Numbers of Items Sold Separately
Part number
83165722-002
83104511-001
IMPORTANT:
In a system where fresh air is continuously required or more fresh air than normal is required due to hard work
intensity, it is dangerous to control fresh air (outdoor air) intake. Do not control fresh air (outdoor air) intake
using this product and other CO
Duct CO
sensor used for
2
) concentration in a duct. This
2
Duct CO
Assembly kit:
- Sampling probe
- Sealing gasket, two screws, two washers
- Cable assembly
Zero calibration service bag (calibration gas (at 0 ppm CO
measuring instruments in such systems.
2
Sensor
2
Description
sensor
2
Description
© 2014-2016 Azbil Corporation All Rights Reserved.
1
AB-7175
Specifications/Instructions
) generator)
2
Advertisement
Table of Contents

Related Manuals for Azbil CY8100C1001


Summary of Contents for Azbil CY8100C1001
- Page 1 ● Linear output signal in 1 V DC to 5 V DC range ● Long-term stability ● CE Marking certified product: Model CY8100C1001 conforms to all the applicable standards of CE Marking. Model Number Model number Description CY8100C1001 Duct CO...
-
Page 2: Safety Instructions
Azbil Corporation will not bear any responsibility for the results produced by the operators. Warnings and Cautions ... -
Page 3: Specifications
AB-7175 Specifications Item Specification Power 24 V AC +10 %, -15 % (at 50 Hz to 60 Hz) Consumption power Max. 3 VA Output signal 1 V DC to 5 V DC (Linear to 0–2000 ppm CO concentration) Allowable load resistance Min. -
Page 4: Assembly Kit
AB-7175 Dimensions Sensor and sampling probe assembled 84.7 55.7 ⌀24.4 ⌀6 Sensor 44.5 Sampling probe (included in the assembly kit) 40.9 Note: Total length of the cable, attached to the printed circuit board in the product, is 1 m. Figure 1. Dimensions (mm): Sensor and sampling probe assembled Assembly kit Sampling probe : Indication for mounting orientation... -
Page 5: Installation
AB-7175 Installation Precautions for installation ● Installation environment Although the sensor’s enclosure conforms to IEC IP65 for dust-proof and splash-proof, avoid installing in locations exposed to corrosive atmosphere or direct sunlight. IEC: International Electrotechnical Commission ● Handling of the sensor Annual drift of the continuously powered sensor is ±150 ppm. - Page 6 AB-7175 Installation of the assembly kit Sampling probe: Mount the sampling probe before assembling the sensor with the sampling probe. 1) Select a the probe mounting position where the typical CO concentration of process fluid can be measured and where the specified air velocity can be acquired.
- Page 7 AB-7175 Installation of the sensor The sensor is easily assembled with the sampling probe by snap-in bayonet mount. Refer to the following steps. 1) Engage the notches of the sensor with the locking knobs of the sampling probe, then lightly press the sensor. Locking knob Engage.
- Page 8 AB-7175 Wiring CAUTION Installation and wiring must be performed by qualified personnel in accordance with all applicable safety standards. All wiring must comply with applicable codes and ordinances. Before wiring, be sure to turn off the power to the product. ...
-
Page 9: Operation
AB-7175 Operation Operation check 1) Remove the lid from the sensor and blow your breath on the sensor from approximately 10 cm away from the sensor. 2) Check that the CO concentration displayed on the sensor LCD and the output voltage quickly rise. LCD: Liquid crystal display LCD indication On the sensor LCD, CO... - Page 10 AB-7175 6) When the values become stable, press and hold the zero calibration button (shown in Fig. 12) of the sensor for approximately three seconds to activate the zero calibration. 7) Check that the yellow LED flashes. It flashes four times (approximately for ten seconds) when the calibration is executed, and turns off when the calibration is successfully finished.
- Page 11 AB-7175 This blank page is added for page layout purposes.
- Page 12 AB-7175 Specifications are subject to change without notice. Building Systems Company http://www.azbil.com/ Rev. 3.0 Aug. 2016 AB-7175 (J: AI-7175 Rev. 1.5)
Need help?
Do you have a question about the CY8100C1001 and is the answer not in the manual?
Questions and answers